Importing records
Most Kahua applications allow for the import of entity records. Imports can be used to create new records or update existing ones. Creating or updating records through an import is most appropriate in document management, properties, and contact applications. Importing records into Kahua can differ slightly by application.
Imports are done into an application for a project. The import is completed at an application level (not cross-application) and is done for one project at a time.
Note If you are looking to migrate data for multiple projects or applications, please reach out to your account manager for assistance.
Items to consider prior to importing records:
-
Users will need Moderator or Admin access to an application to be able to import records into that application.
-
Typically, it is not recommended to import new cost records, such as a contract, budget, or pay request. This is due to those records having an ‘items’ grid, which is a separate entity within the record itself. These records should be created manually. If you want to migrate cost records from another system, please contact your account manager for assistance.
-
Some cost records, such as budget adjustments or budget changes, allow you to import items into the items grid. You must first create and save the record, then use the Import/Export options on the record's action bar to export and import items to the items grid.
-
Import is most appropriate for apps such as those found in the document management suite, as well as the Contacts app and, if using, the Properties app.
-
If workflow is enabled on a project, you should only utilize an import to create new records, not update them. Do not export and re-import to modify existing records that are locked and currently part of a workflow. You can use the import process to update records that are not currently in workflow or if workflow is not enabled for that project.
-
To generate the file you will need to populate for an import, you must perform an export from the project and application where you want to perform the import .
-
Consider creating at least one record in the application prior to performing the export. This sample record provides an example of how the data should be entered.
How to . . .
You must perform an export to obtain the properly formatted Excel workbook for importing. The export should be performed from the project and application where you want to perform the import. The export will include any existing records in the application for the current project. These existing records can assist you in identifying the proper formatting for the creation of new records.
To complete an export from the project and application where you want to perform an import, complete the following steps:
-
Review the header to ensure that you are in the correct project or partition.
-
Navigate to the appropriate application.
-
It is advisable to enter at least one record prior to completing the export. This record can assist you in identifying the fields and proper formatting of fields when you enter new data into the exported file. You can delete this record after the import is completed successfully.
-
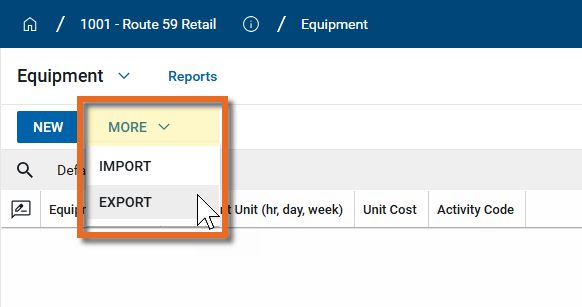
In the action bar, select Export.
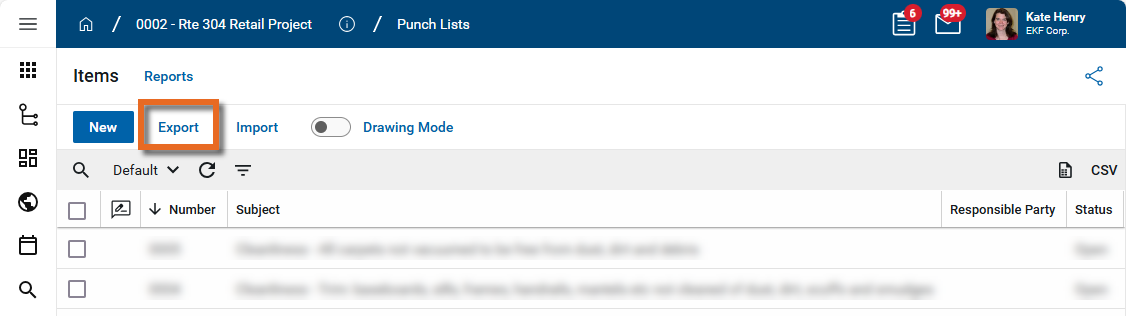
Note In some apps, you may need to click More > Export in the action bar.
-
A dialog box appears with the following settings available for selection:
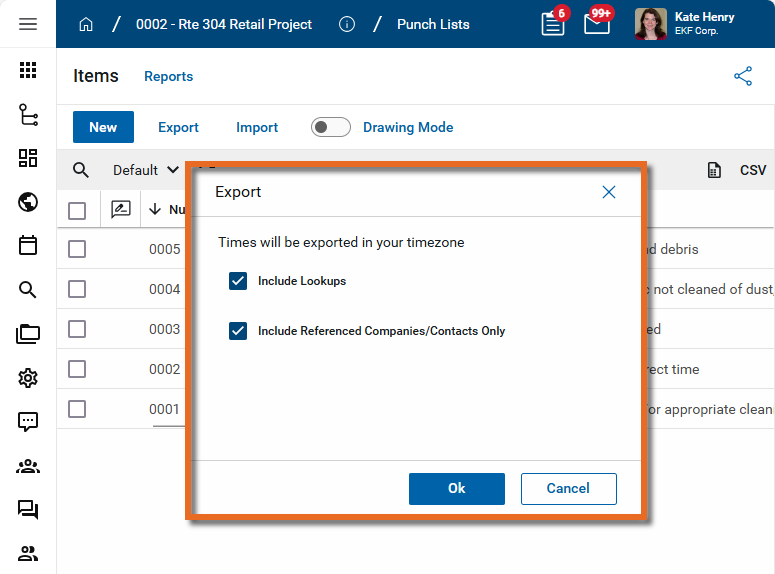
Include Lookups - This option is selected by default. Select this option when exporting for the purpose of obtaining a file to use for an import. The exported file will include lookup values.
Include Referenced Companies/Contacts Only - This option is selected by default. Select this option to include only those company and contact records that are referenced in the records you are exporting. If this option is not selected, all the company and contact records in your domain will be included in the export. Depending on your domain, this can be many records.
This is important when you are exporting for the purposes of importing. In order to be able to reference company or contact records during your import, they must be included in the export file. There are two ways to accomplish this goal:
-
Clear this check box so that all of the company and contact records in the domain are included in the export. Use this option if you want to be able to select from most of the company and contact records in your domain for the records you are importing, or if the number of company and contact records in your domain is small.
-
Create a dummy record or set of records that includes the companies and contacts you will want to include in your import. After generating the export file, you can delete the dummy records. The companies and contacts will be available in the export file for use with your import. Use this option if you have a large number of company and contact records in your domain and it would be unwieldy to work with the list when preparing the import file.
-
-
Click Ok. Select a name and location for the file and click Save.
-
The export file is generated in the selected location. Open it in Excel to review.
Once you have performed the export to generate the appropriate Excel file for import, you must populate it with the data for the records you want to create or update.
Note You will want to ensure you have exported recently prior to creating your import, in order to have the latest reference tabs available (latest contact list, CSI list, etc. based on what fields may be entity references)
To add new records or update existing ones to the newly generated Excel file, complete the following steps:
-
Locate the newly generated file in the location you selected and open it.
-
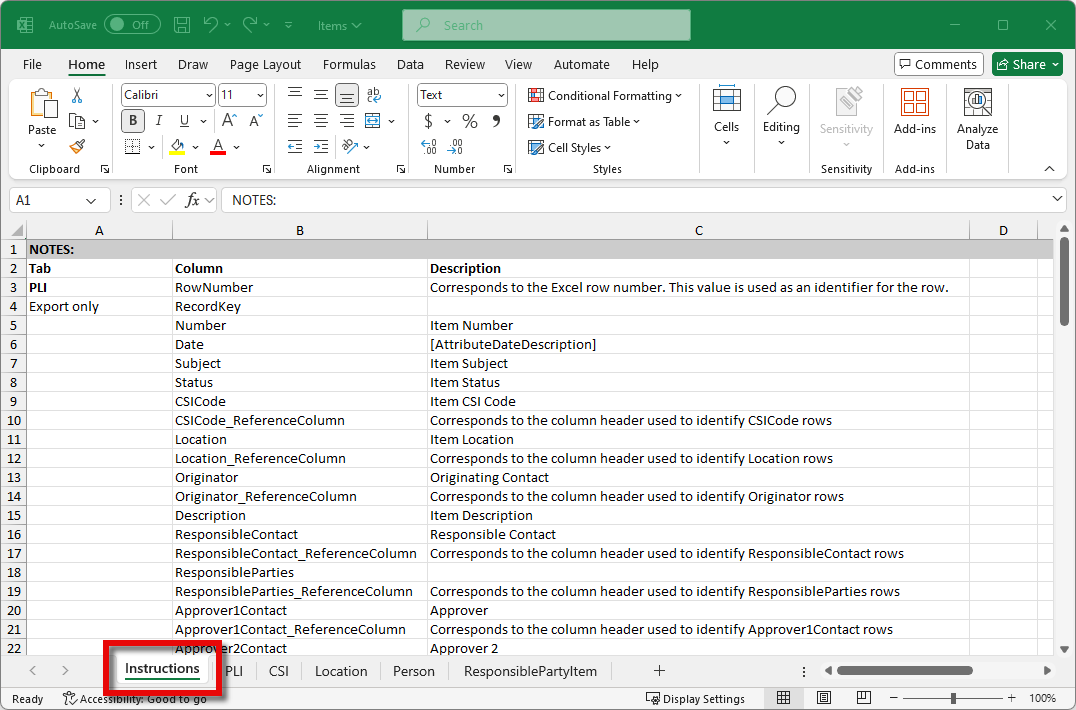
Note that the first tab is typically an Instructions tab. This tab lists the tabs, fields, and field descriptions for the exported Excel file. While this tab does not include any project data, it is important that you leave it in the import file. All tabs in the exported file must be present during the import for the import to complete successfully.
-
The tab after the Instructions tab will be the tab for the app you exported from and will be importing into. If there were records for the project and application you exported from, they will be present in this tab.
-
The remaining tabs contain the entities referenced by records in the application. For example, if records in the app you exported from include a field for CSI codes, there will be a tab listing all the CSI codes for that project. Those CSI codes can then be referenced in the records that you are creating or updating.
-
As you review the export file and prepare the data for import, note the following:
-
The first column in each tab is the RowNumber. This must be populated in numerical order beginning with the number "2". This number must match the Excel row number. All records, existing and new, must have the correct value in the RowNumber field.
-
The second column is the RecordKey. A value appears in the RecordKey field for records that were exported. This value is unique to the project and record that was exported. To update the existing record correctly, you must not modify the value in the RecordKey field.
-
If you have exported a set of records from one project and want to import them as new records in a different project, you must clear the RecordKey field. If you do not clear the RecordKey field, they will not be imported correctly into the new project!
-
Data in rows where the RecordKey field is empty (null) will be used to create new records during the import.
-
-
The remaining column names match the field names for records in the app. For records you are updating, add the new or modified values into the appropriate fields. Enter new records into the remaining rows, ensuring that you populate the RowNumber column as noted in the previous step. Additionally items to keep in mind include the following:
-
All required fields must be populated. Review the application UI to determine which fields are required for that app for that project in your domain.
-
All data must be formatted as text in the Excel file. The exported workbook will be formatted correctly. Do not modify the existing formatting of fields in the Excel file.
-
The data entered in the field must match the type of data that the receiving field is expecting. If the field in the application is an integer field, the value entered must be an integer (do not modify the field formatting, simply enter in an appropriate value in the field). If the field is a lookup field that is set up in the Configuration app, such as Status or Type, the value entered must match one of the existing lookup values for that field in the project and application you will be importing into.
-
If the field accepts multiple values, use the "|" symbol to separate the values. This can be used for text fields and fields that reference other values in the workbook.
-
When updating records, you cannot use the import process to clear a field that has existing data. If you are modifying values for an existing record and enter a null value in a field that had a value upon export, that null value will be ignored upon import and the existing data will remain. This is to prevent the accidental clearing of existing data.
-
-
If a field references other entity data in Kahua, the exported file contains tabs for those entities. Commonly used entity data are items such as CSI Codes, Locations, and Person (from the Contacts app). These are records that exist in a different application than the one you are working with.
In the main tab where you are entering and updating data, there will be two columns present for each entity data item: EntityName and EntityName_ReferenceColumn. To select the appropriate value, you must find the value on the entity tab and enter the correct row number in the EntityName field and enter the column name of "RowNumber" into the EntityName_ReferenceColumn field.
For example, the PLI (Punch List Item) tab of the Punch Lists export includes two columns, Location and Location_ReferenceColumn. This references the Location tab in the Excel workbook. In the example below, the values "2" and "3" appear under Location, and the value "RowNumber" appears under Location_ReferenceColumn.
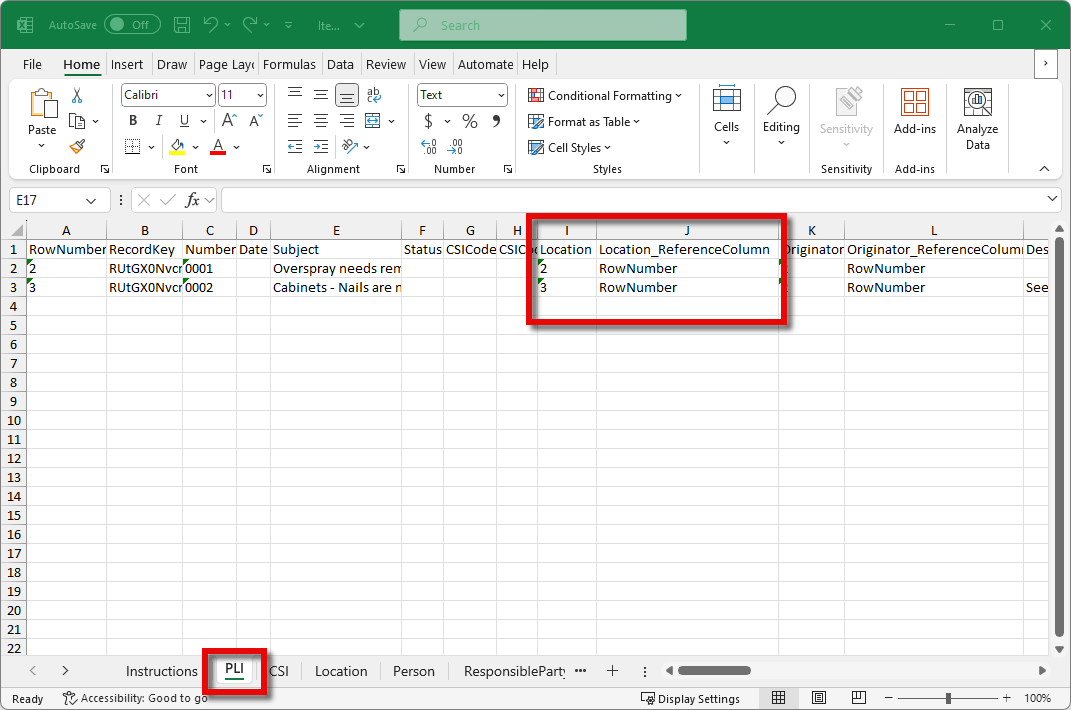
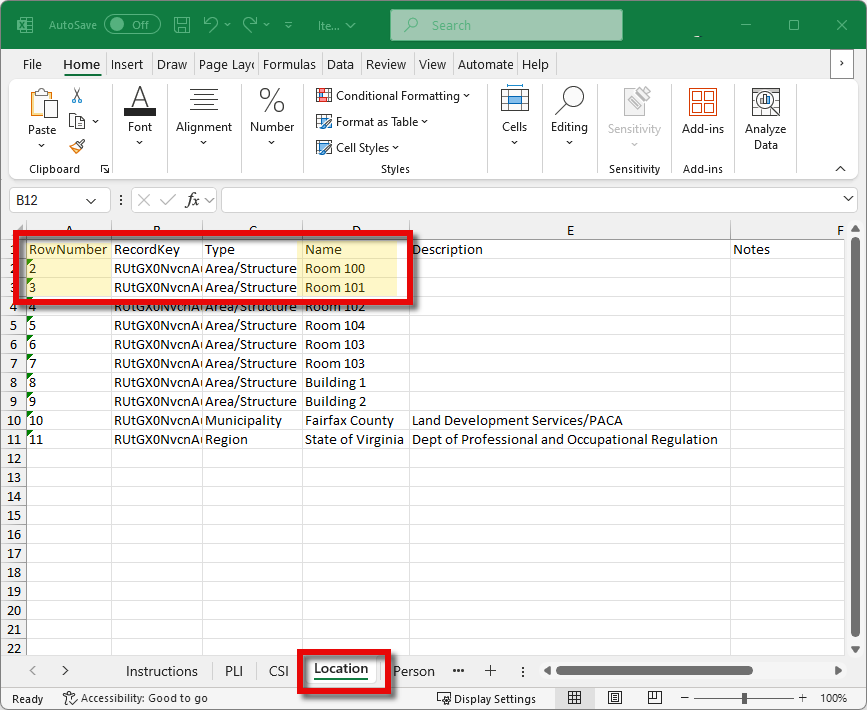
In the Location tab, the value in RowNumber 2 is "Room 100", and the value in RowNumber 3 is "Room 101". During the import process, Kahua will use this reference to correctly populate the value of "Room 100" where RowNumber 2 is selected for the location, and populate the value of "Room 101" where RowNumber 3 is selected for the location.
-
When you are done entering data in the Excel workbook, save and close the file.
Once you have entered the data for the records you want to create and update, you are ready to begin the import process.
To import the data, complete the following steps:
-
Review the header to ensure that you are in the correct project or partition.
-
Navigate to the appropriate application.
-
In the action bar, select Import.
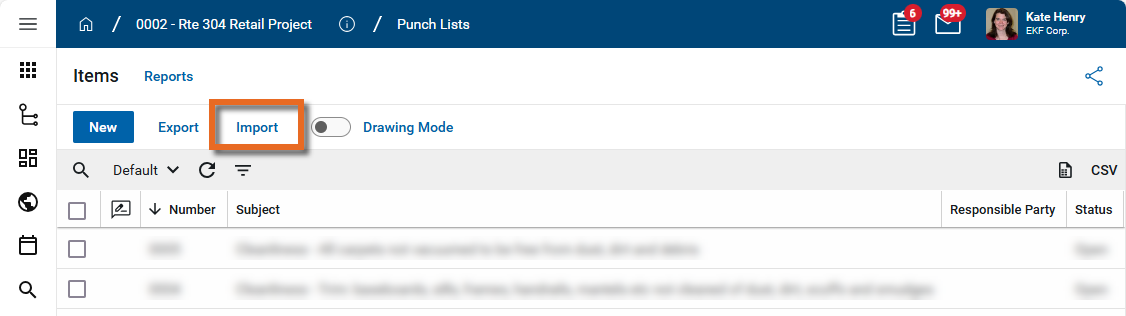
Note In some apps, you may need to click More > Import in the action bar.
-
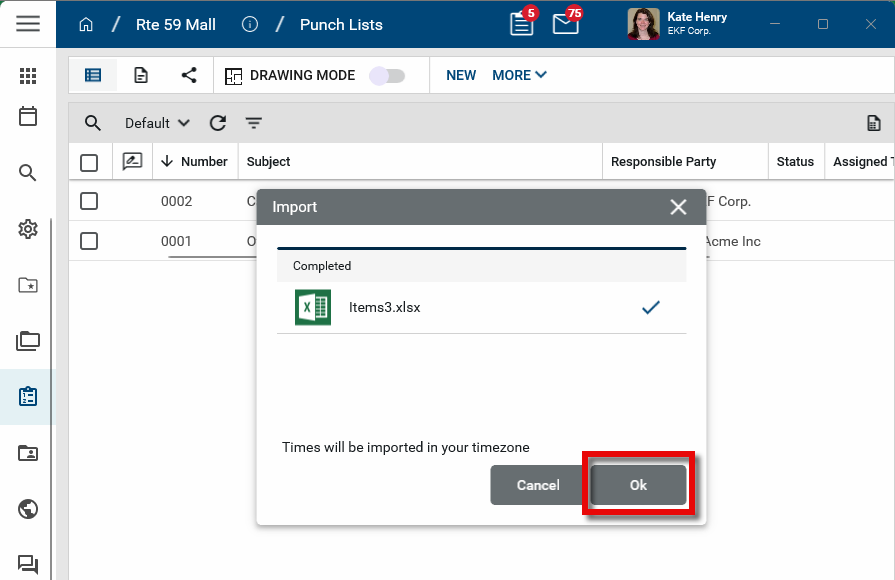
Select the prepared file. The file must be closed before you can select it.
-
Once you have selected the file, click Ok to begin the import process.
-
The import process begins. If you have many line items, the import process may take several minutes.
-
A confirmation appears when the import is complete. Click Ok to close the dialog box.
-
If the import fails, refer to Troubleshoot an import.
If your import fails, review the following items before contacting support for assistance:
-
Review the error message for a mention of a specific row or column. Does the error message indicate a row / column that is troublesome? If so, validate primarily against that row as you research below. If not, complete an overall analysis of your import with the below checklist.
-
Did you alter the order of tabs in your Excel file, start with an export from a different project, or edit the column headers in any way? This can cause an import to fail.
-
Is your data in the correct format within the Excel file?
-
Are all fields adhering to their proper format – for instance, lookup values match an existing lookup value available in the UI, integer fields contain integers only, etc.?
-
Did you list a relevant number (row number) for all entity lookups (Ex. CSI Codes, Locations, Contacts, Companies)? Did you list the ‘RowNumber’ in the [FieldName]_ReferenceColumn to indicate that the tool should look to that row number in the corresponding reference tab included in import?