Activity - Inserting and Updating App Data
How to insert and update App data via the API
The base mechanism for modifying data within an app is through an Activity. When building an App, activities are defined in the app definition itself.
Activities not only ensure that data modifications go through standard Kahua logic (to do things such as update the last modified timestamp, etc.), but they also provide directive stacks where business logic can be inserted to ensure that data coming in through the API is validated and accurate for the app you are working with.
It's important to understand that when you insert data via the API, you must tell Kahua what workflow state the data is in. In addition, the data being inserted should be valid based on that workflow state, as Kahua does not have the ability to automatically validate that the provided data is valid for the given workflow state. Because of this, it's important that the app or process that is inserting data via the API should ensure the data it's inserting is in the correct workflow step, as well as the correct state for data in that workflow step. Activities can help provide that validation, but they must be built in order to validate the data properly.
When there are explicit API methods to add or update data for specific types, those methods should be used instead of the activities API. Certain types of data have special business processes or business rules that are enforced through those explicit APIs to ensure that they work properly. Whenever an explicit API is available, it should be used. This includes, but is not necessarily limited to:
-
Contacts
-
Companies
-
Workbreakdown Items (WBS)
-
Files and Folders
 Performing a basic insert via an app activity
To perform an insert operation using an activity defined in an app, you must first know the name of the activity, as well as the "set" name in the activity. This is defined in the app itself. If the app or extension that you wish to insert data to does not have an activity defined, you will be unable to insert or update data into that app unless you use the ad hoc activity capability described later in this document.
For this example, we will insert a record into the "Properties" app (kahua_Properties). The Properties app has an activity named "Properties" defined in it, with a set name of "Property". The endpoint for this call will be:
https://{envname}service.kahua.com/v2/domains/{{domain}}/projects/:projectId/apps/:appName/activities/:ActivityName/run
The following examples are in our new v2 API for activities. It works exactly the same as v1 except it accepts JSON in our new v2 format, which is more compact and easier to work with. The v2 query API returns entity data in the same format that is used in the v2 activity APIs.
The following values are used in the endpoint:
-
{{envname}}: The name of the environment you are making the call to. For instance: devweekly.
-
{{domain}}: The domain key for the domain you are inserting data into, such as MagsevenBuilders.
-
:projectId: The ID of the project you are inserting data into. For this example, we'll say its project 12345.
-
:appname: This is the name of the app you are inserting data into. For this example, that's kahua_Properties.
-
:activityname: This is the name of the activity in the app that you are using for the insert: Properties
App and entity names needed for this request can be found in our data dictionary. Refer to this page for more details and a link to download the data dictionary.
Given these values, the URL we'll be sending our POST request to will be:
https://devweeklyservice.kahua.com/v2/domains/MagsevenBuilders/projects/12345/apps/kahua_Properties/activities/Properties/run
The body of our request will contain the data we're inserting into the app:
{
"sets": [
{
"name": "Property",
"entities": [
{
"id": 0,
"entityDef": "kahua_Properties.Property",
"hubPath": "kahua_Properties.NoWorkflow\\Start",
"LeasedOwned": "Owned",
"Address1": "2123 Main Street",
"PropertyName": "Empire State Building"
}
]
}
]
}When inserting data into an app, be sure to provide any required fields as necessary. Ideally, the activity that you are calling will have assertions defined that can validate the data being passed in. It's also worth noting that Kahua will automatically populate values for autonumber fields (such as the "PropertyID" field in the properties app). Kahua will also manage system fields automatically such as: "CreateBy", "CreatedTimestamp", "CreatedDateTime", "ModifiedDateTime", "DomainPartitionId", "ShortLabel", etc. These system values do not need to be passed into the activity.
Other key things to note in the example above are:
-
The "id" field of "0" is passed in, indicating that the record is a new record. The system will assign an ID to the inserted record and return that ID in the result of the API request.
-
The "name" field in the request body is the "set" name of the activity that we are calling. In this example, that is called "Property". The set name must match what is defined in the activity.
-
The "hubpath" must be provided and include a valid hubpath. This defines the workflow step that the inserted record will be in. Hubpaths are in the form Appname.HubDefinitionName\Stepname (Note the double backslash in the request body is due to the need to escape the backslash for JSON).
Inserting child data
Often times you will need to insert child data, such as lines on a contract, etc. This can be done with a hierarchical JSON data structure as shown below. For this example, the Properties app contains a list of third-party agreements:
{
"sets": [
{
"name": "Property",
"entities": [
{
"id": 0,
"entityDef": "kahua_Properties.Property",
"hubPath": "kahua_Properties.NoWorkflow\\Start",
"LeasedOwned": "Owned",
"Address1": "2123 Main Street",
"PropertyName": "Empire State Building",
"Property3rdPartyAgreements": [
{
"id": 0,
"entityDef": "kahua_Properties.Property3rdPartyAgreements",
"Type": "Lease",
"StartDate": "\"2021-07-20T00:00:00\"",
"ExpirationDate": "\"2025-07-20T00:00:00\""
}
]
}
]
}
]
}Note that again the ID for the child entity is 0, meaning it is a new entity and Kahua will assign it an ID. The proper entity def needs to also be provided for the child entity.
Adding a reference to an entity
Sometimes the data you are inserting will reference a record in another app, such as a contact or a company. In this case, you are not creating that referenced entity, you are just adding the reference to the existing entity as part of your insert. The most straightforward way to do this is to provide the ID for the entity you are referring to, along with the entitydef that defines the type of data it is:
{
"sets": [
{
"name": "Property",
"entities": [
{
"id": 0,
"entityDef": "kahua_Properties.Property",
"hubPath": "kahua_Properties.NoWorkflow\\Start",
"LeasedOwned": "Owned",
"Address1": "2123 Main Street",
"PropertyName": "Empire State Building",
"BuildingOwner":
{
"id": 5057674,
"entityDef": "kahua_CompanyManager.kahua_Company"
}
}
]
}
]
}Sometimes the ID of a reference you wish to add isn't known. In that case you may have to use a query API request to find the ID of the entity you wish to add a reference to first in order to look up the ID. However, if there is an alternate attribute that can be used to uniquely identify the record you wish to reference, you can have Kahua automatically resolve that reference for you. For instance, if you know the email of the BuildingOwnerContact, you can use that instead to set the BuildingOwnerContact reference:
{
"sets": [
{
"name": "Property",
"entities": [
{
"id": 0,
"entityDef": "kahua_Properties.Property",
"hubPath": "kahua_Properties.NoWorkflow\\Start",
"LeasedOwned": "Owned",
"Address1": "2123 Main Street",
"PropertyName": "Empire State Building",
"BuildingOwnerContact":
{
"entityDef": "kahua_PeopleManager.kahua_Contact",
"referenceType": "Resolve",
"referenceResolveAttributePath": "EmailAddress",
"referenceResolveAttributeValue": "mkrkahua+GC@gmail.com"
}
}
]
}
]
}NOTE: The Resolve method will only work if the provided referenceResolveAttributePath and referenceResolveAttributeValue identify a single record. If the provided data resolves to multiple records, or no records, then the record will be inserted but the reference will not be set and an error will be returned.
By default, Resolve looks everywhere for the entity. For contacts, this makes sense, but for other situations, you may only want to search the current partition. You can specify the referenceParititionScope attribute to define the scope. This attribute takes the following values: Partition, Domain, DomainPartition, Any, Match. For more information on these, refer to the Query - Get Data from an App. This is an example fragment of what the call may look like
{
"name": "WorkBreakdownItem",
"entities": [
{
"entityDef": "kahua_WorkBreakdown.Item",
"referenceType": "Resolve",
"referenceResolveAttributePath": "Code",
"referenceResolveAttributeValue": "Value",
"referencePartitionScope": "Partition"
}
]
}To update an existing record, the exact same endpoint and data are used. However, in this case, you must provide the ID of the record you wish to update, and you only provide the attributes that you wish to update. The following example changes the value of the "LeasedOwned" attribute on entity 11622882 to Leased:
{
"sets": [
{
"name": "Property",
"entities": [
{
"id": 11622882,
"entityDef": "kahua_Properties.Property",
"LeasedOwned": "Leased"
}
]
}
]
}To add a new child entity to an existing entity, you provide the ID of the main document entity just as above. However, for the child entity you will include an ID of 0 to indicate a new child entity record should be added:
{
"sets": [
{
"name": "Property",
"entities": [
{
"id": 11622882,
"entityDef": "kahua_Properties.Property",
"Property3rdPartyAgreements": [
{
"id": 0,
"entityDef": "kahua_Properties.Property3rdPartyAgreements",
"Type": "Lease",
"StartDate": "\"2021-07-20T00:00:00\"",
"ExpirationDate": "\"2025-07-20T00:00:00\""
}
]
}
]
}
]
}While it's preferable to define activities in an app or extension itself, it is also possible to define an activity as part of the API request body that is passed in with each POST request to the API. This can be used when an activity doesn't exist in the app or extension you are inserting to and you have no ability to add the activity to that app/extension. The endpoint for ad hoc activities is:
https://{envname}service.kahua.com/v2/domains/{{domain}}/projects/:projectId/apps/:appName/activities/run
The following values are used in the endpoint:
-
{{envname}}: The name of the environment you are making the call to. For instance: devweekly.
-
{{domain}}: The domain key for the domain you are inserting data into, such as MagsevenBuilders.
-
:projectId: The ID of the project you are inserting data into. For this example, we'll say its project 12345.
-
:appname: This is the name of the app you are inserting data into. For this example, that's kahua_Properties.
-
:activityname: This is the name of the activity in the app that you are using for the insert: Properties
When the record is added to a partition that is not a project (that is, app list), use the ID of the partition not the project.
The only difference is that now the activity name isn't part of the endpoint, as the activity will be part of the request body. Here's an insert into the Properties app using an ad hoc activity:
{
"activity": {
"PropertyName": "Activity",
"Name": "AdHocProperties",
"Flow": [
{
"PropertyName": "Iterate",
"Set": "AdHocProperty",
"New": {},
"Existing": {}
}
]
},
"sets": [
{
"name": "AdHocProperty",
"entities": [
{
"id": 0,
"entityDef": "kahua_Properties.Property",
"hubPath": "kahua_Properties.NoWorkflow\\Start",
"LeasedOwned": "Owned",
"Address1": "2123 Main Street",
"PropertyName": "Empire State Building"
}
]
}
]
}Projects can be created both through an ad hoc activity or using the ApplyTemplate activity. Using the ApplyTemplate activity will allow you to create a project from a template. Make sure to set the ReferenceTemplateId to the ID of the template project.
https://{envname}service.kahua.com/v2/domains/{{domain}}/projects/:projectId/apps/kahua_Project/activities/ApplyTemplate/run
{
"sets": [
{
"name": "Items",
"entities": [
{
"id": 0,
"entityDef": "kahua_Project.Project",
"hubPath": "kahua_Project.NoWorkflow\\Start",
"ReferenceTemplateId": 37239012, // ID of template project
}
]
}
]
}The ApplyTemplate activity requires kahua_PortfolioManager_Project_Owner_extension to be installed.
Creating a pay request using the Kahua extension activityPay requests are typically one of the most complex entities to create, as they have several parts to them that must be setup correctly:
- Links to the original contract, contract lines, change requests, and change request lines (or SOV lines)
- "CompletedToDate" fields are copied over from the previous pay requests so the running total of cost is accurately continued If the above linkages and values are not made correctly, the pay request will likely not work, or will not contain accurate values. Further, it's possible that those inaccurate values could be carried on to future pay requests, create data issues that are difficult to repair. Due to this, Kahua now provides an activity that should be used to create pay requests. This activity is in the K4X extension: kahua_ContractInvoice_extension. This activity uses existing logic in the extension to properly create all invoice lines, linkages to contracts and change orders, and copy over totals from previous pay requests. To use it, it only requires the Contract ID of the contract the pay request is being created for. In addition, there is a flag IncludeAllChangeOrders that indicates if lines from all change orders should be included on the pay request. If not present, the default behavior is false. Below is a sample call to create a pay request:
https://{envname}service.kahua.com/v2/domains/{{domain}}/projects/:projectId/apps/:appName/activities/:activityName/run
{
"sets": [
{
"name": "NewPayRequest",
"entities": [
{
"id": 0,
"HubPath": "kahua_ContractInvoice.KahuaWorkflow\\Active",
"entityDef": "kahua_ContractInvoice.ContractInvoice",
"Contract": {
"id": 28805863,
"entityDef": "kahua_Contract.Contract"
},
"IncludeAllChangeOrders": "True"
}
]
}
]
}Once the pay request is completed, frequently there is a need to then update work completed, add payment date and check number, then potentially move the pay request to a paid state. Again, this is best done by invoking logic in the app to advance the state of the pay request, as below:
https://{envname}service.kahua.com/v2/domains/{{domain}}/projects/:projectId/apps/:appName/activities/run
{
"listIdentifier": 0,
"listId": 0,
"activity": {
"PropertyName": "Activity",
"Name": "ContractInvoice",
"Flow": [
{
"PropertyName": "Iterate",
"New": {},
"Set": "ContractInvoice",
"Existing": {
"Directives": [
{
"PropertyName": "Event",
"Name": "ToPaidValidationExecute"
}
]
}
}
]
},
"sets": [
{
"name": "ContractInvoice",
"entities": [
{
"id": 33488688,
"entityDef": "kahua_ContractInvoice.ContractInvoice",
"DatePaid": "9/3/23",
"CheckNumber": "1234",
"Items": [
{
"id": 33488689,
"entityDef": "kahua_ContractInvoice.ContractInvoiceItem",
"WorkCompletedThisPeriod": "50"
}
]
}
]
}
],
"data": "",
"parameters": []
}Pay requests should be created and completed in order. Pay request creation pulls totals from the prior pay request in order to track completed/remaining values, so it is important that when programmatically creating pay requests, they are completed and paid prior to creating another pay request.
Also note that to add change orders to a pay request, you must invoice against them at the line item level; not just the change order level. The below code snippet shows an example of invoicing against a change order:
https://{envname}service.kahua.com/v2/domains/{{domain}}/projects/:projectId/apps/:appName/activities/run
{
"listIdentifier": 0,
"listId": 0,
"activity": {
"PropertyName": "Activity",
"Name": "ContractInvoice",
"Flow": [
{
"PropertyName": "Iterate",
"New": {},
"Set": "ContractInvoice",
"Existing": {
"Directives": [
{
"PropertyName": "Event",
"Name": "ToPaidValidationExecute"
}
]
}
}
]
},
"sets": [
{
"name": "ContractInvoice",
"entities": [
{
"id": 33488688,
"entityDef": "kahua_ContractInvoice.ContractInvoice",
"DatePaid": "9/3/23",
"CheckNumber": "1234",
"Items": [
{
"id": 33488689,
"entityDef": "kahua_ContractInvoice.ContractInvoiceItem",
"WorkCompletedThisPeriod": "50"
},
{
"id": 33488690,
"entityDef": "kahua_ContractInvoice.ContractInvoiceItem",
"Items": [
{
"id": 33488691,
"entityDef": "kahua_ContractInvoice.ContractInvoiceItem",
"WorkCompletedThisPeriod": "500"
}
}
]
}
]
}
],
"data": "",
"parameters": []
}This activity is built into the Kahua_AEC_Invoice_Extension app. For this to sample API to run properly, you will need to have created a purchase order (PO) already and use the ID of that existing PO in the body of the API call for ID under purchase order. This activity will automatically grab all approved purchase order change orders (POCO) and include them. If you do not want POCOs to be included then make sure to not create an POCO for the associated approved PO.
https://{envname}service.kahua.com/v2/domains/{{domain}}/projects/:projectId/apps/kahua_AEC_Invoice/activities/NewInvoiceWithPO/run
{
"sets": [
{
"name": "Firstset",
"entities": [
{
"entityDef": "kahua_AEC_Invoice.Invoice",
"HubPath": "kahua_AEC_Invoice.NoWorkflow\\Active",
"id": 0,
"CurrencyCode": "USD",
"PurchaseOrder": {
"id": 41240562,
"entityDef": "kahua_PurchaseOrder.PurchaseOrder"
}
}
]
}
]
}Entities can be deleted using an ad hoc activity with the delete directive. The URL is the same as a regular ad hoc activity call.
{
"activity": {
"PropertyName": "Activity",
"Name": "Activity",
"Flow": [
{
"PropertyName": "Iterate",
"Set": "Activity",
"New": {},
"Existing": {
"Directives": [
{
"PropertyName": "Delete"
}
]
}
}
]
},
"listIdentifier": 0,
"listId": 0,
"sets": [
{
"name": "Activity",
"entities": [
{
"id": ID OF ENTITY TO DELETE,
"entityDef": ENTITY DEF OF ENTITY TO DELETE,
}
]
}
],
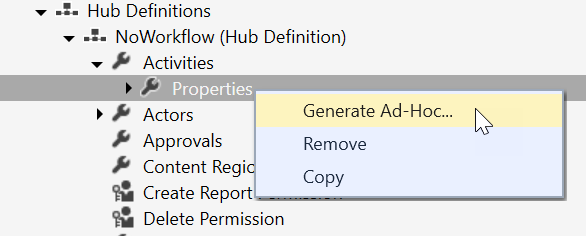
"parameters": []
}It is recommended that ad hoc activities are built out in kBuilder, as kBuilder can automatically generate a JSON activity snippet from an activity that is built in an app definition. This is done by right clicking on the activity in the kBuilder project explorer, then selecting "Generate Ad-Hoc...". This will put the JSON snippet for the activity in the windows clipboard, where it can then be pasted in your request body: