Building a New Portable View Template
This article explains how to build a portable view template. For more general information on portable view templates, refer to Portable Views.
A portable view (PV) is a PDF version of a Kahua record such as a letter, RFI, or contract. The base Kahua environment includes built-in portable views for each app. You can create additional portable views in Microsoft Word and install them in Kahua where they can be used by yourself or others.
To create a new portable view template, you will add text and portable view tokens to a MS Word document. Then in the Configuration app, you will install the document to the application it is to be used for.
Tokens are hooks into specific data in the Kahua apps. When a view of a document is requested within an app, the Word template file embedded with portable view tokens is processed by the system to replace tokens with data from the document or the project, partition, or domain you are currently in. It then builds a PDF version of the document with the current values of those tokens. It functions similarly to the mail merge function in Microsoft Word.

You can change what logo is used in the portable views by making a selection in the Configurations app. For more information on how select the logo, refer to Setting the Portable View logo. All other changes are made by creating and modifying the portable view template.
How to . . .
To create a new portable view template, complete the following steps:
-
Open a Microsoft Word document. You can use an existing file or create a new one.
Note If you use an existing file, ensure there are no macros or hidden markups. These items can cause unexpected results.
-
Open Kahua and navigate to the partition where you will install the template. Consider setting up a separate partition to use for testing portable view templates, or use a test environment if you have access to one.
-
Navigate to the Configuration app.
-
From the applications tab, select the app you will be working with.
-
Select the Portable Views tab.
-
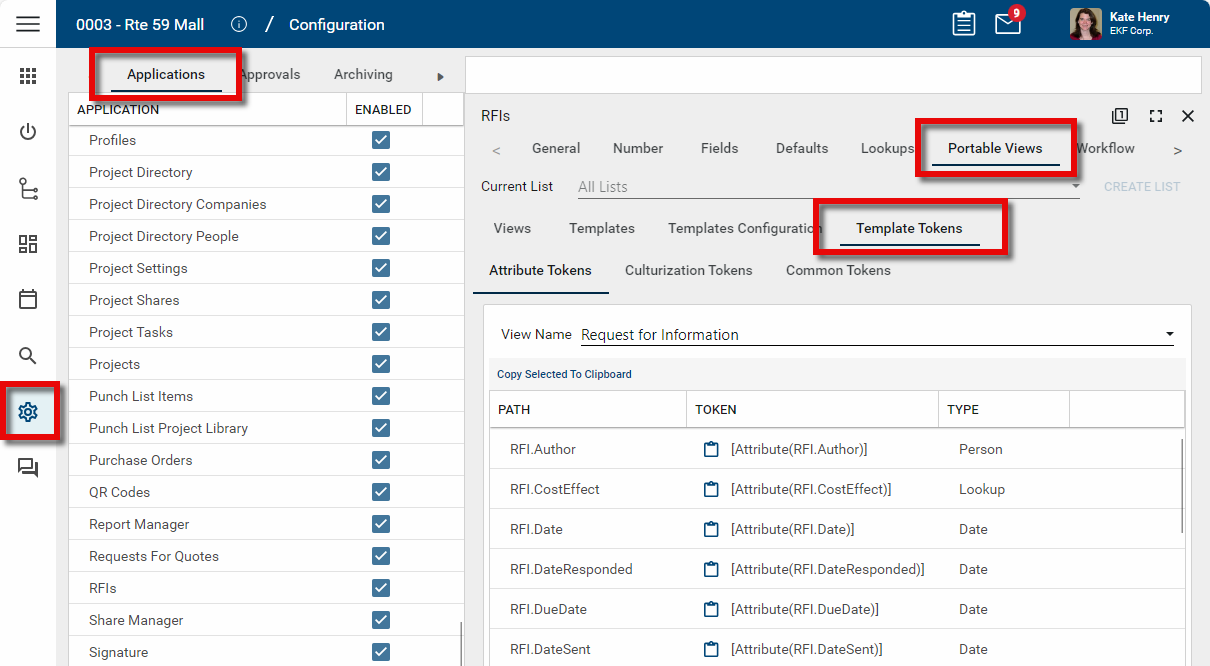
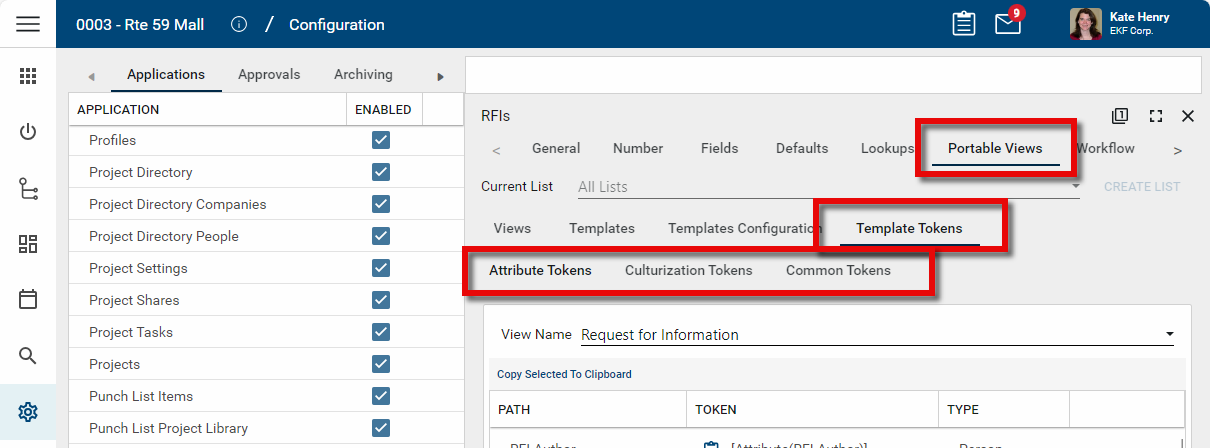
To access the template tokens for the application, select the Template Tokens tab. Three tabs will appear underneath the Template Tokens tab. For more information on accessing these template tokens, refer to View the Token List for an App.
-
Copy the tokens as needed to the appropriate locations in your Word document.
-
You can apply MS Word formatting text directly to the tokens, for example, applying bold or italic styles, or changing the font or font size.
-
Additionally, you can apply specific formatting to the token results (e.g., convert currency values to text), or apply conditions to control what text should appear (e.g., have the text "Response Required" appear if the RFI Response field is empty). For more information, refer to Apply formatting to tokens.
-
Once the new portable view template is complete, save it to an accessible location.
The next step is to install the template in the appropriate location. Refer to Install a portable view.
Kahua portable view templates use tokens as placeholders for fields from the selected entity (e.g., a memo, an RFI, a contract), or from the project, partition, or domain you are currently in.
When you open an entity in Kahua and select a portable view template to use to view the entity, the portable view processor scans the template for these tokens and replaces the tokens with the appropriate content.
In order to create a new portable view, you will need to access the template tokens for the application where you intend to make the portable view available. The list of tokens is available in the Configuration application. Tokens can be copied from this list and applied to a portable view template.
To access the list of tokens for an app, complete the following steps:
-
Navigate to the Configuration application (Apps > Administration > Configuration).
-
From the Applications tab, select the appropriate app.
-
Select the Portable Views tab.
-
Select the Template Tokens tab.
-
Three tabs will appear under the Template Tokens tab:
-
Attribute Tokens - These are template tokens specific to the entities in the selected app. They follow the format of [Attribute(entity.fieldname)].
Example In the RFI app, the attribute tokens will include fields such as the RFI Author ( [Attribute(RFI.Author)] ), the RFI Date ( [Attribute(RFI.Date)] ) and the RFI Question ( [Attribute(RFI.Question)] ).
-
Culturization Tokens - These are tokens that represent text in the app. They may use default values or they may have been modified to more closely align with your organization's business processes.
Example If your organization uses the term "Reply" on RFIs instead of the default value of "Response", this is where that value would have been updated.
-
Common Tokens - These tokens are ones that are not app-specific, but instead reference the user, project, partition, or domain, or current settings like the current date or time. These tokens are not formatted and can be placed in your document as is.
Example Examples of simple tokens from the Common Tokens list are [ProjectNumber], [ProjectName], [UserName], [ProjectOwner], [CurrentTime] (note that the output for CurrentTime is the current date and time), and [ProjectStatus].
-
-
Select the appropriate tab for the tokens you are looking for. Note the View Name drop-down list. You may need to change the View you are looking at to get the right tokens.
Example The Communications app has several different views to choose from. Many tokens are the same for all types, but some are document specific.
-
The Type column in the list of tokens is useful to help you find the token you are looking for and also provides a clue to the type of syntax/arguments that may be available for that token.
Example The cost apps have many tokens so scanning for just currency type tokens may speed up your searching.
-
Tokens have a hierarchy – the parent level then attributes within that level. In the example, the RFI Source Company has several child attribute tokens such as Government ID and VendorNumber.
-
To select a single token, click the clipboard icon
 next to the token name. This will copy the token to your clipboard. You can then paste the token into the Microsoft Word document that will be your portable view template.
 -
Tokens can be formatted. For more information, refer to Apply formatting to tokens.
Formatting can be applied to tokens to control how the field values appear in the document.
You can apply formatting to token values. This can be especially useful for date and time tokens and currency value tokens.
Currency tokens have special format options that allow the number to be written out in words.
-
Words or WordsMixedCase - Currency text appears in title case ("Two Hundred Dollars and Zero Cents").
-
WordsUpperCase - Currency text appears in upper case ("TWO HUNDRED DOLLARS AND ZERO CENTS").
-
WordsLowerCase - Currency text appears in lower case ("two hundred dollars and zero cents").
Example [Currency(Source=Attribute,Path=RFI.CostAmount,Format=WordsMixedCase)] where the RFI Cost Amount is $550 would result in Five Hundred and Fifty Dollars and Zero Cents.
Conditional formatting can be applied to tokens. The format to use is as follows, where operator is the condition (e.g. Equals, IsEmpty, IsTrue, etc.) and the optional value is the value being checked:
[IF(Source=Attribute,Path=attribute path,Operator=operator,Value=value)]
[THEN] Content to show if condition met
[ENDTHEN]
[ELSE] Content to show if condition not met
[ENDELSE]
[ENDIF]
The following conditions are allowed:
-
Equals
-
DoesNotEqual
-
Contains
-
DoesNotContain
-
In
-
IsGreaterThan
-
IsGreaterThanOrEqualTo
-
IsLessThan
-
IsLessThanOrEqualTo
-
IsEmpty
-
IsNotEmpty
-
IsNull
-
IsNotNull
-
IsTrue
-
IsFalse
In the example below, if there is a value in the RFI Response field, the RFI Disclaimer text will appear. If there is no value in the RFI Response field, then nothing will appear.
[IF(Source=Attribute,Path=RFI.Response,Operator=IsNotEmpty)][THEN]
[Attribute(RFI.Disclaimer)]
[ENDTHEN]
[ENDIF]Note You must be an administrator to install a portable view.
Portable views can be installed at any level in the partition structure. This is useful when there are different partitions for business units that may have different document needs. It is also helpful for building and testing your portable views. You can work in your own testing partition initially, and then install the portable view template at a higher level when it is ready to use in your production environment.
To install your newly created portable view, complete the following steps:
-
Navigate to the level where you want to install portable views. Note that what you install at this level will affect all partitions/projects below it unless there are lower level overrides in place.
Important You can work in your own testing partition initially, and then install the portable view template at a higher level when it is ready to use in your production environment.
-
Navigate to the Configuration application (Apps > Administration > Configuration).
-
Select the app you are installing the portable view for from the Applications list.
-
Navigate to the Portable Views > Views tab.
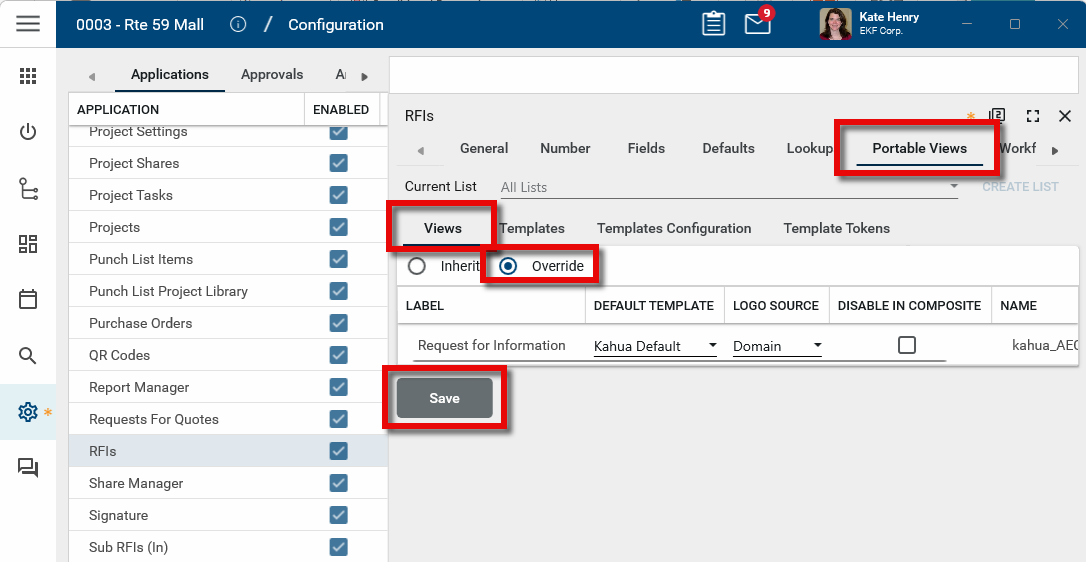
-
Select Override and click Save.
-
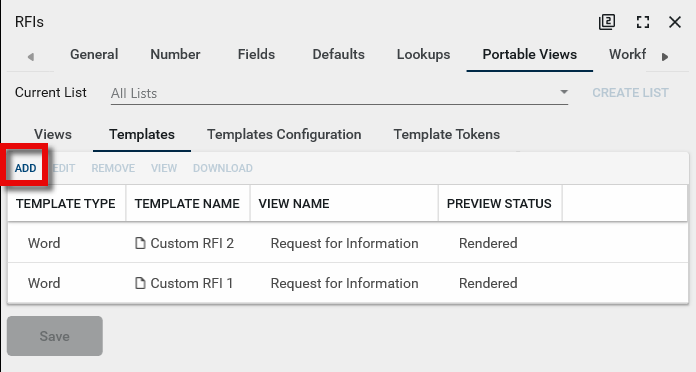
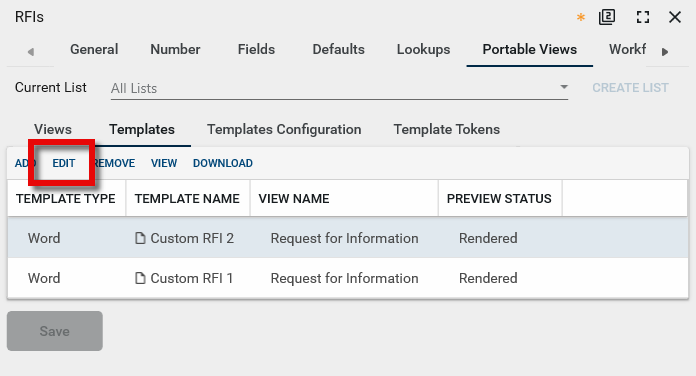
Select the Templates tab. Click Add.
-
The Create View Template window opens. Complete the following fields and click Ok when you are done:
Field Description View Name Select the correct view name. Template Name Assign a name to the template. This is the name that will appear in the user interface. Filename Click Select File and browse to the MS Word file. -
Click Save on the Templates tab. The template is now uploaded to Kahua.
-
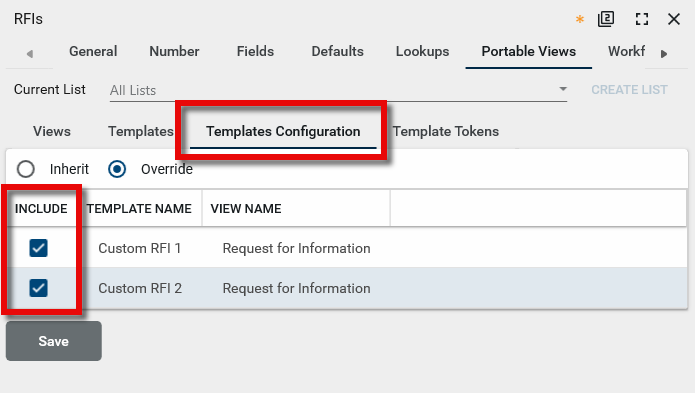
To make the template available for selection, open the Templates Configuration tab.
-
Select Override.
-
Select the check box in the Include column next to the template you just added and click Save. This allows the new template to be selected as a default view for this application.
-
Open the Views tab. In the Default Template column select your newly installed template. This will be the view that is applied to newly created or edited entities in this application.
-
Click Save to save your changes.
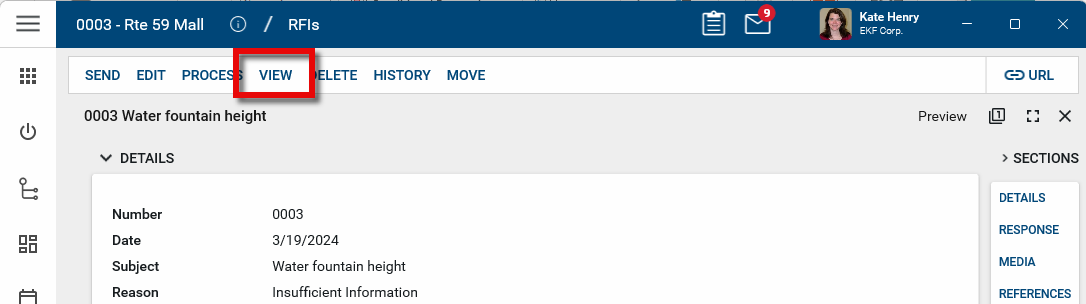
To test the portable view you have just installed, complete the following steps:
-
Ensure you are in the correct project/partition.
-
Open the application where you installed the new portable view.
-
Create a new item or edit an existing one and click Save. Existing items must be edited to use the new portable view.
-
Click View to open the item with the newly defaulted portable view.
For information on modifying what logo is applied to a portable view for an application in a specific project, refer to Setting the Portable View logo.
If you want to update a portable view that is already installed, complete the following steps:
-
Make changes as needed in Microsoft Word and save the file. This file name can be the same or different than the original template's file name.
-
Navigate to the Configuration application (Apps > Administration > Configuration).
-
Select the appropriate application and click on Portable Views.
-
Select the Templates tab.
-
Select the template you want to update.
-
Click Edit to open the Edit View Template window.
-
Click Select File and select the updated MS Word file.
-
Click Ok to close the window.
-
Click Save to save your changes.
-
Be sure to test your newly installed portable view. Refer to Test the newly installed portable view.