Scheduling Reports
Built-in and custom reports can be scheduled to run on a set interval for a specified period of time. Filters can be applied to the scheduled report. The report can be sent as a link or a separate file. Depending on the report, it can be sent as a PDF, XLS or CSV file. A report can be sent to individual Kahua contacts, Kahua groups, or outside email addresses.
For information on building reports with the report wizard, refer to Creating ad hoc reports.
How to . . .
Schedules must be added to existing reports. The reports can be built-in or custom. To schedule a report, complete the following steps:
-
Ensure you are in the project where you want to schedule the report. Scheduled reports can only be run against the project where they were scheduled. You cannot schedule reports to include multiple projects.
-
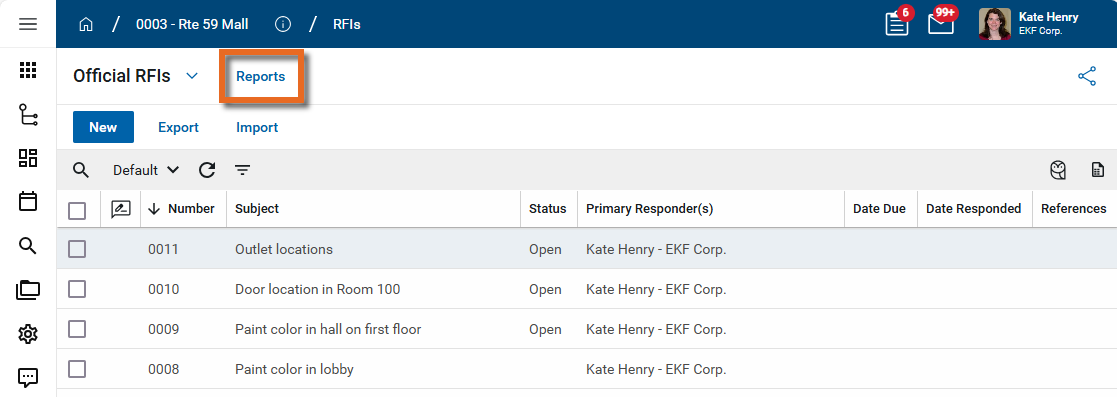
Open the application where you want to schedule the report and select Reports in the application title bar.
Alternatively, you can access reports from the Report Manager application. Navigate to Apps > Administration > Report Manager application. Under Applications, select the application for which you want to schedule a report.
-
Select the report you want to schedule.
-
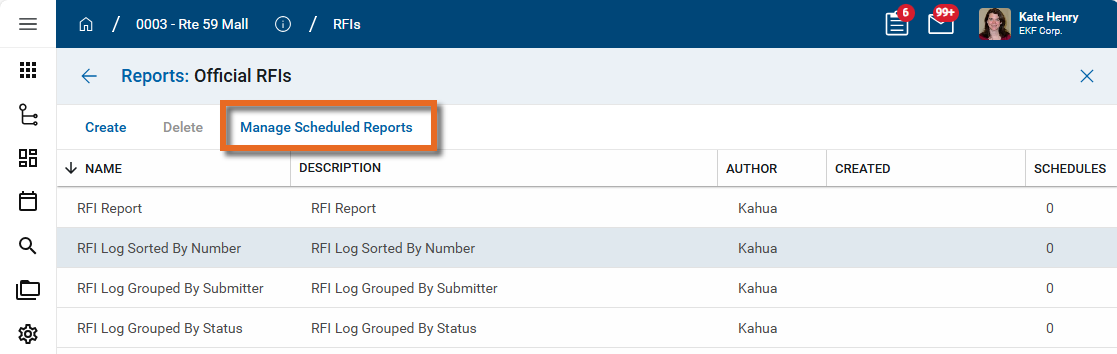
Select Manage Scheduled Reports in the action bar. The Scheduled Reports window for the selected report opens.
-
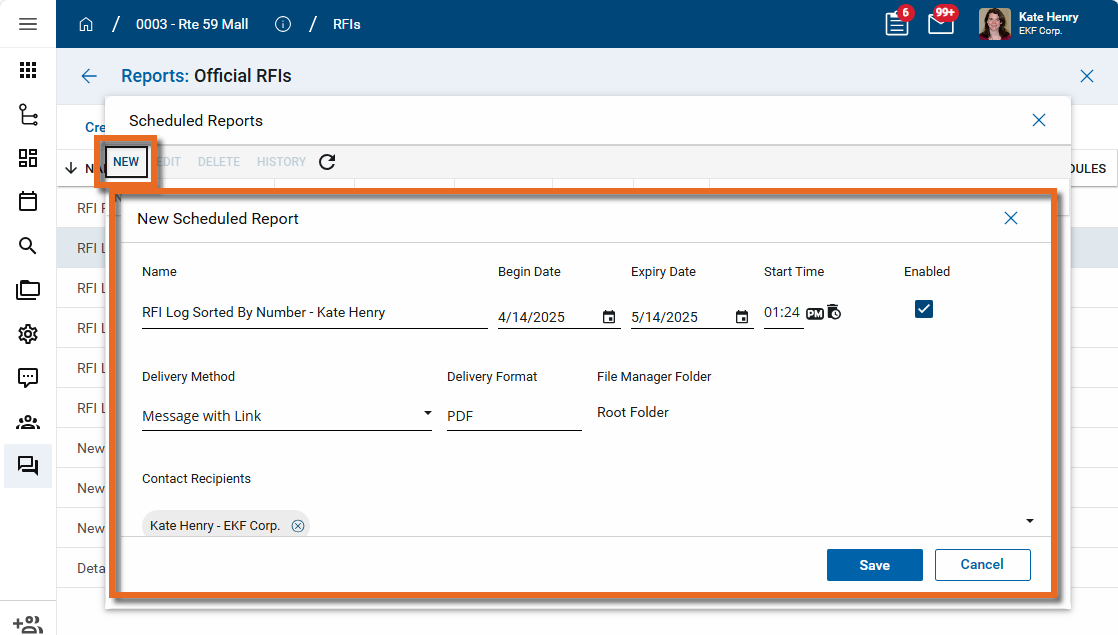
Click New to create a new scheduled report for the selected report.
-
Complete the following fields:
Field Description Name Enter a name for the report. Begin Date, Expiry Date, Start Time Enter the date range the report should be run and the time it should be run. Enabled Select this check box to enable the scheduled report to run. File Naming Configuration Use this section to configure the filename of the scheduled report output.
-
Specify Explicit Filename - If desired, select this option and enter a name to be used for the scheduled report output. If no value is entered, the report name will be used.
-
Append Current Date - Enable this option to append the date the report was run to the filename. Select a format for the appended date from the drop-down list.
You can review the results of your selections in the Example Filename field.
Delivery Method Select the appropriate delivery method:
-
Message with Attached File - Select this option to have the report sent as an attachment to the message.
-
Message with Link - Select this option to have the report stored in File Manager and the message include an anonymous file link from the stored report file.
Note When sent as a link, there is only one file stored in File Manager. When the scheduled report is run, that new report becomes the current version and the older report is stored as a previous version of the same file.
Delivery Format Select the delivery format, e.g., PDF, XLS, CSV, or TXT. Contact Recipients Select the combination of Contacts and Groups who should receive this report. Email Recipients Enter any additional email addresses that should receive this report. Use semicolons to separate the email addresses. Frequency, Recurrence Select the report appropriate report frequency and recurrence. Filter Criteria Enter the appropriate filter or filters to be applied each time the report is generated.
Select Add Condition to add a filter. Select Add Group to add a set of filters that function together.
-
-
Click Save to save the scheduled report.
-
Click the Close icon
 to close the Scheduled Reports page.
You can edit your own previously scheduled reports. To edit a scheduled report created by another user, you must have Administrator permissions for the application associated with the report.
To edit a previously scheduled report, complete the following steps:
-
Ensure you are in the project where the report was scheduled.
-
Open the application for the report and select Reports in the application title bar to open the Reports view.
-
Alternatively, you can access reports from the Report Manager application. Navigate to Apps > Administration > Report Manager application. Under Applications, select the application for which you want to manage scheduled reports.
-
Select the report with the associated scheduled report that you want to modify.
Note To identify which reports are associated with a schedule, click on the Schedules column header to sort the report list by the number of scheduled reports. To make the Schedules column easier to access, click the column header and drag it to another location.
-
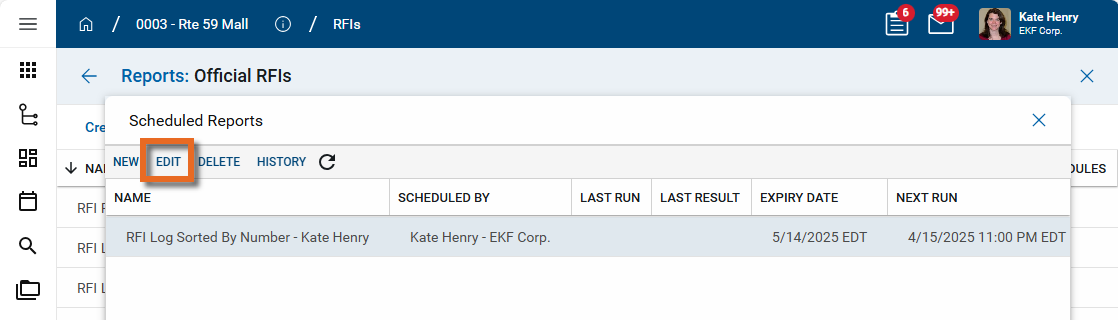
Select Manage Scheduled Reports in the action bar. The Scheduled Reports window for the selected report opens.
-
Select the scheduled report and click Edit.
-
Make your modifications. Refer to Schedule an existing report for field descriptions.
-
Click Save when you are done and to return to the Scheduled Reports page.
-
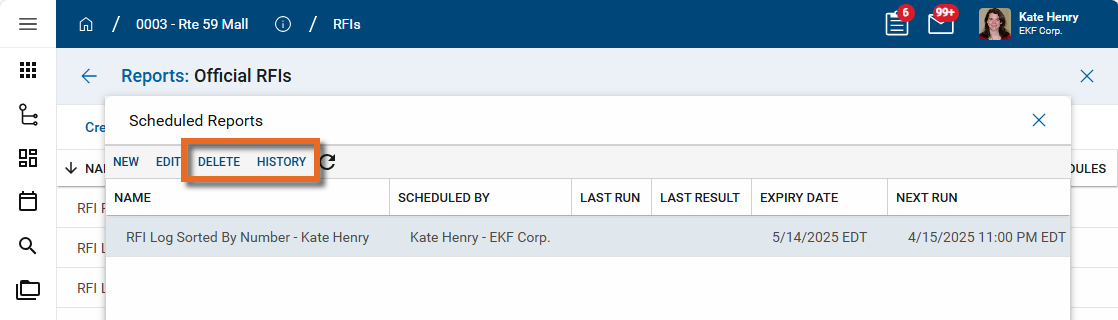
To delete the report schedule, click Delete. To view information on when the report was run, click History.
-
Click the Close icon
to close the Scheduled Reports page.