Configuring Public File Links
Public file links (previously named "Anonymous File Links") allow users to send unique URL links for files or folders stored in the File Manager application to any Kahua user or non-user. The recipient of the link can then download some or all of the files locally without having to log in to Kahua to do so.
When this feature is disabled, links to files can still be sent but the recipient must be a Kahua user and they will need to log in to Kahua to open the files. The links cannot be opened anonymously.
For more information on how to use this feature, refer to Public File Links.
Key elements of this feature include the following:
-
When this feature is enabled, the recipient of the link does not need to be a Kahua user to download the files.
-
When this feature is disabled, links to files can still be sent but the recipient will need to log into Kahua to open the files. They cannot be opened anonymously.
-
Public file linking can be configured at the partition, or project level.
-
Domain administrators can determine at the partition or project level if links should be always available or if they should expire after a set number of days. If they are set to expire, the recipient will no longer have access to the file after that number of days.
-
The file download will always pull the latest version of the document as determined by Kahua version control, unless the Auto-expire all links when new version uploaded setting is enabled.
-
When a link is sent, the files are made available to the recipient to download locally. This allows for a bypass of any email file size limits that would be encountered if the user attempted to send the files directly in an email message.
Important This is not a dynamic share. The recipient can only download the files. They cannot update or contribute to the document in Kahua. If your goal is to collaborate with a third party, you can use the Kahua sharing feature. Refer to Understanding how Kahua sharing works.
How to . . .
Public link file access can be enabled or disabled at the domain level in the Domain Settings application. If enabled at the domain level, you can then use configuration settings at the partition, project, and folder level to enable, disable, or additionally configure the public file link settings.
If public link file access is disabled at the domain level, it cannot be enabled anywhere in the domain. When this setting is disabled, links to files in the File Manager application can still be sent, but the recipient will need to log into Kahua to open the files. They cannot be opened anonymously.
To enable or disable this setting, complete the following steps:
-
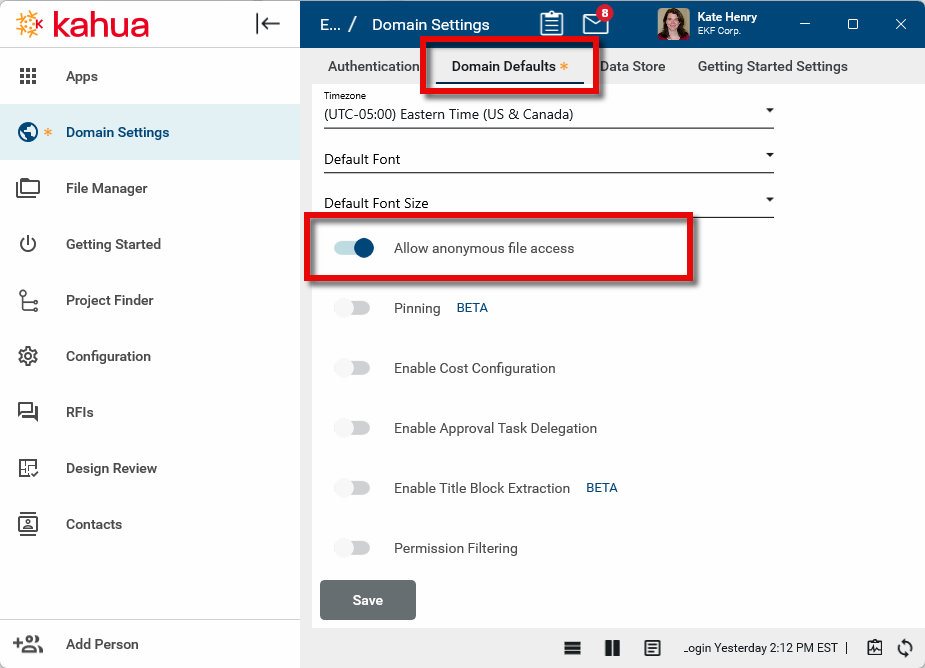
Navigate to Apps > Administration > Domain Settings. Open the Domain Settings application.
-
Open the Domain Defaults tab.
-
Select the Allow public links toggle.
-
Click Save.
When public link file access is enabled at the domain level, it can be configured or disabled at the partition or project level. The setting follows the Kahua inheritance model. That is, if it is enabled at some point in the hierarchy, it will be enabled at all points lower in the hierarchy unless those settings are overridden.
To configure public file linking at the project or partition level, complete the following steps:
-
Review the header to ensure that you are in the correct project or partition. To apply these settings to your domain, ensure that you have navigated to the root level.
-
Open Apps > Administration > Configuration.
-
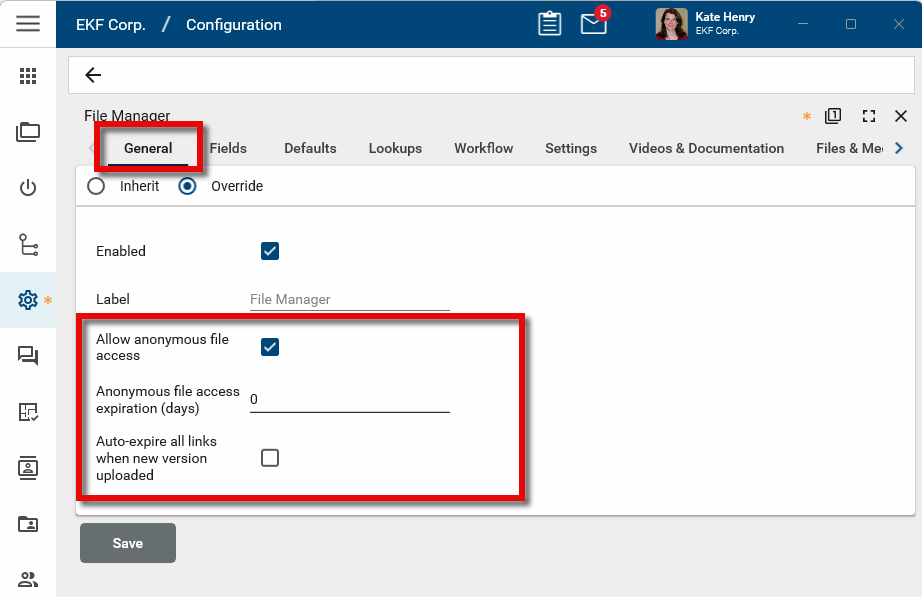
On the Applications tab, select File Manager.
-
On the General tab, select Override.
-
Configure the following settings:
Setting Description Allow public links
Select this option to allow users to send public file links from this partition or project.
Public link access expiration (days)
Set the number of days after which public file links will become invalid. To have links never expire, enter 0.
By default, recipients will access the latest version of the shared file, regardless of when the link was sent.
If this option is selected and a newer version of the linked file is uploaded, the original link will expire and recipients will be instructed to contact the sender for a new link.
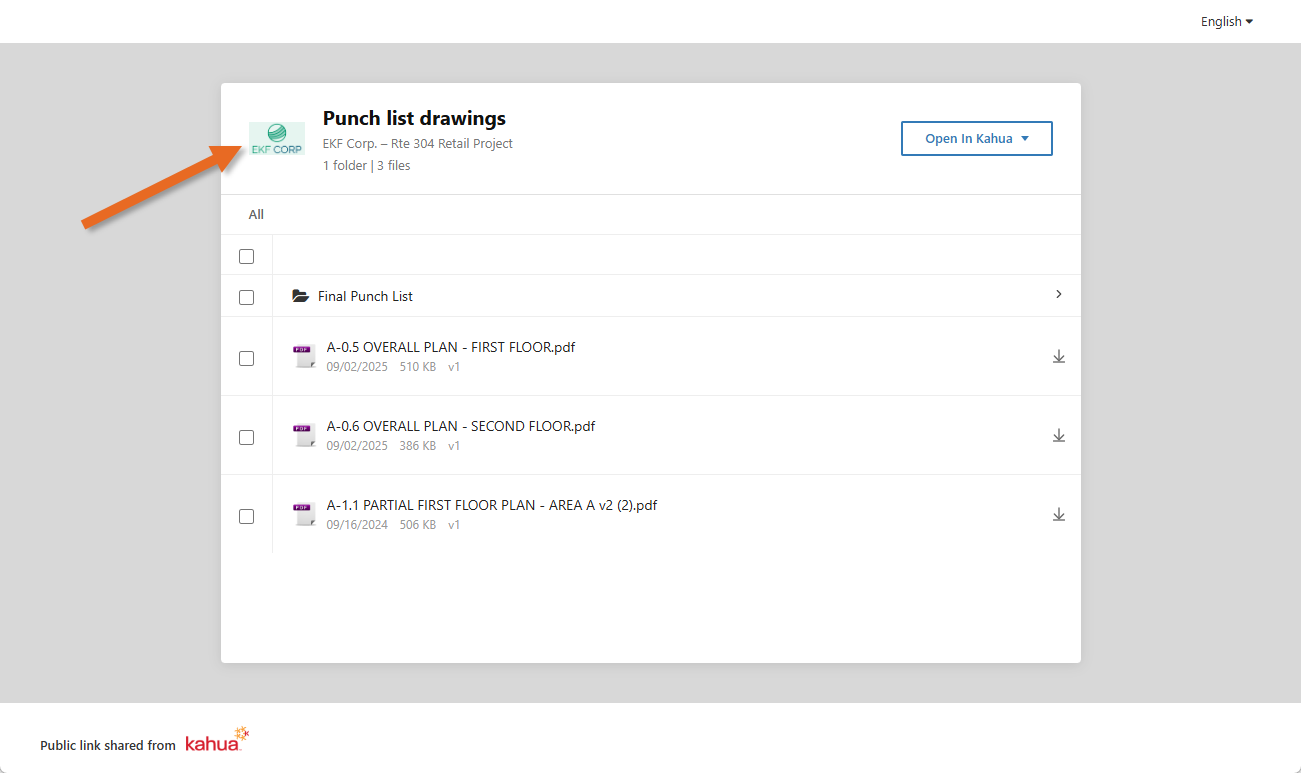
When the public link is opened, your logo appears in the upper left corner. The logo is set up in Domain Settings > Home Page Settings > Branding Information. For more detailed information, refer to Home Page Settings.