Dashboards app
Dashboards is a domain-level application that uses data feeds to present a variety of visuals, including charts, lists, and webcams. The primary purpose of a dashboard is to present information in a variety of formats that will allow a user to make decisions around actions that may need to be taken, such as responding to overdue items. Dashboard definitions follow Kahua’s inheritance model as a user navigates from project to project, so that a single dashboard definition can be used on multiple projects. Dashboards can be created for personal use or shared with groups in the domain.
Important This Dashboards application is separate from the Kahua Analytics Dashboards. Refer to Kahua Analytics.
For more information on using Kahua Analytics Dashboards in your domain, contact support or your account representative.
Key elements of the app are as follows:
-
Each dashboard is a collection of widgets viewed on a single named page. The user who creates or edits the dashboard can control the size and location of individual widgets.
-
You can create multiple dashboards and have them available on multiple projects.
-
The Dashboards app is a domain level app, so dashboards created in the app are available in all projects. However, the data that appears on a dashboard is based on the currently open partition or project.
-
Even though dashboards can be created at any point in the hierarchy, the log views that widgets are based on must be created high enough up in the hierarchy so that they are available for all the projects where you want to use them.
-
The data that appears in a dashboard can be from just the currently open project, or it can include projects below your current level in the hierarchy, depending on how the dashboard is configured.
-
To view a widget on a project's dashboard, a user must have access to the app in that project. Access to the data on widgets follows the user's permissions.
-
You can apply filters to the data on a dashboard at any time using the Filter drop-down menu.
-
A user can click on an item in a dashboard to drill through to the record or records in the application.
-
Users with the appropriate permissions can create dashboards for themselves, or they can share dashboards with one or more groups. Permissions are managed in the Groups app, just like any other app. Refer to Setting up groups.
How to . . .
Dashboards are available in the Dashboards application. Depending on your permissions, you may be able to view, edit, or create dashboards. Like all other Kahua apps, permissions are managed in the Groups app. Refer to Setting up groups.
To view or manage an existing dashboard, complete the following steps:
-
Navigate to the Dashboard application (select the Dashboard app icon
 from the launch bar or select Apps > All Apps > Dashboards).
 -
If the correct dashboard is not currently selected, click the drop-down menu in the upper left corner and select the appropriate dashboard.
-
On the dashboard, complete any of the following actions as desired:
Action Description Apply a filter Click on the Filter option next to the dashboard name. A list of available filters appear. Make the appropriate selection to apply it to your dashboard.

To remove filters, click on Filter and select Clear at the top of the list.
Open a dashboard for editing Click the Edit icon
 to open the dashboard up for editing.
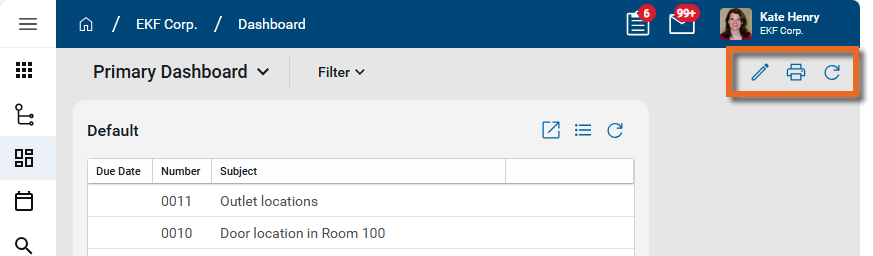
When you are done, click Save to save your changes. Click the Close icon
 to close without saving your changes. For more information on editing dashboards, refer to Create or edit a dashboard.
Print to a PDF Select the Print icon
 . A PDF of the current dashboard opens in a print dialog.
Refresh Click the Refresh icon
 to refresh the data.
Delete the dashboard Select the Edit icon
. Once the dashboard is open for editing, if you have the appropriate permissions, the Delete icon  appears. Select the Delete icon and click Ok on the confirmation message to delete the dashboard.
 Important Deleted dashboards cannot be recovered in the Recycle Bin app.
-
On a widget, complete any of the following actions as desired:
Action Description Access the underlying data Chart widgets - Click on a portion of the chart to open a log view filtered by the attribute group of the selected element. If there is more than one attribute grouping defined for that section, only the first will be used as a filter.
List widgets - Click on the Expand icon
 to open the current log view in the app. Click on an item in the list to open it in the app.
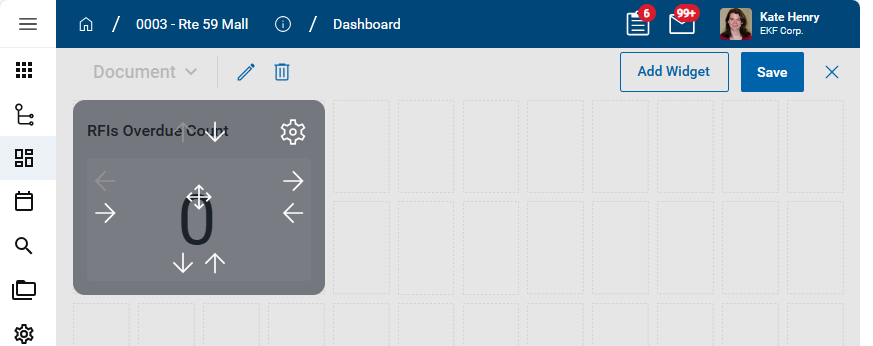
 Number Tile widgets - Click on the number to open the current log view in the app.
Change the list being viewed. If available, click on the list selector
 to filter the widget by a different list.
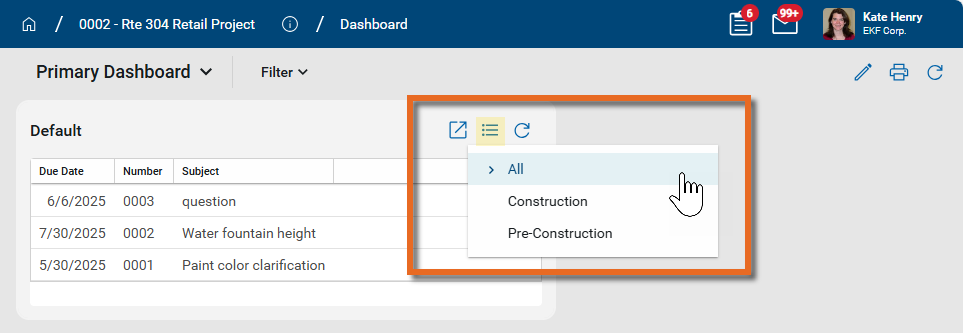
Note Not all apps use lists. For more information, refer to Lists.
Refresh Click the Refresh icon
to refresh the data.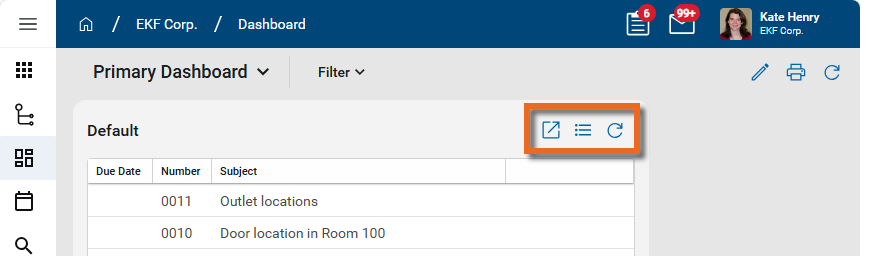
The Dashboards application is a domain level application. New dashboards can be created at any point in the hierarchy and they will appear in the dashboards application throughout the domain.
However, it is important that any views used by widgets on a dashboard are created at a level high enough in the hierarchy so that they are available for all the projects where you want to use them.
Example If you have two projects in the Northeast Territory partition, Project A and Project B, and you want them to use the same dashboard widgets, any views used in the widgets must be created in the Northeast Territory partition (or higher). If you create the view in Project A, it will not be available on the dashboard widgets in Project B.
To create a new dashboard, complete the following steps:
-
Navigate to the Dashboards application (select the Dashboard app icon
from the launch bar or select Apps > All Apps > Dashboards). -
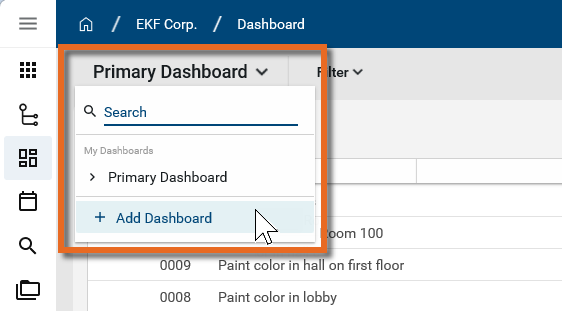
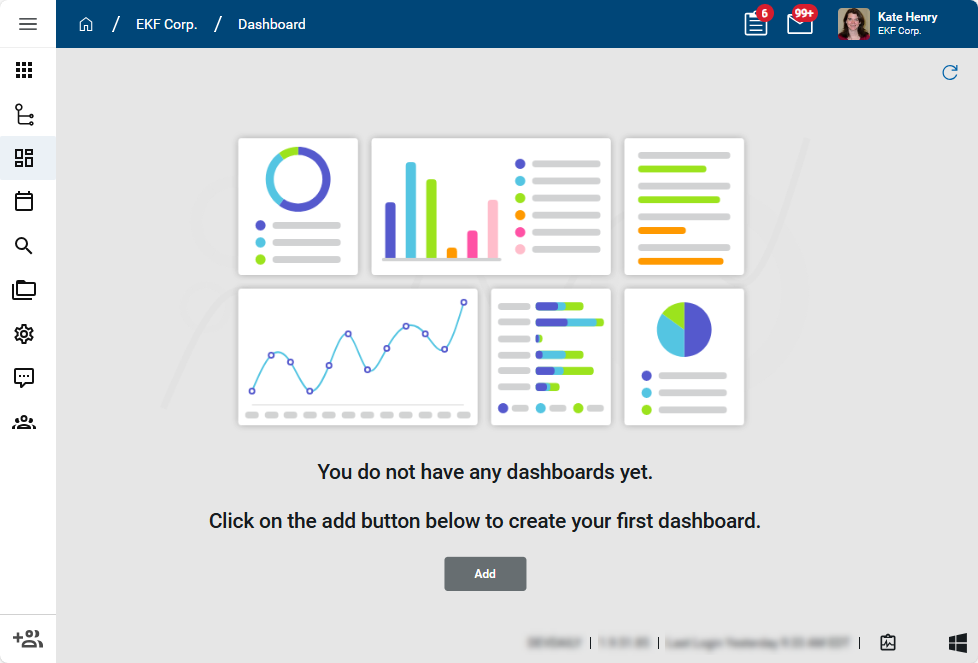
If this is your first dashboard, the page below appears. Click the Add button to create a new one.
If there is already a dashboard available to you and you want to add a new one, click the drop-down menu in the upper left corner to open the list of all available dashboards. Click + Add Dashboard at the bottom of the list to add a new one.
To edit an existing dashboard, click the drop-down menu in the upper left corner to open the list of all available dashboards. Select the dashboard you want to edit and click the Edit icon
 in the upper right corner.
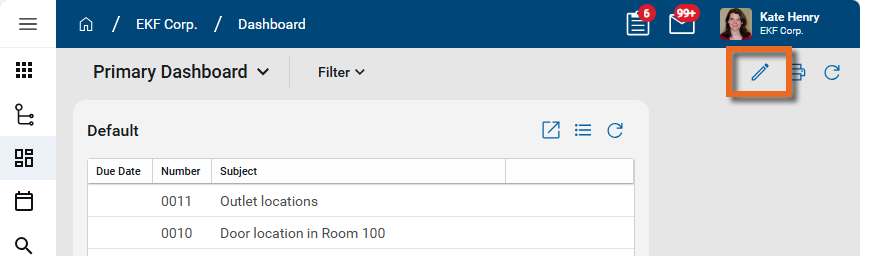
-
The Configure Dashboard dialog appears. Complete the following fields and selections as appropriate:
Field Description General tab Name Enter a name for the dashboard. Availability Select the appropriate availability:
-
All projects. - The dashboard resides at the root domain level and is available for all the projects in the domain.
-
This project and any project underneath it. - The dashboard resides in the current partition or project and is available at this point in the hierarchy and below.
Share Share Toggle this option on to share the dashboard. List of groups Select the appropriate groups names from the Groups app to share this dashboard with. For more information on creating groups, refer to Setting up groups. -
-
Click Add Widget to add content to the dashboard. Click Save when you are done. For more information on adding and managing widgets, refer to Add and edit widgets in the dashboard.
A widget is a single visual item on a dashboard that presents information from a selected dataset. Your dashboard can include multiple widgets. Examples of widgets would be a bar chart that displays punch list item counts by status, or a list of overdue RFIs.
To add a new widget, complete the following steps:
-
Review the header to ensure that you are in the correct project or partition.
-
Navigate to the Dashboard application (Apps > All Apps > Dashboards).
-
If the correct dashboard is not currently selected, click the dropdown menu in the upper left corner and select the one you want to modify.
-
Click the Edit icon
to open the dashboard up for editing and click Add Widget. -
Select the appropriate widget type from the Add Widget list. The available widget types include the following:
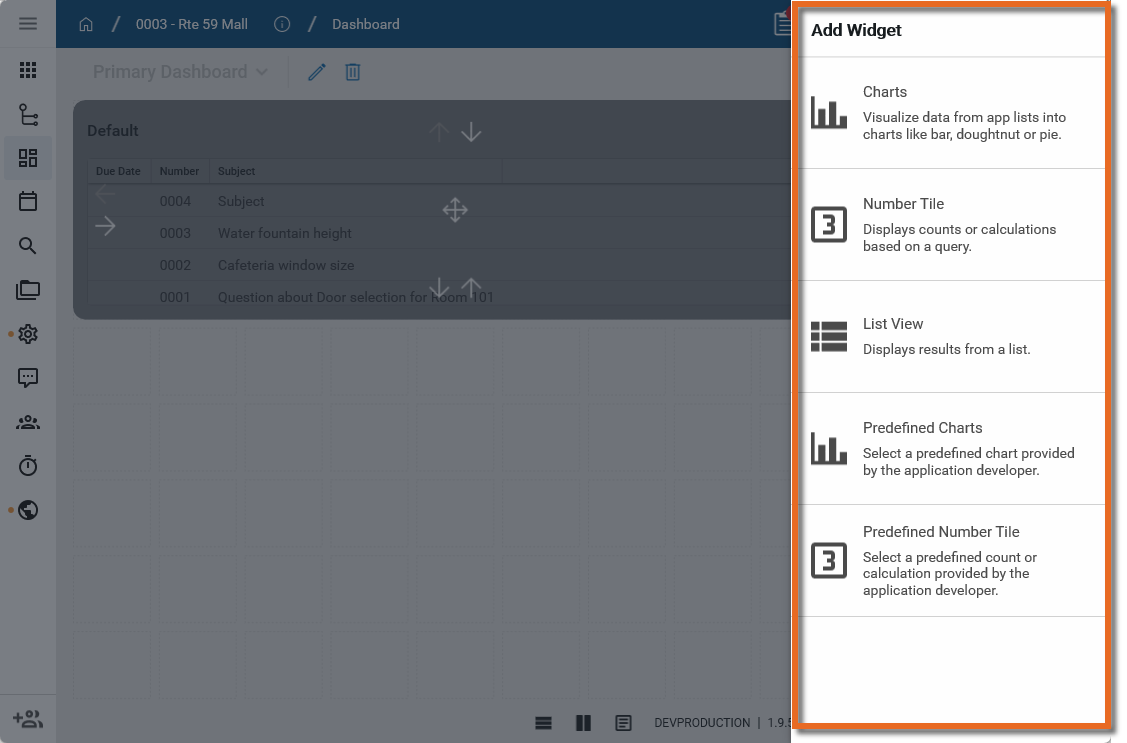
-
Charts - This option allows you to build a chart for a selected app based on a selected log view. Depending on the app and chart format selected, data can be grouped by different values, calculated in different ways, plotted along a linear or logarithmic axis, with various color and label selections.
The available chart formats are Bar, Stacked Bar, Clustered Bar, Doughnut, Line, and Pie.
-
Number Tile - This option displays a count or a calculation based on a selected log view.
-
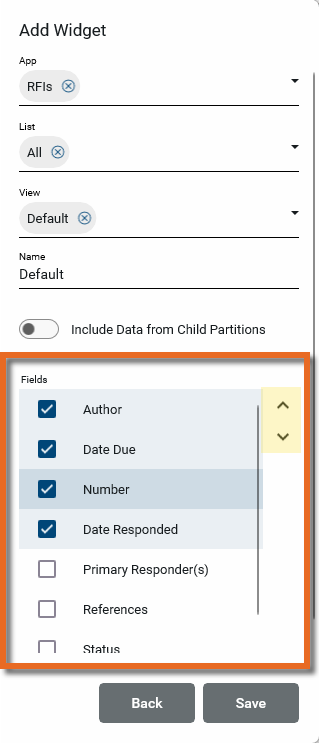
List View - This option displays a list of records from an app based on a selected view. You can determine what fields to include and in what order they should appear.
-
Predefined Charts - This option allows you to select from a list of predefined Chart widgets for a selected app.
-
Predefined Number Tile - This option allows you to select from a list of predefined Number Tile widgets for a selected app.
-
Video Stream - This option allows you to add a webcam to your dashboard.
Note The Video Stream option is only available in the Kahua Commercial Network (KCN). It is not available in the Kahua Government Network (KGN)
-
-
Complete the selections as appropriate.
Note Different selections will appear for different widget types.
Field Description Common to multiple Widget Types
App Select the app that is the basis of the widget. Name Enter a name for the widget. This name will appear as the title of the widget on the dashboard. In some cases, the name of the selected View may appear as the default, but this value can be modified.
Include Data from Child Partitions Select this option to include data from projects lower in the hierarchy in this widget.
Note Only projects that the viewer of the dashboard has access to will appear in the widget.
Entity This option only appears when the File Manager app is selected. Choose from the File Manager folder types of Controlled, File, or Media.
List This option will only appear when the selected app has multiple lists available. Choose the appropriate list.
View Select the appropriate log view for the selected app. The columns available in the View determine the attributes available in the widget parameters.
If the desired view does not exist, create a new view in the application.
Important For dashboards to function correctly across projects, custom views for individual dashboard widgets must be set up at a high enough level in the hierarchy to be accessed by the projects where you want to use them.
Example If you have two projects in the Northeast Territory partition, Project A and Project B, and you want them to use the same dashboard widgets, any views used in the widgets must be created in the Northeast Territory partition (or higher). If you create the view in Project A, it will not be available on the dashboard widgets in Project B.
Widget This option only appears on Charts-type widgets. Select the appropriate data visualization from the selections of Bar, Stacked Bar, Clustered Bar, Doughnut, Line, and Pie.
Additional Parameters (in alphabetical order, not all options will appear for all widget or chart types)
Aggregation In the Number Tile widget type, use this option to count instances or provide a sum of numerical values in the selected column of data.
Calculation Depending on previous selections, you may be able to choose between the following options:
-
Count - A count of records returned.
-
Sum - A sum of the numerical values in the column of data.
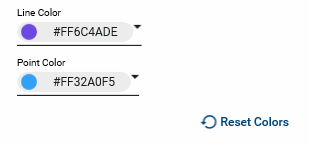
Color: Line color / Point Color / Reset Colors
In the Line chart widget type, make selections in the following options as desired:
Line Color - Select the line color.
Point Color - Select the color of the plot points.
Reset Colors - Click to return the Line and Point colors to the system defaults.
Fields In the List View widget type, a list of the available fields will appear. Select the appropriate fields. To modify the order in which the fields display, select a field and click on the up or down arrow icons

 .
.
Group By In a chart, select the appropriate field to group the data by. Depending on previous selections, the Add Grouping option may be available, allowing you to apply a secondary grouping of the data.
When grouping by a date field, the following options are available:
-
None - No grouping is applied.
-
Day – Records are grouped by the actual date, as a number (1, 2, 3, etc.).
-
Month – Records are grouped by the month of the date (January, February, etc.).
-
Weekday – Records are grouped by the day of the week for the date (Monday, Tuesday, etc.).
-
Year – Records are grouped by the year of the date (2025, 2026, etc.).
Hide Legend In the Stacked bar and Clustered Bar chart widget types, select this option to remove the legend from the chart output.
Horizontal In the Stacked bar and Clustered Bar chart widget types, select this option to flip the x and y axis. This results in horizontal bars.
Ratio Totals the Calculation value for Count/Sum and returns results spread across the total, for a ratio of 100%. All bars will be the same size.
Rotate Labels It may be helpful to rotate the labels to increase the amount of space for the image on the widget.
For the Video Stream widget type, select the appropriate Webcam Stream.
Webcam streams are set up for your project in the Configuration app. For more information on setting up webcam streams, refer to Webcam.
Series By In the Stacked Bar and Clustered Bar chart widget types, select one or more attributes to build the "stack" or "cluster" portion of the bar.
Depending on previous selections, the Add Grouping option may be available, allowing you to apply a secondary grouping of the data series.
The output will include a legend based on the defined series.
Vertical Axis Depending on previous selections, you may be able to choose between the following options:
-
Linear - Provides evenly distributed X-axis based on the values
-
Logarithmic - Provides scaled X-axis based on the values. Negative numbers are not supported.
Source In the Predefined Charts and Predefined Number Tiles widget types, once you select the app, the available widget sources appear. Select the appropriate source.
-
-
Click Save to save your changes. Click Back to return to the widget type selection page.
-
Once the widget is created and appears on the dashboard, you can modify its size and placement on the page.
-
Use the left / right and up / down arrows on the widget to adjust the width and height of the widget, or click and drag the edge of the widget to move that edge to the desired location.
-
Click on the center arrow icon to move the widget to another location on the page.
-
Click the gear icon
 and select Edit to re-open the widget settings page.
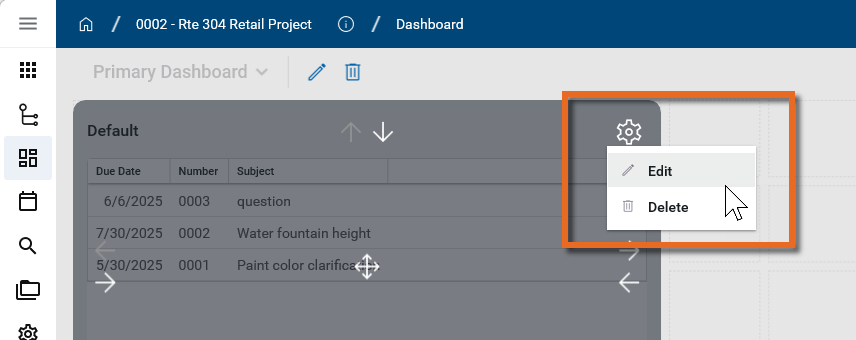
-
Click the gear icon and select Delete to remove the widget from the dashboard.
-
-
Click Save on the upper right corner of the dashboard when you are done.
Your domain administrator or another user with the appropriate permissions can configure the app in the Configuration application.
Important Because this is a domain-level app, you must navigate to the root domain to access Configuration for this app.
The Configuration app can be accessed directly through the apps list (Apps > Administration > Configuration).
For general information on configuring this app in Configuration, refer to Application configuration.