Configuration app
The Configuration app is where you configure all applications and multiple settings for your domain, partitions, and projects. Users in the Domain Administrator group have access to the Configuration app. Other users may be granted access to some or all elements of the app through group permissions. Refer to Setting up groups.
Important When working in the Configuration app, it is important to review the header and ensure that you are working at the correct level in the hierarchy, either the root domain or at a partition or project level.
Settings that you establish at the root domain or lower levels will inherit down the hierarchy until they are overridden. For more information on the hierarchical structure of Kahua, refer to Understanding the hierarchical structure of Kahua.
The Configuration app can be accessed directly through the apps list (Apps > Administration > Configuration), or by right-clicking on an application in the launch bar and selecting Configure. When you select Configure for an app from the launch bar, the detail view of the configuration page for that application opens automatically.
The following tabs are available in the Configuration application:
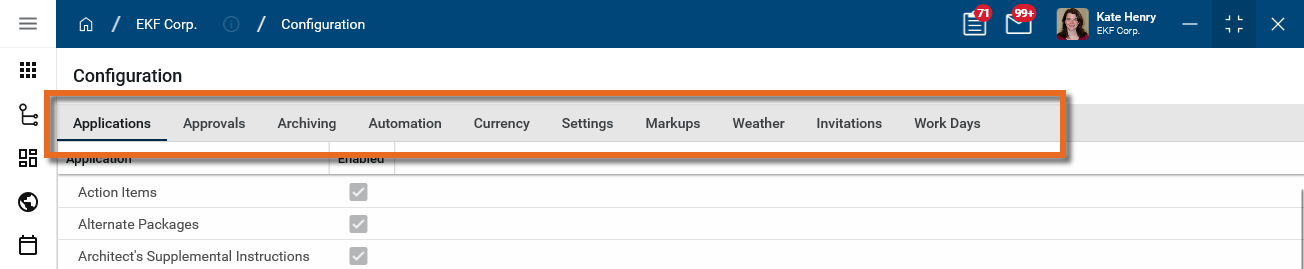
On this tab you access configuration settings for each application. You can enable or disable an application, and if applicable, modify numbering schemes, control which fields are visible and if any are required, enter default values, manage lookup lists, add portable views, select workflows, and manage other settings.
For more information on configuring applications, refer to Application configuration.
Note When apps are grouped together under a main app heading, the main app may appear in the applications list, but all the configuration occurs in the sub-applications. In these situations, selecting the main app heading may generate an "Access Denied: You do not have rights to the app App Name." error message. This indicates that you must select the sub-applications to access the app configuration settings.
On this tab you can establish and modify approval workflows for cost applications. Kahua allows you to define linear workflows that are in line with your company's business processes. In this tab, the Review and Signature workflows for various applications are defined, including the determination of task type (Kahua or Docusign), the order of approvals, any thresholds associated with the approval roles, and any additional workflow logic.
For more information, refer to Approval configuration.
Note Users who are not domain administrators can be granted the ability to manage Approvals by being a member of a group with that permission. In the Groups application > Group name > Permissions tab > Configuration section, select the Approvals Administrator permission. Refer to Manage permissions for a group.
Applicable Packages This section applies to the Kahua for K-12 Education, Kahua for Owners, Kahua for General Contractors, and Kahua for Subcontractors packages, and to domains using custom extensions that include this functionality. If you are not sure if this is relevant to you, please contact your domain administrator.
Important This tab only appears if the Enable Cost Configuration setting is selected in Domain Settings > Domain Defaults (navigate to Apps > Administration > Domain Settings).
On this tab you can configure cost settings for your project.
Depending on your settings, there are two sub-tabs available.
On the Configuration > Cost tab > Cost sub-tab, you establish cost guards and control
To modify these settings, complete the following steps:
-
Review the header to ensure that you are in the correct project or partition.
-
Navigate to the Configuration application (Apps > Administration > Configuration).
-
Select the Cost tab. Select the Cost sub-tab.
-
Select Override.
-
On the General tab, make the following selections as appropriate:
-
Budget / Expense only at leaf nodes - When these options are selected, only the last level of an activity code in the project's WBS structure can be assigned to a budget or expense item.
-
For expenses, only show activity codes with budget - Select this option to require expense items to only use activity codes that are in selected statuses in the project’s existing budget documents. Select the appropriate values in the table.
-
-
On the Cost Guards tab, select Use Cost Guard to prevent expenses for an activity code from exceeding the activity code’s assigned budget is selected statuses. Make the appropriate selections on the budget side and the expense side.
The multi-project cost documents feature allows you to create cost documents in one project, typically at a program (parent) level, that include line items associated with child projects. For more information, refer to Multi-Project Cost Documents.
To be available for selection here, the multi-project cost documents feature must first be enabled for your domain on the Domain Settings > Domain Defaults page. Refer to Enable Multi Project Cost Documents.
To enable the Multi Project Documents on your project, complete the following steps:
-
Navigate to the Configuration application (Apps > Administration > Configuration).
-
Select Cost > Multi Project Documents.
-
Select Enable Multi Project Cost Documents on this Project.
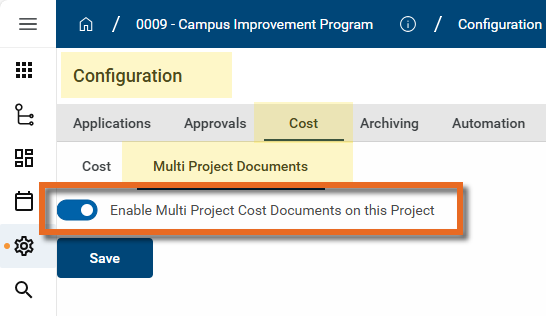
Important Unlike other settings, this setting is not inherited from the project above it in the hierarchy. It must be enabled for each project or partition where you want to apply it.
-
Click Save.
Note Users who are not domain administrators can be granted the ability to manage Cost by being a member of a group with that permission. In the Groups application > Group name > Permissions tab > Configuration section, select the Cost Administrator permission. Refer to Manage permissions for a group.
When a project is complete, it can be archived. The project becomes read-only and cannot be modified.
Note To preserve records of a project while the project is in progress, consider using the Project Snapshot feature. Refer to Project Snapshots.
To archive a project, complete the following steps:
-
Review the header to ensure that you are in the correct project or partition.
-
Navigate to the Configuration application (Apps > Administration > Configuration).
-
Select the Archiving tab.
-
Select Archived to archive the project.
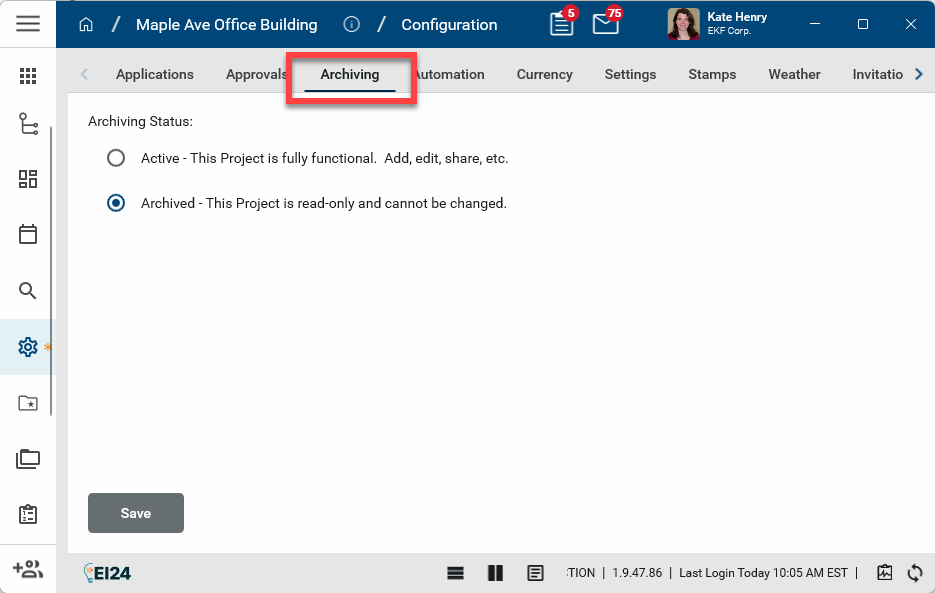
Important Only the project you are currently in will be archived. Projects lower in the hierarchy are not impacted. You must archive each project individually.
-
Click Save. The project is archived. No modifications to records in the project can be saved.
-
To open the project back up for editing, select Active and click Save.
Note Users who are not domain administrators can be granted the ability to archive projects by being a member of a group with that permission. In the Groups application > Group name > Permissions tab > Configuration section, select the Archiving Administrator permission. Refer to Manage permissions for a group.
On this tab you can create and define automated processes, such as automation of daily reports to be created for a project.
Note Users who are not domain administrators can be granted the ability to manage Automations by being a member of a group with that permission. In the Groups application > Group name > Permissions tab > Configuration section, select the Automation Administrator permission. Refer to Manage permissions for a group.
The Authorization tab is used to manage authentication related to the Kahua API. It becomes available when one or more users are added to the API User group. Refer to Review system groups.
Users with access to the Kahua Wiki can reference this page for detailed information regarding API authentication and this page for more general information on the Kahua API.
Note If you do not have access to the Kahua Wiki, please reach out to Kahua Enablement at enablement@kahua.com. Note that you will be required to complete certain prerequisites before being granted access to the Kahua Wiki.
Default currency and exchange rates for partition and projects are established here. For more information, refer to Multi-Currency Configuration.
Note Users who are not domain administrators can be granted the ability to manage Currency settings by being a member of a group with that permission. In the Groups application > Group name > Permissions tab > Configuration section, select the Currency Administrator permission. Refer to Manage permissions for a group.
Important Before modifying these settings, review the header to ensure that you are in the correct project or partition.
Note Users who are not domain administrators can be granted the ability to manage Settings by being a member of a group with that permission. In the Groups application > Group name > Permissions tab > Configuration section, select the Settings Administrator permission. Refer to Manage permissions for a group.
The following settings are configured on the Settings tab of the Configuration app:
| Setting | Description |
|---|---|
| Disable Outbound Emails for all Users |
For sensitive or confidential projects, you can select Disable Outbound Emails for all Users so that outbound emails are not sent for tasks, notifications, or messages manually sent using the "Send" action, etc. No external emails are sent, except for system-generated ones such as Share invitations. Notifications are limited to the Kahua Messages app only. Users are only permitted to send content to other Kahua users as Message recipients. This means if the recipient does not have a Kahua account, the recipient will not receive the message. The sender is provided with a warning banner at the top of every message to let them know their message may not be delivered due to this setting. To disable outbound emails for some users in your current partition or project instead of all users, navigate to the Users app and select this setting for those individual users. Refer to Manage user email activity. |
| Allow Outbound Notifications |
Select this option allow users to receive generic email notifications for items that require their attention when Disable Outbound Emails for all Users is selected. When this setting is selected, users will receive a generic email to their provider mailbox, while the message with the full content is delivered to the Messages app within Kahua.
To allow generic email notifications for some users in your current partition or project instead of all users, navigate to the Users app and select this setting for those individual users. Refer to Manage user email activity. Note This setting is only available for selection when Disable Outbound Emails for all Users is selected. |
| Disable Adhoc Emails for all Users | Select Disable Adhoc Emails to require that the user select a contact in the To/CC/BCC fields of a message. The user will not be permitted to manually type an email address. Note: The selected contact will not need to be a Kahua user to be selected. Instead of disabling ad hoc emails for all users, this setting can be selected for individual users in the Users app. Refer to Manage user email activity. |
| Copy App Messages to Communications by Default | Select this option to have the Copy to Communications check box on messages selected by default for all users in the current partition or project. Users will be able to clear the check box prior to sending the message. For more information, refer to Messages app. |
| Reporting Logo Source | Select the source to use for the logo file that appears in the header of reports for this partition or project. Select from the following choices:
For more information on managing your logo on reports, refer to Managing report logos. |
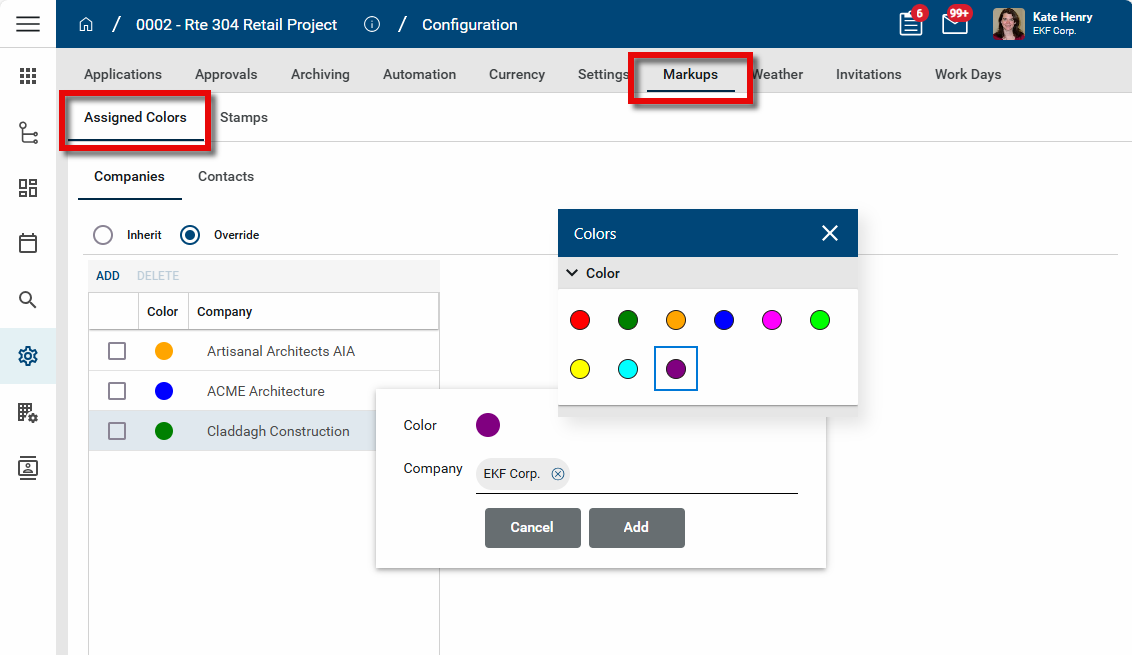
On this tab you can manage the markup colors assigned to companies or contacts and manage the stamps used on markups.
On this tab you assign a markup color to specific company’s users or individual users in the markup tool.
Important Enabling this feature does not affect existing markups. Assigning colors only affects markups that are created after the color is assigned.
Note Users who are not domain administrators can be granted the ability to manage color assignment by being a member of a group with that permission. In the Groups application > Group name > Permissions tab > Configuration section, enable the Markup Colors Configuration Administrator permission. Refer to Manage permissions for a group.
Key elements of this feature are as follows:
-
The color assignment applies to the line and text color only.
-
If a color is assigned to a company or contact in a project or partition, the user cannot change it when they are creating markups.
-
When a color is assigned to a company or contact in a project or partition, the color is assigned for markups in all relevant apps in that project or partition in Kahua (i.e. File Manager, Reference section files, and anywhere you can mark up a document).
-
A company or contact cannot be assigned to more than one color. An error message will appear if you try to save a second color assignment for a particular company or contact.
-
A contact color assignment will override any company color assignment, i.e., if a user has been assigned a color, and their company has been assigned a different color, the color directly assigned to the contact will be applied to any markups they create, not the color assigned to the company.
-
Fill color automatically defaults to "none" for users with color assignments, unless the user has selected Remember Prior Setting for the fill color. Users with assigned colors can modify their fill color from the color palette when in markup mode.
-
When a company or contact is assigned a color for markups, the color assignment overrides the Remember User Prior Settings, except for fill color.
-
Color assignments work through shares when a user has an assignment and is marking up a document through a share or a workflow task.
To assign a color to a company or contact, complete the following steps:
-
Review the header to ensure that you are in the correct project or partition.
To assign colors to for use throughout your domain, ensure you are at the root domain. To assign colors for a particular partition or project, ensure that you have navigated to that partition or project level.
-
Navigate to the Configuration application (Apps > Administration > Configuration).
-
Select the Markups > Assigned colors tab.
-
Select Override.
-
To assign colors to companies, select the Companies tab. To assign colors to an individual contact, select the Contacts tab.
-
Click Add. The color selection dialog appears.
-
Click on the color sample to open the color selector. Choose the appropriate color.
-
Click in the Company or Contact field and make the appropriate selection.
-
Click Add to complete the selection.
-
Click Save when you are done.
To change the color assigned to a company or contact, click on the color sample for that company or contact. The color selector appears. Make the appropriate selection to change the color. Click Save to save your changes.
To remove a color assignment, select the check box for the assignment and click Delete. Click Save to save your changes.
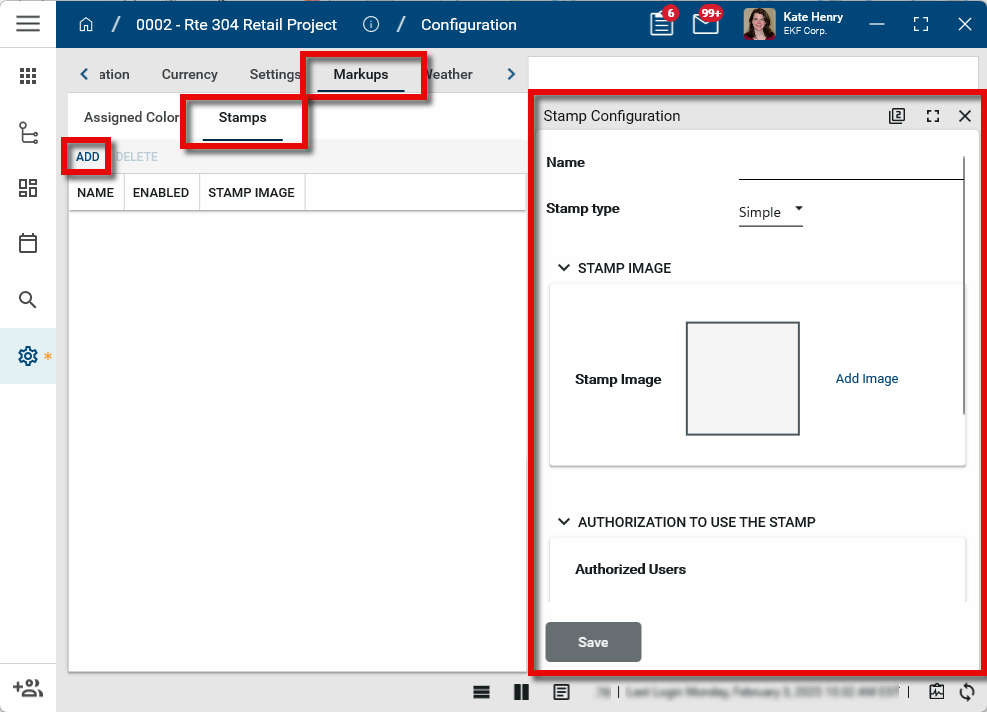
Stamps are used in markups, typically to indicate approval or rejection of documents or drawings, but they can be used for whatever purpose makes sense for your organization. For more general information on stamps, refer to Using Stamps.
Note Users who are not domain administrators can be granted the ability to administer stamps by being a member of a group with that permission. In the Groups application > Group name > Permissions tab > Configuration section, enable the Stamp Configuration Administrator permission. Refer to Manage permissions for a group.
There are two types of stamps that can be set up, Dynamic and Simple. Dynamic stamps capture certain information at the time that the stamp is applied, such as the date, user or user company, project data, submittal data and so on. The information that each dynamic stamp will capture is managed by your administrator. Simple stamps do not capture any additional information and behave like any other markup applied to the drawing.
To add a stamp, complete the following steps:
-
Review the header to ensure that you are in the correct project or partition.
To set up stamps for use throughout your domain, ensure you are at the root domain. To set up stamps for a particular partition or project, ensure that you have navigated to that partition or project level.
-
Navigate to the Configuration application (Apps > Administration > Configuration).
-
Select the Markups > Stamps tab.
-
Click Add. The Stamp Configuration page opens.
-
Enter a Name for the stamp.
-
Select the appropriate Stamp type.
-
Simple - Simple stamps behave like any other markup applied to a drawing or document.
-
Dynamic - Dynamic stamps capture selected information at the time that the stamp is applied, such as the date, user or user company, project data, submittal data and so on.
-
-
In the Stamp Image section, click Add Image to select an image to use as the stamp image. The selected image file can be a JPG or PNG format and must be a maximum of 1 MB in size.
-
If you are creating a dynamic stamp, select Configure Dynamic Fields. This option is not available until you have uploaded an image file.
-
Make a selection in Fields from App.
-
Click Add. Select a field from the drop-down list.
-
Click on the color field to select a color for the text. Determine if the text should wrap. Determine if the text should be right-justified.
-
Once those selections are complete, click and drag on the image to create a text box for the selected field. Once created, use the upper left corner handle to move the box. Use the lower right corner handle to modify the size of the box.
-
Click Add again to add another field and repeat the steps above. To remove a field, click on it and select Remove. Click Save when you are done.
-
-
To limit who has the ability to apply this stamp, add a user, multiple users, or groups of users to the Authorized Users field, or add a company to the Authorized Companies field. If both fields are left blank, then any user can apply this stamp.
-
Select Lock Modifications to lock the stamp in place once it is saved. Prior to saving, the stamp can be moved, re-sized, or removed. Once saved, with Lock Modifications selected, only a Domain Administrator will be able to modify or remove the stamp.
-
Click Save when you are done.
The stamp is added to the list of stamps. To disable a stamp, click on it to open the detail view, clear the Enabled check box, and click Save. This can be useful to disable a stamp at a particular partition or project level in your domain, leaving it available for use at another level.
Weather data can be configured for each project. Once configured, the weather data is collected at a selected frequency and stored. It is then available to be added to Daily Reports by selected Add Daily Conditions on the weather section of a daily report. It also appears on the project's widget on the Kahua home page.
For detailed instructions on configuring weather data, refer to Configuring weather data for a project.
Note Users who are not domain administrators can be granted the ability to manage the weather configuration by being a member of a group with that permission. In the Groups application > Group name > Permissions tab > Configuration section, select the Weather Administrator permission. Refer to Manage permissions for a group.
On this tab you can set up webcam livestreams that can be selected for use in a Video Stream widget in the Dashboards app. Refer to Dashboards app.
Note Video Stream widgets are only available in the Kahua Commercial Network (KCN).They are not available in the Kahua Government Network (KGN).
Important At this time, only webcam livestreams from OxBlue or Earthcam are supported.
To add a webcam stream, complete the following steps:
-
Review the header to ensure that you are in the correct project or partition.
-
Select Override.
-
Click Add Stream.
-
Enter the name of the stream. The name appears in the selection list when you are configuring the livestream widget in the Dashboards app.
-
Enter the URL of the stream.
-
Select Preview stream to open a preview window containing the livestream.
Note To remove a video stream from the list, click the Delete icon ![]() .
.
When you invite internal and external users to work with you in Kahua, they are sent an invitation email. The templates used to create those emails are managed here.
A system default template is used when new internal users are invited to your Kahua domain. This template can also be selected when you invite external users. You cannot customize the system default template, but you can add additional text to appear on the invitation. You can create additional templates to use when inviting external users. For detailed instructions on modifying the additional text for the system default template and creating additional templates for use when inviting external users, refer to Managing invitation templates.
Note Users who are not domain administrators can be granted the ability to manage the invitation templates by being a member of a group with that permission. In the Groups application > Group name > Permissions tab > Configuration section, select the Invitation Templates Administrator permission. Refer to Manage permissions for a group.
On this tab you can determine work days, such as office days, job site days, holidays, and exceptions to these days. By default, Active Days, meaning days the project is active, are set to Monday through Friday for both Office Days and Job Site Days. These selections can be used in conjunction with app settings to determine appropriate due dates in select applications, such as RFIs.
Note Users who are not domain administrators can be granted the ability to manage the Work Days settings by being a member of a group with that permission. In the Groups application > Group name > Permissions tab > Configuration section, select the Calendar Administrator permission. Refer to Manage permissions for a group.
To modify the settings on this page, complete the following steps:
-
Review the header to ensure that you are in the correct project or partition.
-
Navigate to the Configuration application (Apps > Administration > Configuration).
-
Select the Work Days tab.
-
Note that inheritance is managed per individual section, not at the tab level.
-
In the Active Days section, as appropriate, enable Office Days and Job Site Days and select the appropriate work days.
-
In the Holidays section, click Add to add a holiday. Enter a Description, a Date, and select Office Closed or Job Site Closed as appropriate. A day selected as a holiday will be considered an inactive day.
Note You may need to double-click in the Description field to enter text.
-
In the Exceptions section, click Add to add an exception. Enter a Description, a Date, and for Office Calendar or Job Site Calendar, select "Open" or "Closed" as appropriate. Exceptions override the status of a date to make it active or inactive, regardless of its setting for “Active Days” or “Holidays”. Exceptions only affect office and job site calendars. Exceptions do not impact straight calendar days.
-
Click Save when you are done.