Application configuration
The Configuration application is where you configure settings for your domain and for each application, at various levels through the hierarchy. There are multiple tabs in the Configuration app. This article outlines general information about settings found on the Application tab. For more information on the Configuration application, refer to Configuration app.
The Configuration app can be accessed directly through the apps list (Apps > Administration > Configuration), or by right-clicking on an application in the launch bar and selecting Configure. When you select Configure for an app from the launch bar, the detail view of the configuration page for that application opens automatically.
On this tab you access configuration settings for each application. You can enable or disable an application, and, depending on the application, potentially modify numbering schemes, fields, default values, lookups, portable views, workflows, and other settings. Some applications have the settings as described here, some have settings unique to that application. Below is a review of settings commonly found for applications.
The Configuration app follows the hierarchical inheritance model. Modifications made on the Applications tab inherits down through the hierarchy until they are overridden. For more information on the hierarchical inheritance model, refer to Understanding the hierarchical structure of Kahua.
Note If an app is open when its Configuration settings are updated, you may need to close and re-open the app for the settings to be applied.
The commonly available tabs and elements on the detail view for an application configuration are as follows:
Important Changes to each tab must be saved independently. You must click Save on all tabs that are modified to save your changes.
The General tab allows you to enable or disable an application. You may want to disable an application so it does not appear to users in your domain or in a certain partition or project.
Disabling an application in Kahua will hide that application from the Apps menu of all users, regardless of whether or not that user has permission to the application in Groups.
To disable an application, complete the following steps:
-
Review the header to ensure that you are in the correct project or partition.
-
Navigate to the Configuration application (Apps > Administration > Configuration).
-
Open the Applications tab and select the appropriate application. The application detail view appears.
-
Click on the General tab and select Override.
-
Clear the Enabled check box.
-
Click Save. The application will be disabled at your current level in the hierarchy and downwards, unless overridden at a lower level.
To re-enable the application for a particular project or partition, navigate to that partition or project, complete the same steps and select Enabled.
Note Some applications have additional settings on the General tab. Review the documentation for the application for more information on those settings.
Some apps, such as RFIs, Submittals, and Punch Lists, permit the creation of multiple list views. When utilized, records in the app will appear on one list but not any others.
The settings for each list can be configured separately, i.e., the settings on the Numbers tab, Fields tab, Defaults tab, Lookups tab, etc. can vary for each list.
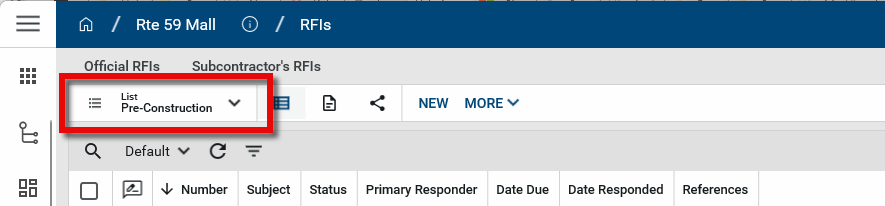
Example For example, in the RFIs app, you can have a "Pre-Construction" list and a separate "Construction" list. RFI numbers on the "Pre-Construction" list can be configured to have a prefix, such as a "PRE-0001" format, while RFIs on the "Construction" list can be configured to have a different one or none at all and instead follow a "0001" format. Similarly, Lookup values can be different for each list.
To create and configure lists, complete the following steps:
-
Review the header to ensure that you are in the correct project or partition.
-
Navigate to the Configuration application (Apps > Administration > Configuration).
-
Open the Applications tab and select the appropriate application. The application detail view appears.
-
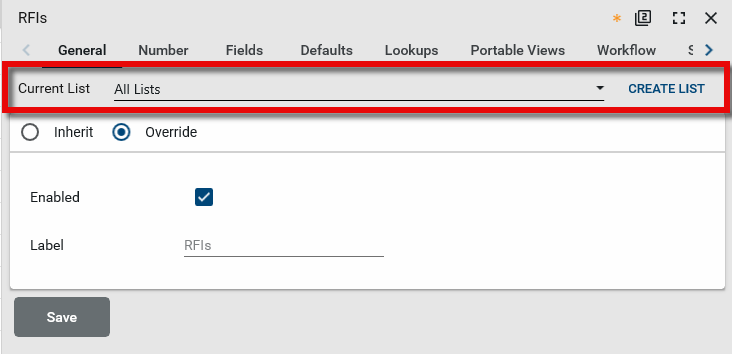
Click on the General tab. For apps that utilize lists, the Current List field will appear on the General tab.
-
Select Override.
-
To create a new list, select Create List. Enter a name and click Ok.
-
To enable or disable a list, select it from the drop-down menu. Select or clear the Enabled check box.
-
Review the various tabs and modify the configuration settings as appropriate.
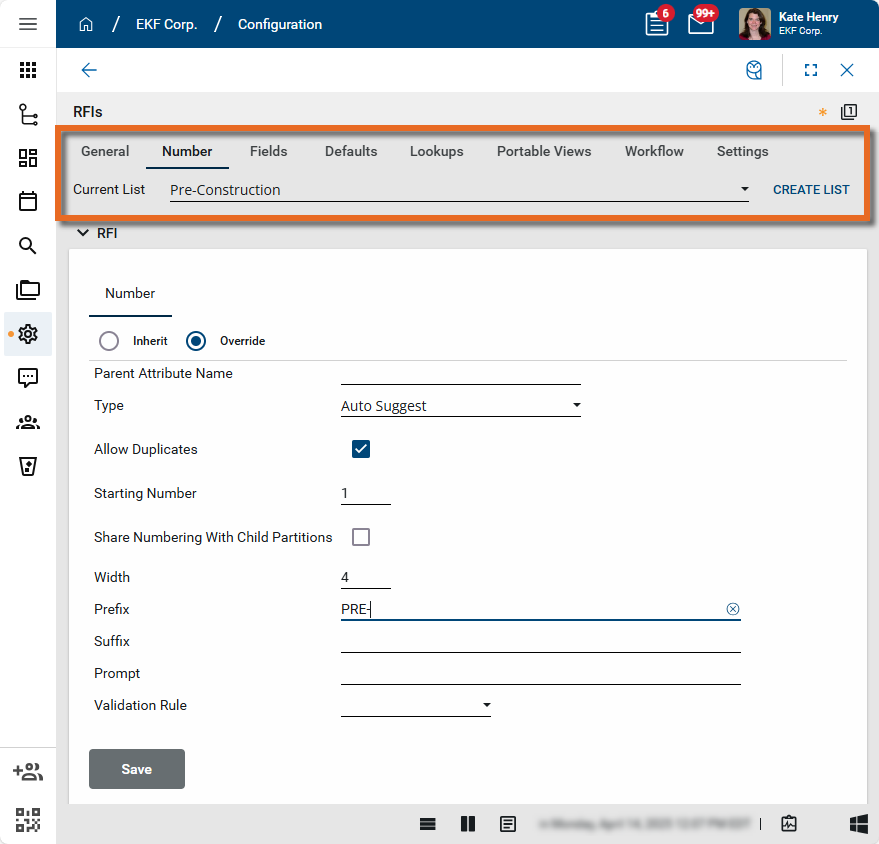
Example For example, to configure a numbering scheme for a specific list, select the Number tab. Select the list from the drop-down menu and make the appropriate changes.
-
Click Save to save your changes to this tab. The changes made will appear at your current level in the hierarchy and downwards, until they are overridden at a lower level.
-
The list name will appear next to the app name when the app is opened. To switch to another list in the app, select the drop-down icon
 next to the list name.
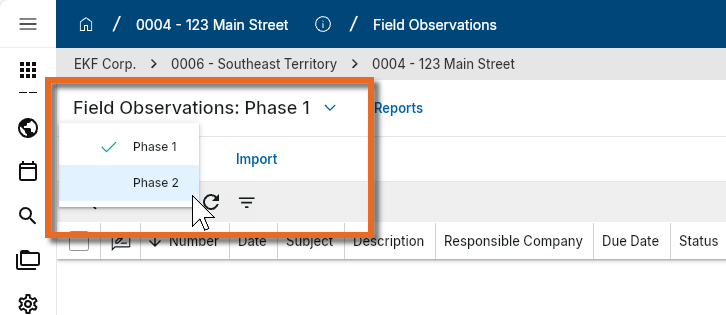
Note You must have more than one list set up for the list name to appear next to the app name.
The Number tab allows you to modify the numbering scheme for records in an application. Kahua provides flexibility to determine numbering format, assignment method (by default, manual, etc.) and whether the numbering is shared with other projects or isolated to each individual project.
If additional numbering formatting is required, Kahua supports the ability to set numbering to include prefixes/suffixes and/or define an attribute to be concatenated to a record’s number.
To modify the numbering scheme, complete the following steps:
-
Review the header to ensure that you are in the correct project or partition.The changes made here will inherit down the hierarchy until they are overridden in a partition or project at a lower level.
-
Navigate to the Configuration application (Apps > Administration > Configuration).
-
Open the Applications tab and select the appropriate application. The application detail view appears.
-
Click on the Number tab and select Override.
-
Review the following settings:
Field Name Description Current Number If this application has existing records, the Current Number field will appear with the last number used in the application. You can select Change to select a new number to be used. This will not modify any existing records. New records will be incremented by one from the number entered here.
Example If you have ten RFIs already created in the app, the Current Number in this field will be "10". If you select Change and enter "100" as the value instead, the next RFI created will be numbered "101", assuming Auto-Number is enabled.
Parent Attribute Name This field allows for definition of an attribute found on the project’s records to prompt unique numbering based on that parent attribute.
Example If the database name for the Vendor Company is entered here when creating numbering for Contracts, each contract with that vendor company will increment in number, but contracts with other vendor companies will be uniquely incremented.
Type Select one of the following options: Auto - Kahua will assign a number to each record upon creation. This number cannot be modified.
Auto Suggest - Kahua will default a number to each record upon creation. Users have the ability to modify this number prior to saving the new record or by editing the record at a future time (assuming that user has edit rights to that record).
Auto Suggest Next Whole Number - Kahua will default the next whole number to each record upon creation. Users have the ability to modify this number prior to saving the new record or by editing the record at a future time (assuming that user has edit rights to that record).
Manual - No number will be generated when creating a new record. Users will need to manually enter a value in the Number field.
Allow Duplicates Select this option to allow users to save a record with duplicate numbers.
This option is typically cleared if the Type field is set to "Manual" or "Auto-Suggest", as users can manually enter a number or edit a suggested number. If not selected, users will receive validation message if they attempt to save a record with a duplicate number.
Starting Number Enter a starting number for records in this application. The default value is "1".
If this application already has records created, the Starting Number appears as "Unavailable". You can instead use the Current Number field to establish a different number for new records to begin with. Existing records will not be modified.
Share Numbering with Child Partitions Allows projects at and below the current partition to share numbering. If not selected, each project will have its own set of numbers for this application. Width Allows for definition of how many characters each number should be when the Type field is set to "Auto", "Auto Suggest", or "Auto Suggest Next Whole Number". For example, if the Width is set to "4", the record numbers for this application would start with 0001, 0002, etc. Prefix / Suffix If a specific attribute or hard-coded value should be fixed to the start or end of a numbering scheme, enter it here. If intending to enter an attribute (such as Project Name, etc.), ensure the attribute entered is the database name as used on a Portable View.
If you are using a hard-coded value, simply enter it here. For instance, typing "RFI-" in the Prefix field will result in record numbers such as RFI-0001, RFI-0002, etc.
Prompt If a number is to be assigned upon save, or is dependent on selection of another field for a prefix/suffix/parent attribute, listing a prompt here will display this prompt in the Number field of the record until the proper attributes are selected.
Example For example, you could enter the following text to appear in the Number field: "Number will be assigned upon selection of …".
Validation Rule Select "Numeric Only" to validate that the number the user entered or the system created is numeric only. Additional validations may be added in custom applications. -
Click Save to save your changes to this tab. The changes made will appear at your current level in the hierarchy and downwards, until they are overridden at a lower level.
The Fields tab allows you to hide or expose fields for an application, relabel them, or make the fields required.
To modify the fields for an application, complete the following steps:
-
Review the header to ensure that you are in the correct project or partition. The changes made here will inherit down the hierarchy until they are overridden in a partition or project at a lower level.
Note To apply these changes to the whole domain, ensure that you are in the root domain.
-
Navigate to the Configuration application (Apps > Administration > Configuration).
-
Open the Applications tab and select the appropriate application. The application detail view appears.
-
Click on the Fields tab and select Override.
-
The Name of each field appears in the first column. These are all the fields available in the application. By default, some fields may not be exposed to users.
-
Locate the field you want to modify. You can edit the following three columns:
-
Label - To relabel the field, clear the original value in this column and enter the label as you want it to appear in the app.
-
Is Required - Select this check box to make this field required when the record is saved.
-
Is Visible - Select or clear the check box to make this field visible or not visible.
Important You can set a default value for a field that does not appear on records in the app (i.e. Is Visible is cleared). Refer to Defaults.
-
-
Repeat the process for all the fields you want to modify for this app.
-
Click Save to save your changes to this tab. The changes made will appear at your current level in the hierarchy and downwards, until they are overridden at a lower level.
Note Some applications have universal lookup fields available, which are custom lookup fields that can be used across multiple applications. For more information on universal lookup fields, refer to Universal Lookups.
The Field Groups tab is available for some applications. Depending on how you are using Kahua, you may want to work with a smaller subset of fields for an application. The different options on this tab control what fields appear in the application.
The Field Groups selections will override the visibility selections on the Fields tab.
Important The selection of fields included in each option is built-in and cannot be modified.
For assistance in implementing field groups in an app, reach out to Support or your account manager.
The Defaults tab controls default settings for an application and allows data to be defaulted into specific fields. The fields and settings that appear here vary by app.
Important Default values selected here apply to all newly created records in this app in the project or partition, regardless of whether or not Is Visible is selected for the field on the Fields tab.
For example, if you want all submittal packages to follow a sequential review in your project, you can set Sequential Review? to "True" on the Defaults tab, and clear the Is Visible option on the Fields tab. All newly created submittal packages will have the Sequential Review option selected. The field value is not editable, as it does not appear on the record.
To modify the default values in an application, complete the following steps:
-
Review the header to ensure that you are in the correct project or partition. The changes made here will inherit down the hierarchy until they are overridden in a partition or project at a lower level.
-
Navigate to the Configuration application (Apps > Administration > Configuration).
-
Open the Applications tab and select the appropriate application. The application detail view appears.
-
Click on the Defaults tab and select Override.
-
Select the Edit icon
 to the right of the field you want to select a default value for. The default selection dialog box appears.
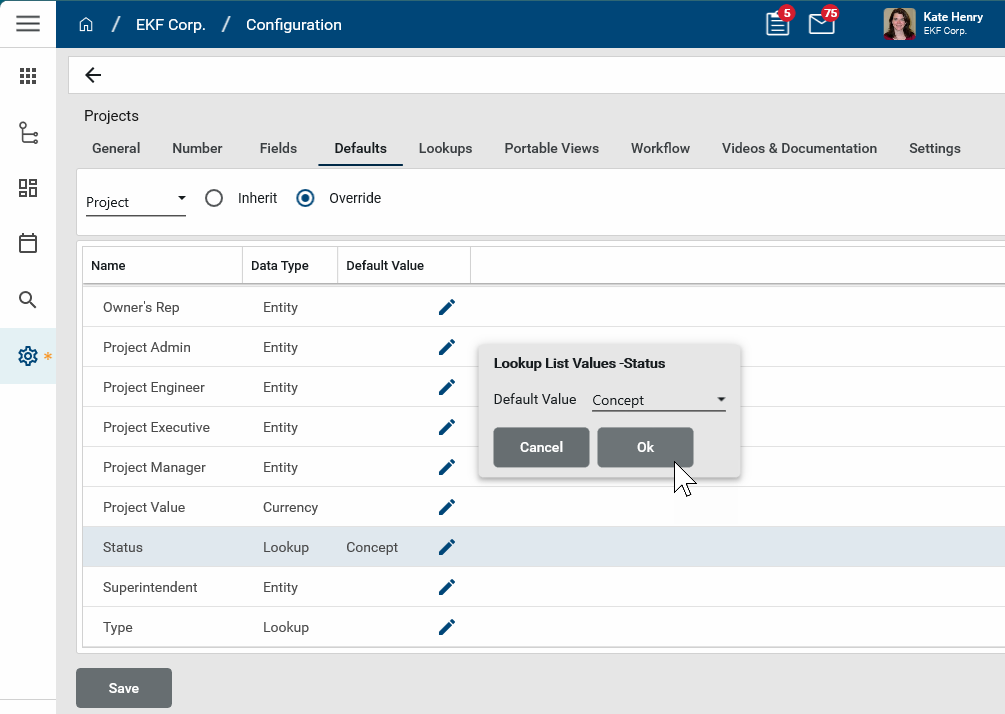
-
Depending on the type of field you are modifying (lookup, date, text, etc.), you will be prompted to select a value or define a value for that field. Select or enter a value and click Ok.
-
Repeat the process for all the fields you want to modify for this app.
-
Click Save to save your changes to this tab. The changes made will appear at your current level in the hierarchy and downwards, until they are overridden at a lower level.
The Lookups tab allows you to modify lookup values for fields that use drop-down lists. You can add new values, remove existing ones, or modify current ones.
To modify the lookup values for fields in an application, complete the following steps:
-
Review the header to ensure that you are in the correct project or partition. The changes made here will inherit down the hierarchy until they are overridden in a partition or project at a lower level.
-
Navigate to the Configuration application (Apps > Administration > Configuration).
-
Open the Applications tab and select the appropriate application. The application detail view appears.
-
Click on the Lookups tab.
-
On the left, select the field you want to modify. Select Override.
-
To add a new value, enter it at the bottom of the list and click Add. This will add it to the bottom of the list. Click the Up
 and Down
  arrows to move it to a new position.
Note If the move arrows do not initially appear, click Save to refresh the page.
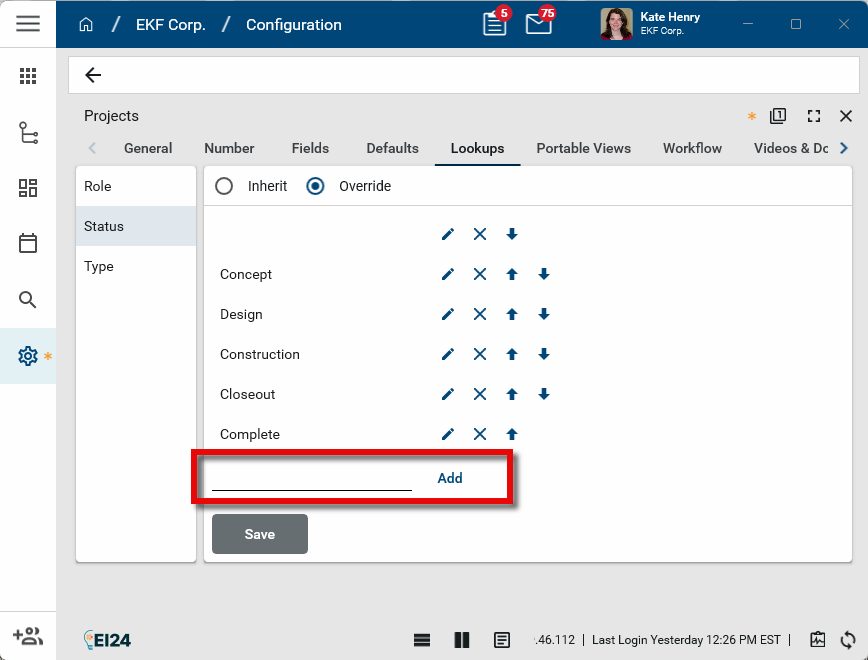
-
To remove a value, click the Remove icon
 for that value.
 -
To edit an existing value, click the edit icon
for that value. -
Make any additional changes to the order of the list by clicking the Up
and Down arrows to move values to a new position. -
Click Save to save your changes to this tab. The changes made will appear at your current level in the hierarchy and downwards, until they are overridden at a lower level.
Note Some applications have universal lookup fields available, which are custom lookup fields that can be used across multiple applications. For more information on universal lookup fields, refer to Universal Lookups.
The Portable Views tab is where additional portable views are installed for an application. A portable view (PV) is a PDF version of a Kahua record such as a letter, RFI, or contract. The base Kahua environment includes built-in portable views for each app. Here you can manage existing portable views and add new ones.
For more general information on portable views, refer to Portable Views.
For information on managing portable views on this tab, including how to add new ones, refer to Building a New Portable View Template.
The Workflow selections will vary for each application. Review the documentation for an application or contact Support or your account manager if you have questions about the workflow options for an application.
The Settings selections will vary for each application. Review the documentation for an application or contact Support or your account manager if you have questions about the settings for an application.
On this tab you can manage what videos and PDF documents are available to your users when they select Videos & Documentation from the application menu. For more information, refer to Accessing and Configuring Videos & Documentation.