Setting up groups
Important This article describes the process for setting up groups in domains created before the 2026.1 release. In those domains, the Groups app can be found in Apps > Administration. If your domain has the Groups app as a sub-application of the User Management app, it was created after the 2026.1 release or was migrated to use the new group management model and you should refer to Setting up groups under User Management.
Groups in the Groups application serve several functions:
-
Manage access to partitions and projects.
-
Manage access and permissions for applications.
-
Manage distribution groups for messages and notifications, and for selection as recipients for approval and review tasks.
You can set up separate groups for each function or have some groups serve multiple purposes.
Important things to know about the Groups app include the following:
-
Groups follow the partition/project hierarchy and inheritance model. Membership in a group is inherited down the hierarchy until it is overridden. For more information on the partition/project hierarchy, refer to Understanding the hierarchical structure of Kahua.
-
Inheritance for the Members tab and the Permissions tab of groups are independent of each other. You can override and modify membership in a group without disrupting the inheritance of permissions for the group.
-
Users can be members of one or more groups. The rights given to users in the groups is additive, not subtractive. For example, if a user is in a group that has moderator access to an app and also in a group that has observer access in the same app, the user will have all the permissions for the moderator level and all the permissions for the observer level.
-
Access to records can be filtered for many applications. For example, on some apps filters can be applied so that group members can only see records they created themselves or were created by a user from their company.
Note In order for filter options to appear, the feature must be enabled by selecting Permission Filtering on the Domain Settings app > Domain Defaults tab. Refer to Permission filtering.
-
Users with administrative rights to the Groups app are able to create and manage groups. If you want a user to be able to manage group membership but not edit group permissions, you can provide them with Moderator access.
-
There are several built-in system groups available in each domain. Their names and descriptions cannot be edited. The Domain Administrator and User Administrator groups provide administrative rights and their permissions settings cannot be modified. For more information, refer to Review system groups.
How to . . .
The following system groups may appear in your domain:
-
Domain Administrator - This group exists at the root domain. Members of this group have the Administrator role for all applications. The permissions settings for this group cannot be modified. You can add and remove members from this group.
Note The first person from a company who registers an account with Kahua sets up the Kahua domain and is assigned to the Domain Administrator group. For information on how to transfer those administrative rights to another user, refer to Transfer administrative rights to another user.
-
Domain User - When new users are created, by default they are added to this group at the root domain. This group allows general access to commonly used applications. Typically, when new apps are introduced to Kahua, members of the Domain User group have Contributor permissions by default.
Note If you do not want new users to automatically be added to this group, your domain administrator can select the Exclude new users from the Domain User group setting in Domain Settings app > Domain Defaults. This option is typically used by organizations with strict security controls that want to manually add new users to groups.
-
Team - This group can be used as a distribution list for messages. It cannot be used to provide permissions. Its members are users who have access to the current partition or project, i.e., users who are included in one or more groups at the current partition or project level.
-
User Administrator - This group exists at the root domain. Members of this group can add and remove users, and also grant or revoke user licenses. The permissions settings for this group cannot be modified. You can add and remove members from this group.
-
API User - This group is used to perform operations that may be in place to support integrations and other methods that call the Kahua APIs. This group only appears at the domain root.
When a user is added to the API User group, the Configuration > Authorization tab becomes available. Refer to Authorization.
Important You cannot modify the name or description of system groups.
You can create groups at the root domain level, or lower in the hierarchy. Generally speaking, when creating groups that manage permissions, it is a best practice to create groups at the root domain level. You can then add or remove group members at the appropriate level of the hierarchy to manage their access to projects or partitions.
To create a new group, complete the following steps:
-
Review the header to ensure that you are in the correct project or partition.
Important Groups follow the partition/project hierarchy and inheritance model, so it's very important that they are created at the correct level.
-
Navigate to the Groups application (Apps > Administration > Groups).
-
Select Create Group in the action bar. The New Group page opens.
-
Enter a name for the group. Click Save.
Note To later change the name of a group, select the group and open the General tab, review the Source field and navigate to that partition or project level in the hierarchy. Select Edit, update the value in the Label field, and click Save.
-
If you are currently in a project or partition and not at the domain level, a message appears to ask if you want to make the group available across all projects.
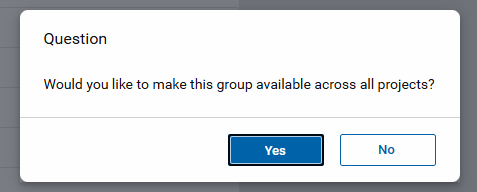
-
Select Yes to make the group available to all projects in your domain, regardless of your current location in the hierarchy. The group will be added at the root level of your domain. To delete this group in the future, you must access it from the root domain.
-
Select No to have the group appear at your current project or partition level and levels below it in the hierarchy.
Note If you select No now when you are creating the group, you can later select Make group available across all projects on the General tab to move the group to the root domain and make it available to all projects in your domain.
-
-
Modify each tab as appropriate.
-
General tab - Refer to Manage the General tab.
-
Members tab - Refer to Manage members in a group.
-
Permissions tab - Refer to Manage permissions for a group.
-
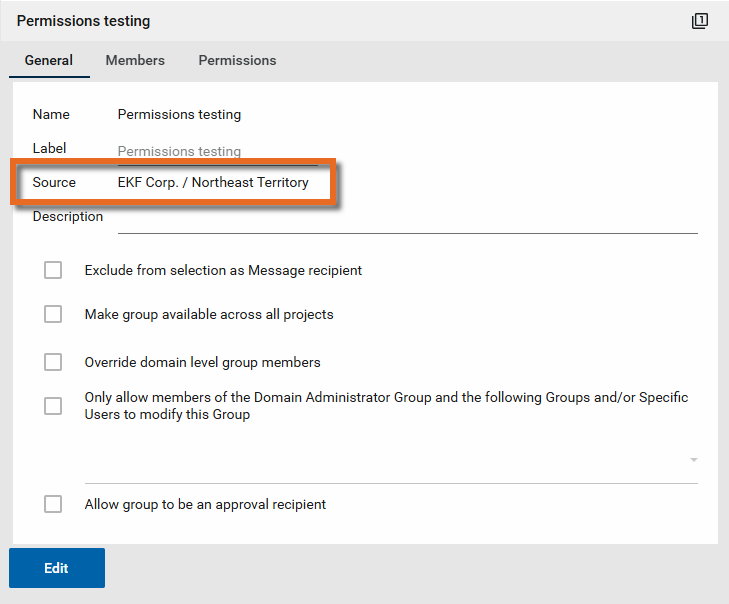
A group's General tab can only be modified at the level where the group originates. You can review the Source field to determine where in the hierarchy to navigate to in order to modify the General tab.
To modify the General tab for a group, complete the following steps:
-
Navigate to the Groups application (Apps > Administration > Groups).
-
Click on the appropriate group to select it and open the detail pane.
Note The list of groups can be sorted by any column by clicking the column header in the grid.
-
Click on the General tab.
-
Click on the Edit button.
Note If the Edit button is disabled, you may not be in the appropriate level in the hierarchy to edit the group. Review the Source field on the General tab. This value indicates where in the hierarchy the group originates from. You must navigate to that level in the hierarchy to modify this group. Click on the current project or partition name in the header and navigate to the appropriate level.
-
Review the options on the General tab and modify as appropriate:

Note Not all options will appear for all groups.
Option Description Name This is the system name of the group. It cannot be modified. Label This is the name of the group as it appears in Kahua.
Note This field cannot be modified for system groups. Refer to Review system groups.
Description Enter or modify the description for the group. This field appears on the groups list.
Note This field cannot be modified for system groups. Refer to Review system groups.
Exclude from selection as Message recipient Select this option to prevent this group from being selected in the To/CC/BCC fields in messages. Refer to Exclude a group from messages. Make group available across all projects If selected, the group is moved to the root domain and becomes available to all partitions and projects.
The Source field is updated to reflect the domain root as the origin level of the group (you may need to close and re-open the Groups app for the change to appear),
Note This option appears for groups created at a partition or project level, not at the root domain.
Override domain level group members If Make group available across all projects is selected and you have already added members to this group at this level in the hierarchy, select this option to prevent those members from being removed from the group and any levels inheriting those members lower in the hierarchy .
Important This option is only available for selection when Make group available across all projects is selected.
Note This option appears for groups created at a partition or project level, not at the root domain.
Only allow members of the Domain Administrator Group and the following Groups and/or Specific Users to modify this Group This option allows you to limit who has the ability to manage group membership or permissions to domain administrators and selected users or groups.
When this option is not selected:
-
Domain Administrators can modify this group's membership and permissions.
-
Users with appropriate permissions can modify this group (i.e., users with the Contributor role for Groups can modify this group's membership, users with the Administrator role for Groups can modify this group's permissions, etc.).
When this option is selected :
-
Domain Administrators can modify this group's membership and permissions.
-
Users with appropriate permissions and who are also named here (or included in a group named here) can modify this group (i.e., users named here with the Contributor role for Groups can modify this group's membership, users named here with the Administrator role for Groups can modify this group's permissions, etc.).
Important In other words, when this option is selected, users not named here (or not included in a group named here) cannot modify this group, regardless of their general permissions for the Groups app.
Allow group to be an approval recipient Select this option to allow this group to be available for selection as a recipient in an approval sequence.
Note This option only appears in non-system groups.
-
-
Click Save when you are done. For information on modifying permissions for this group, refer to Manage permissions for a group.
Users can be members of one or more groups. The rights given to users in the groups will be additive, not subtractive. For example, if a user is in a group that has moderator access to an app and also in a group that has observer access in the same app, the user will have all the permissions for the moderator level and all the permissions for the observer level.
Important Group membership is also how you can manage access to partitions and projects, by adding or removing users at the appropriate level in the hierarchy.
When a user is added to a group at a partition or project in the hierarchy, they are added to all partitions or projects below that level as well.
When a user is removed from a group at a partition or project in the hierarchy, they are removed from all partitions or projects below that level as well.
To add or remove members from an existing group, complete the following steps:
-
Review the header to ensure that you are in the correct project or partition. Group membership is inherited down through the hierarchy, so it is important to ensure that you are making changes at the appropriate level.
-
If you do not want a user to have access to a partition or project, navigate to that partition or project level and remove the user from all groups.
-
If you are adding a new user, add them at the appropriate partition or project level to a group with appropriate permissions.
-
-
Navigate to the Groups application (Apps > Administration > Groups).
-
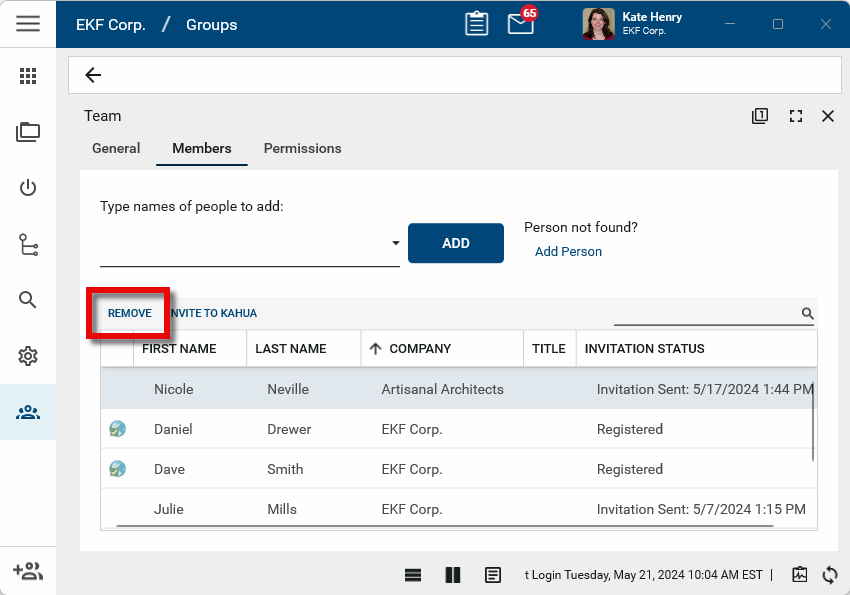
Select the group you want to manage from the list of groups.
-
The detail panel will open to the Members tab. The list of existing members will appear, with their name, company name, title, and invitation status. Click on a column header to sort by that column. Use the search field to filter the list by any value.
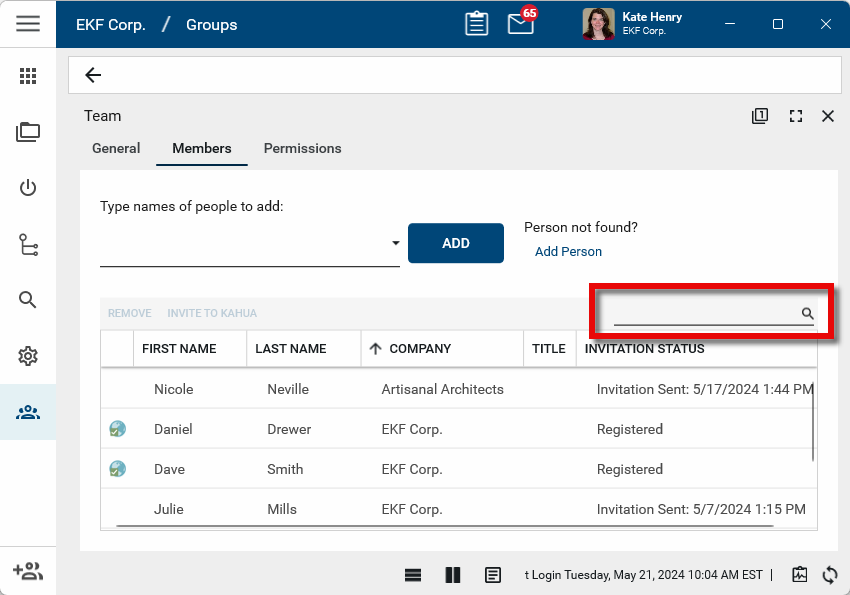
-
To add a user to the group, type their name in the selection field and select them from the list of users in the Users application. For more information on the Users application, refer to Working in the Users application.
If the user has not yet been set up in Kahua and will be an external user (i.e., a user not associated with your own company), select Add person and complete the process to add the external user. For more information on adding external users, refer to Adding External Users.
If the user has not yet been set up in Kahua and will be an internal user (i.e., a user associated with your company), you must first add the user to the Users app. You cannot use the Add Person option. For information on adding internal users, refer to Adding Internal Users.
-
To remove a user from the group, select them from the list and click Remove. Click Ok on the confirmation message.
In addition to managing access to projects and partitions, groups are also used to manage permissions in all Kahua apps. Permissions are hierarchical, so they inherit down through the partition/project structure unless they are overridden. Inheritance of the Permissions tab is independent of inheritance of the Members tab. For more information, refer to Managing Permissions.
Note Generally speaking, it is a best practice to create groups and manage group permissions at the root domain level. Users can then be added and removed as members at the appropriate level in the hierarchy.
The rights given to users in the groups are additive, not subtractive. For example, if a user is in a group that has Moderator access to an app and also in a group that has Observer access in the same app, the user will have all the permissions for the Moderator level and all the permissions for the Observer level.
There are two notable exceptions to the additive nature of permissions. They are as follows:
-
The LimitedView role - This role works differently from other roles in that it does not grant access to any documents within an app. This is a restrictive role which will remove the following actions: Log, Quick Print, Send, Download, Export, Process, View PDF.
-
The None role in the File Manager app - This selection supersedes any other group access which grants access to the File Manager app or specific folder. It ensures that users named in a group with this permission selected are unable to access the files managed by this setting.
To manage permissions for a group, complete the following steps:
-
Review the header to ensure that you are in the correct project or partition.
Important Group permissions are inherited down through the hierarchy, so it is important to ensure that you are making changes at the appropriate level. To make changes for the domain, ensure that you are in the root domain.
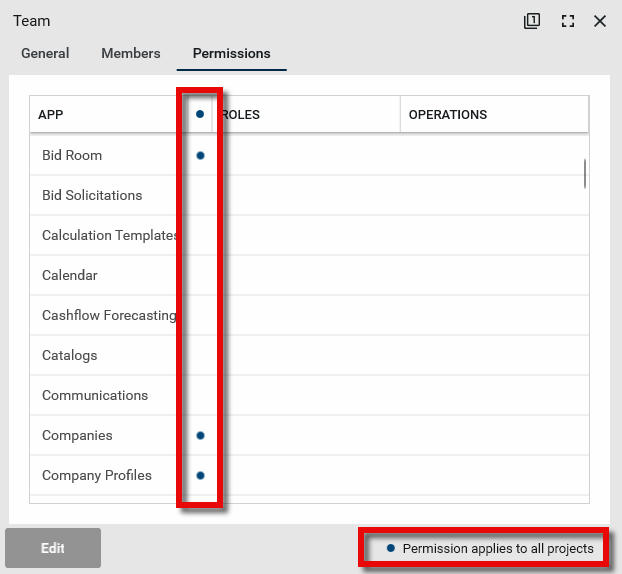
Note There are apps where permission changes will apply to all projects, regardless of the currently selected location in the hierarchy. These apps are denoted on the Permissions tab with a blue circle icon
 .
. 
-
Navigate to the Groups application (Apps > Administration > Groups).
-
Select the group you want to manage. The detail page opens.
-
Select the Permissions tab. Click Edit at the bottom of the page.
-
If the Edit option is greyed out, you may not have the appropriate permissions to manage group permissions, or you may have a system group open. Refer to Review system groups.
-
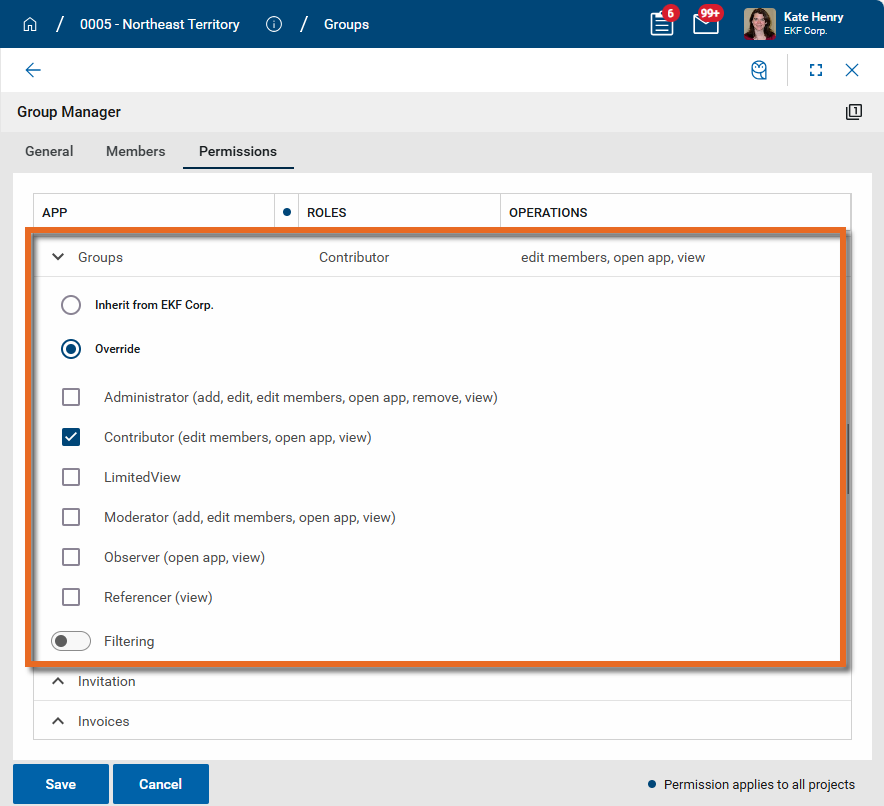
From the list, select the app you want to manage.
-
Select Override.
-
Select the one or more roles you want users in this group to have for this application. For more information on roles, refer to Managing Permissions. For information on roles for a particular app, refer to the app's documentation.
-
To apply a filter to the records that you want group members to be able to access, select Filtering, then select the appropriate filter from the drop-down menu. Not all apps have filters available.
Note In order for filter options to appear, the feature must be enabled by selecting Permission Filtering on the Domain Settings app > Domain Defaults tab. Refer to Permission filtering.
-
Repeat for each app you want to manage roles for within this group.
-
Click Save when you are done.
You can exclude groups from being selected as message recipients. You may have large groups that are used for permissions management that you do not want to use as message recipients. You can enable the Exclude from selection as Message recipient option to prevent the group's selection in the To/CC/BCC fields of a message.
To exclude a group from being used in Messages, complete the following steps:
-
Review the header to ensure that you are in the correct project or partition.
-
Navigate to the Groups application (Apps > Administration > Groups).
-
Select the group you want to exclude from use as a message recipient.
-
Open the General tab and select Edit.
Important If the Edit option is greyed out, you may not have rights to edit the group or the group may originate higher up in the partition/project hierarchy. The General tab must be edited at the level in the partition/project hierarchy that the group originates from. Review the Source field and navigate to that partition or project level in the hierarchy.
-
Select Exclude from selection as Message recipient.
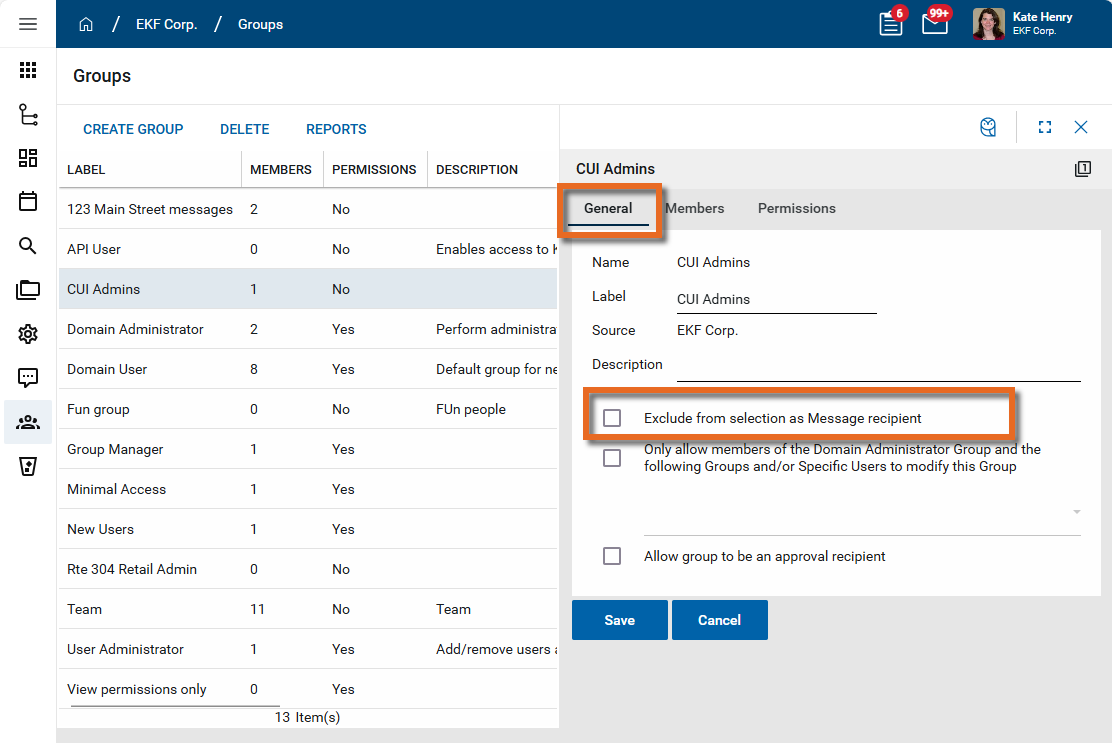
-
Click Save when you are done.
Users in the Domain Administrator group have full rights in the Groups app to add, edit, or delete groups, including modify group membership and permissions, throughout the whole domain. You may want to assign rights to other users to manage groups in partitions or projects lower in the hierarchy. You can do so by creating a new group at the appropriate level and assigning permissions for the Groups app to that group. Depending on what rights you want users in the group to have, you can assign the following roles:
-
Administrator - Users in a group with this role selected can add, edit, or delete groups, including modify group membership and permissions.
-
Moderator - Users in a group with this role selected can add new groups and modify group membership.
-
Contributor - Users in a group with this role selected can modify group membership.
A group cannot be deleted if it currently has members assigned to it. To prepare a group for deletion, remove all the users from the group. Refer to Manage members in a group.
Additionally, groups must be deleted at the level in the partition and project hierarchy where they originate from. The originating level appears on the General tab in the Source field.
To delete a group, complete the following steps:
-
Review the header to ensure that you are in the correct project or partition.
-
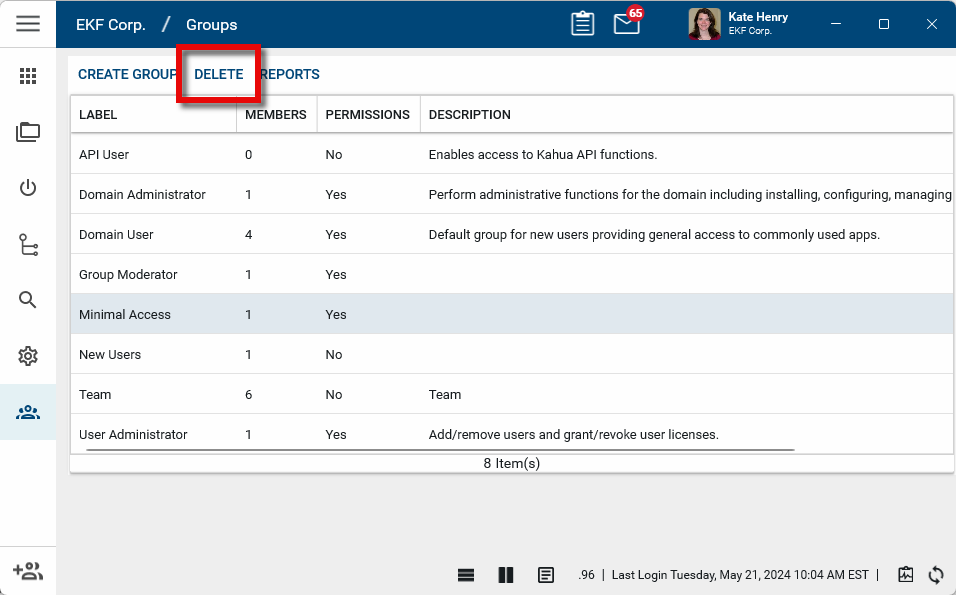
Navigate to the Groups application (Apps > Administration > Groups).
-
Select the group you want to delete from the list of groups.
-
Select Delete from the action bar.
Important If the Delete option is greyed out, you may not have rights to delete a group, or the group may originate higher up in the partition/project hierarchy. Groups have to be deleted at the level in the partition/project hierarchy that they originate from.
-
Click OK on the confirmation message. The group will be deleted.
Important Unlike many other entities in Kahua, deleted groups cannot be restored from the Recycle Bin.