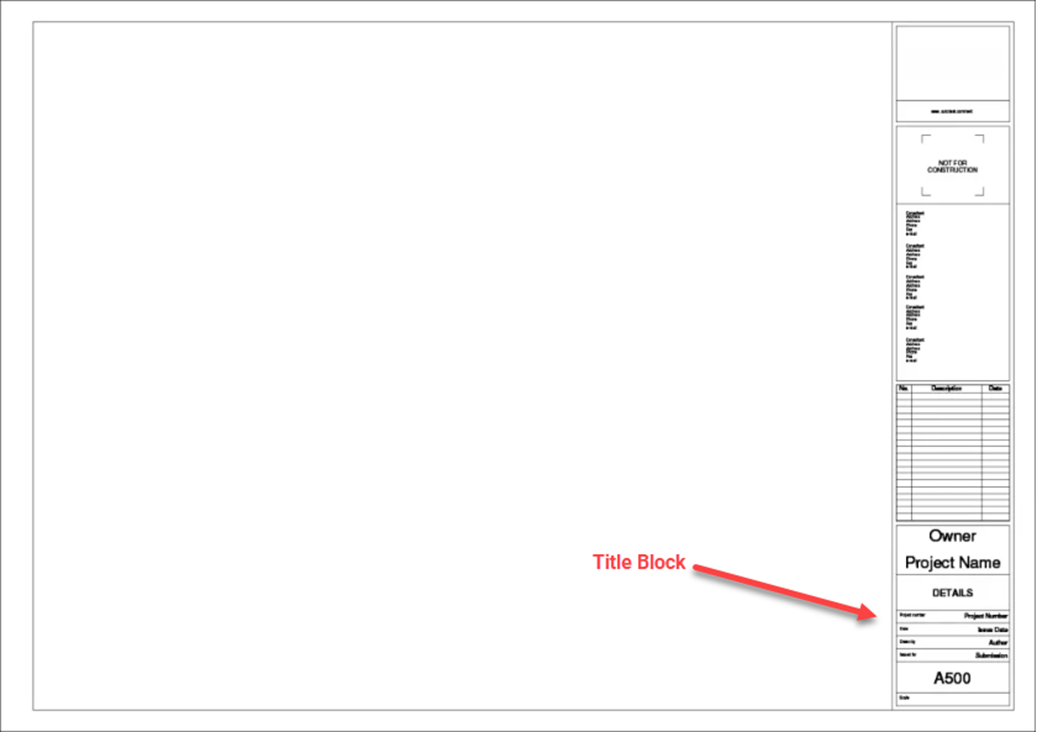
Title Block Extraction
A Title Block is a panel on a construction drawing that provides structured information about the drawing and the project that the drawing was created for.
Kahua's Title Block Extraction process can be used to "extract" information from the title block. The extracted information can be set up to auto-populate any number of drawing-related attributes (such as Sheet Number and Sheet Title) and to generate standardized file naming for these drawing files.
To properly extract this information, a template must be created. The purpose of the template is to define the mapping of areas of the title block to specific drawing attributes. Because each drawing set has the potential to have different title block arrangements, Kahua provides a way to create and manage multiple Title Block Templates.
Different templates can be created for each contributing organization. For example, on a single a project there may be a need to have one template defined for the Architectural Drawing Sets (which come from the Architect), one for the Structural Drawing Sets (which come from the Structural Design Team), and one for the MEP Drawing Sets (which comes from the MEP Design Team).
Key elements of this feature include the following:
-
The feature must first be enabled for your domain by your domain administrator (Apps > Administration > Domain Settings > Domain Defaults > Enable Title Block Extraction).
-
Templates can be created in the File Manager app or the Drawings app. Once created, they can be used in either application.
-
To create a Title Block Template in File Manager, you must have permissions to configure the File Manager app or the folder you are working in.
-
To create the template, you will select a sample file and use that file to indicate where on the title block each piece of information you want to extract is found. The mapping is controlled by the selected location on the title block. Mapped values do not have to have a label in the title block.
-
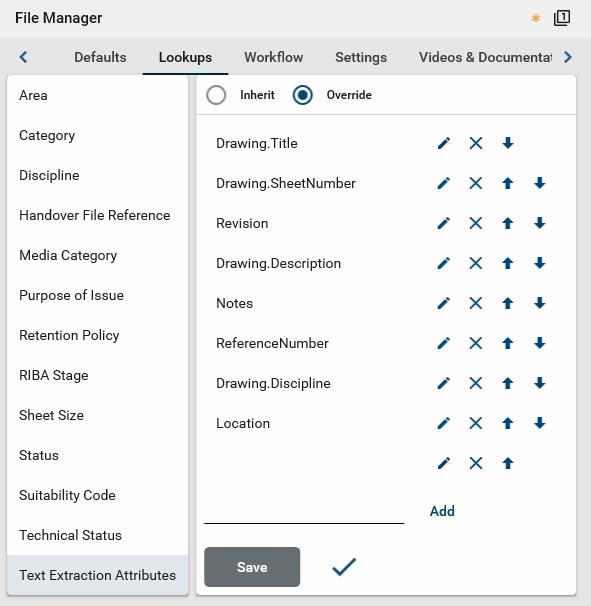
You can manage which fields are available to be mapped. New ones can be added on the Configuration > Applications > File Manager > Lookups tab. You can map up to ten fields in a single Title Block Template. By default, the following fields are available for mapping:
-
Title
-
Sheet Number
-
Rev Number
-
Notes
-
Reference Number
-
Discipline
-
-
To use the title block extraction process in File Manager, drawings must be uploaded to a controlled folder. The extraction takes place in a "working folder" where the results can be reviewed prior to publishing the drawings to the target folder. For more information on controlled folders, refer to Controlled Folders.
-
If needed, you can repeat the title block extraction process by selecting one or more drawings in a controlled folder and clicking Re-Process on the action bar.
-
To use the title block extraction process in the Drawings app, drawings must be uploaded and not yet published. For more information on using Title Block Templates in the Drawings app, refer to Drawings app.
How to . . .
To use the Title Block Extraction process, the feature must first be enabled in your domain by a domain administrator. Navigate to Apps > Administration > Domain Settings > Domain Defaults > Enable Title Block Extraction and select the option. For more information, refer to Enable title block extraction.
There are several items to review prior to creating a title block template in your project.
-
Ensure that you have an appropriate file to base the template on. It is a best practice to use a PDF file that includes a single drawing.
-
If your drawing set is comprised of multiple individual files (one file per sheet), select one of the files to base the template on. Generally speaking, it is preferred to select a smaller file instead of a larger one. If available, the drawing index is typically a good choice for this purpose.
-
If your drawing set is a single multi-page PDF file, extract a representative page as a new PDF and use that file as the basis for the template. A page can be extracted and saved using a third-party PDF viewer, such as Adobe Acrobat, Bluebeam, etc. If available, the drawing index is typically a good choice for this purpose.
-
-
Review the attributes that you want to map from the title block. Ensure that they are all available as Text Extraction Attributes. This can be established at the project level (Apps > Administration > Configuration > Applications > File Manager > Lookups > Text Extraction Attributes), or the File Manager folder level (Folder Properties > Configuration > Lookups > Text Extraction Attributes). For more information, refer to Lookups.
Note You can extract data to any available drawing field by adding that field as a Text Extraction Attributes lookup value. You can map up to ten attributes on a title block template.
-
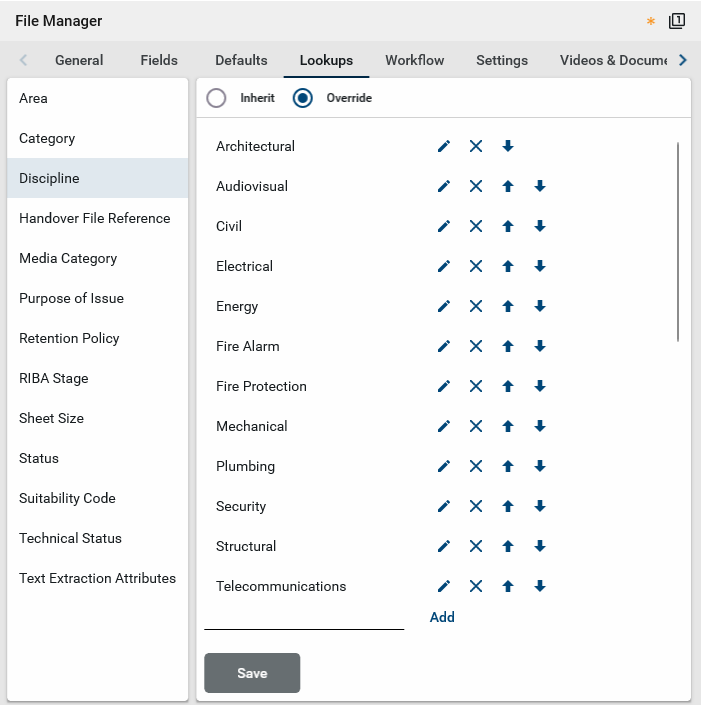
Ensure that all the disciplines represented in the drawing sets are included in the list of Discipline lookup values. This can be established at the project level (Apps > Administration > Configuration > Applications > File Manager > Lookups > Discipline), or the File Manager folder level (Folder Properties > Configuration > Lookups > Discipline). For more information, refer to Lookups.
-
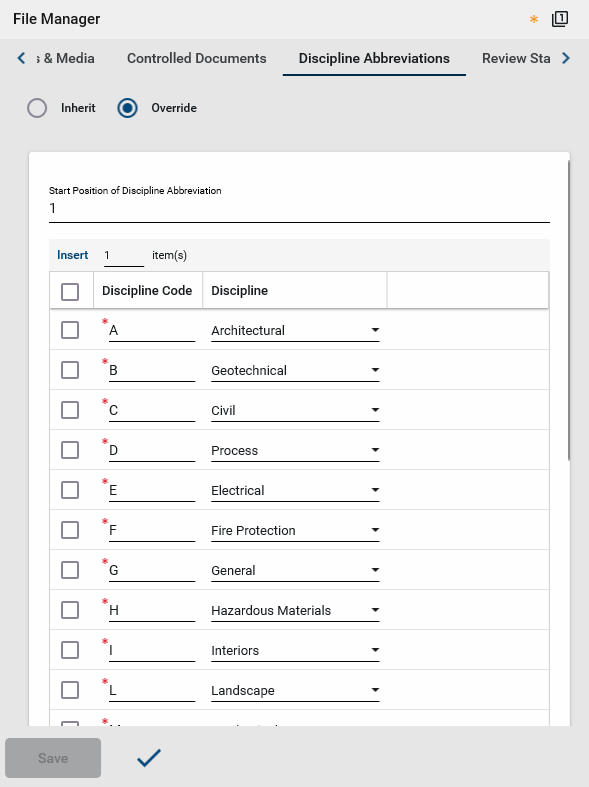
If the discipline code is embedded within the sheet number, ensure that all the discipline codes referenced in your Drawing Set are also configured as Discipline Abbreviations. This can be established at the project level (Apps > Administration > Configuration > Applications > File Manager > Discipline Abbreviations), or the File Manager folder level (Folder Properties > Configuration > Discipline Abbreviations). For more information, refer to Discipline Abbreviations.
-
To automatically generate the drawing names based on extracted attributes, you can select Enforce Nomenclature on the folder configuration and establish a File Name Definition. For more information, refer to File Name Nomenclature section - Enforce Nomenclature.
-
The following information applies to the uploaded drawing set:
-
Drawings can be in any format, including native CAD.
-
Uploaded drawings can be in any orientation, but should be consistent in a set.
-
Drawing PDFs can be vector-based or raster-based (scanned).
-
A TrueType font is recommended but not required.
-
The title block can exist anywhere on the drawing set. Values can also be mapped from multiple areas on a sheet outside of the title block, as long as their placement is consistent within the set.
-
Labels on mapped fields are not required. The mapping is based on the location of the values, not an associated label.
-
Multiple lines of text are supported for fields such as drawing title.
-
Z-coordinate values are supported.
-
In File Manager, Title Block Templates can be created directly in File Manager, or in the Configuration app.
To create a Title Block Template, complete the following steps:
-
Review the header to ensure that you are in the correct project or partition.
-
Navigate to Apps > Document Management > File Manager.
-
Open the controlled folder containing a file with the appropriate title block to base the template on. For more information on selecting this file, refer to Prepare to create a Title Block Template.
-
Open the file for viewing and select Create Template from the action bar. You may need to click the More icon
 to access the Create Template option.
 -
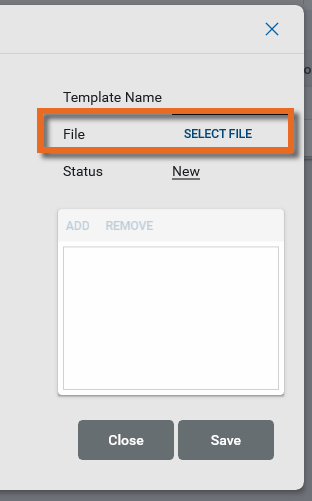
The Text Extraction Template page appears with the selected drawing. Enter a Template Name. For example, if you are creating a Title Block Template for the structural drawings, name the template "Structural Drawings".
-
Alternatively, you can add a template from the Configuration app.
-
Navigate to Apps > Administration > Configuration > Applications > File Manager > Title Block Templates
-
Click Add. Click Select File to select a file with the appropriate title block to base the template on. For more information on selecting this file, refer to Prepare to create a Title Block Template. Choose the file and click Ok.
-
Enter a Template Name. For example, if you are creating a Title Block Template for the structural drawings, name the template "Structural Drawings".
-
Click Save to accept the file. The drawing appears.
-
-
Note that you can adjust the width of the drawing by hovering over the dividing line between the two areas.
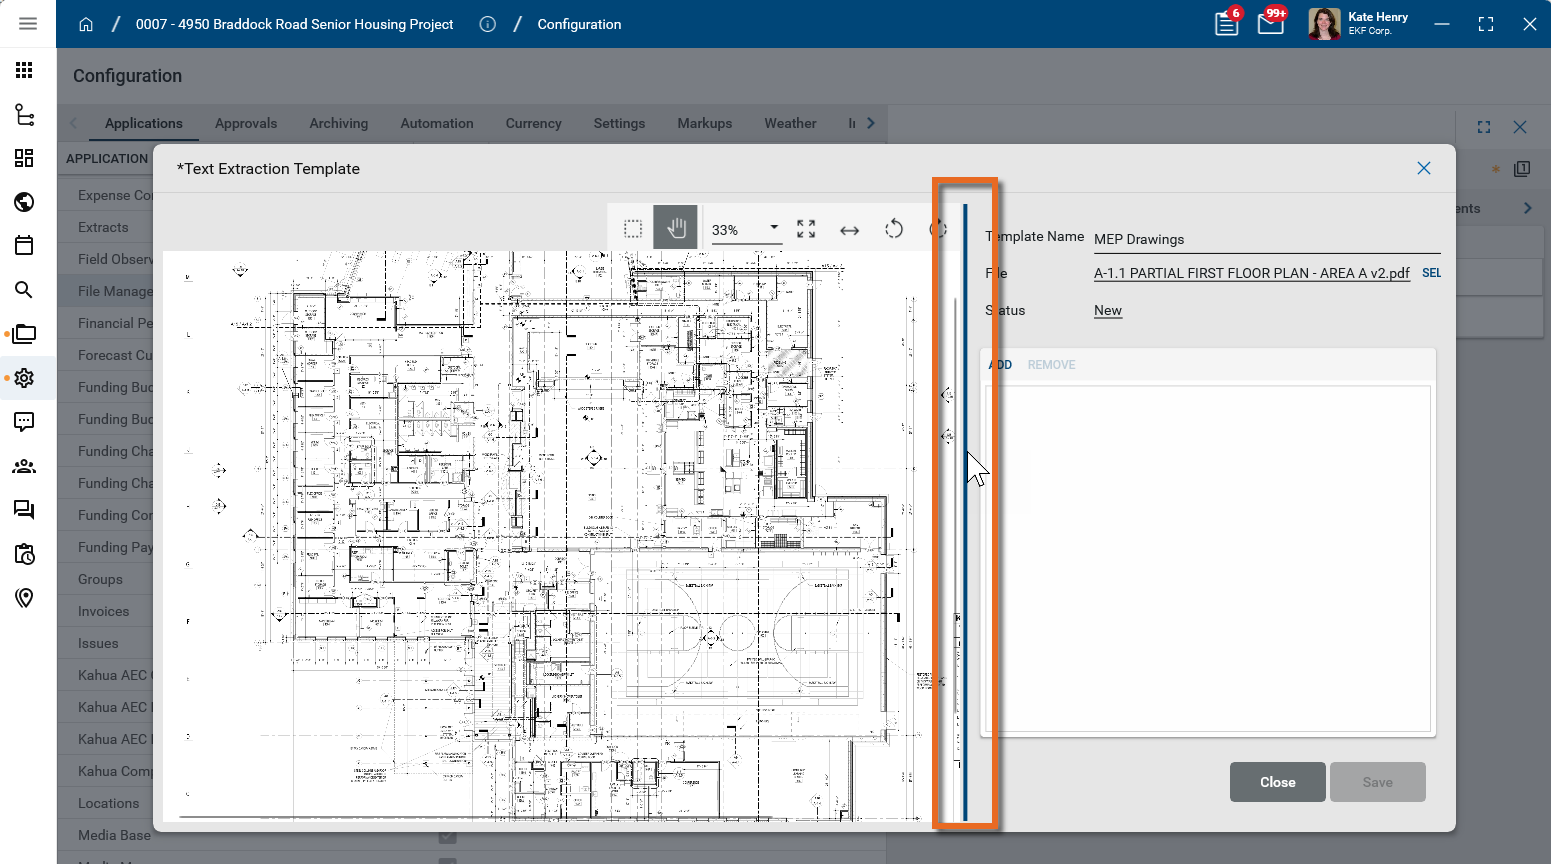
-
The following tools appear in the image toolbar. Use the Pan mode and Zoom selector to navigate to the title block at the appropriate level of detail.

Tool Description Select 
Click this icon to switch between selection mode and pan mode on the drawing. In selection mode, clicking and dragging on the image will select a section of the image and any markups in that selected area.
Pan mode 
Click this icon to switch between pan mode and selection mode on the drawing. In pan mode, clicking and dragging on the image will pan across the image.
Zoom 
Shows your current zoom level on the drawing. Select a level from the drop-down list, manually enter a level and press Enter on your keyboard, or use Ctrl + your mouse wheel to zoom in and out from the current cursor location. Fit Page 
Fits the file image to the display area.
Fit Width 
Fit Width – Fits the file image to width of the display area.Rotate Counter Clockwise  / Rotate Clockwise
Rotates the image counter-clockwise or clockwise. -
To map an area of the title block to an attribute, click Add, then use your mouse to draw a rectangle around the attribute in the title block. Then select the appropriate attribute to map the selected area to from the list of Text Extraction Attributes, as defined in Lookups. Refer to Prepare to create a Title Block Template.
Note The recommended best practice is to make the mapped region as large as possible, without including other attribute areas. This will account for situations where data on one drawing fills more space than what’s on another drawing (esp. with variable length text, such as the Sheet Title). It also helps account for variations between drawing set, including minor margin changes or minor shifts in Title Block placement.
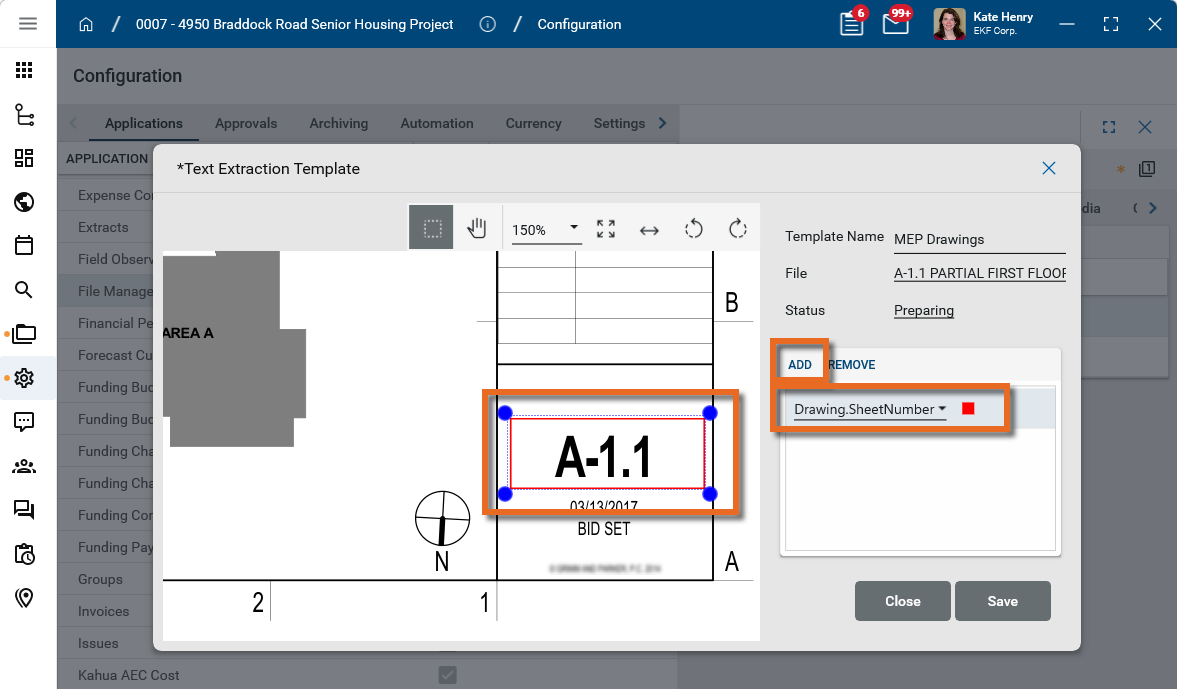
Important Extracting a revision number or date from a Revision table is not supported, as a table can include multiple values. To be mapped for extraction, these values must be defined in a single location in the Title Block.
-
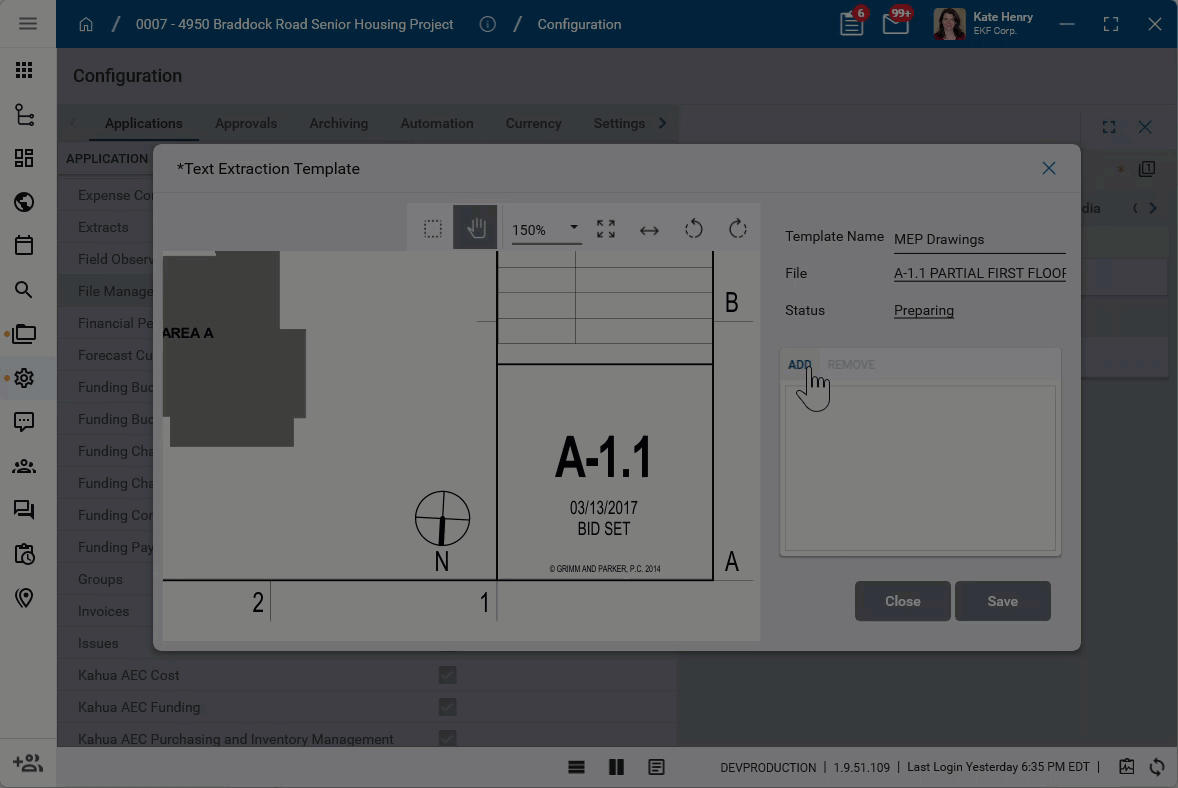
Repeat the process to select additional attributes. You can map up to ten attributes in a single template. Click Savewhen you are done.
Before attempting to upload your entire Drawing Set and trying out the Title Block Extraction process, it is a recommended best practice to test the upload and extraction process with the same file that you used for your template.
The benefit of performing this test is that it is a quick way to determine whether your mappings are correct, as this is only a single-sheet PDF as opposed to a complete drawing set which may include hundreds of drawing sheets.
As part of this process, the file is uploaded to a working folder, where it can be reviewed before being published to the selected controlled folder. If desired, the working folder can be deleted at the completion of the test.
To validate the newly created Title Block Template, complete the following steps:
-
Review the header to ensure that you are in the correct project or partition.
-
Navigate to Apps > Document Management > File Manager.
-
Open a controlled folder to upload the test file into.
-
Add the test file to the folder. You can drag and drop the file into the folder or select Add Files from the action bar.
-
Confirm the file selection.
-
On the Add Files dialog, in the Get Document/Revision Info From field, select "Title Block using Working Folder".
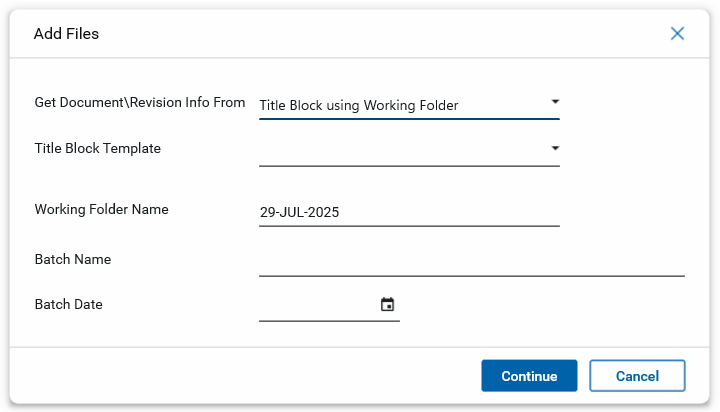
-
Select the appropriate Title Block Template.
-
Update additional fields if desired and click Continue.
-
The extraction process begins. When done, the file is added to the working folder and the Extract Status is set to "Complete".
-
Review the attributes of the drawing file to ensure the values were correctly extracted. If necessary, modify the Title Block Template.
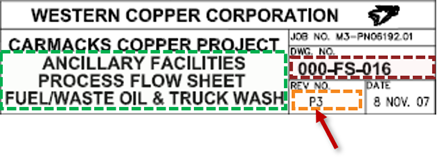
Example The example below shows how the Title Block Extraction process correctly extracted the Sheet Number (in red), the Sheet Title (in green), the Revision Date (in gold), and the Discipline (by inference, using the first character of the Sheet Number).

-
Note that If Enforce Nomenclature is selected for Controlled Documents for this project, the drawing name is automatically created from the extracted Title Block attributes according to the configured File Name Definition. For more information, refer to File Manager Configuration.
-
To remove the working folder at the completion of the test, right-click on it and select Delete.
To modify or delete a Title Block Template, you must have permissions to configure the File Manager app for your project.
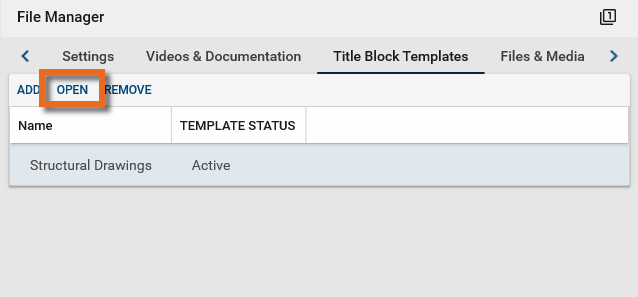
To modify or delete an existing Title Block Template, complete the following steps:
-
Navigate to Apps > Administration > Configuration > Applications > File Manager > Title Block Templates.
-
To modify an existing template, select it and click Open.
-
Make the appropriate changes and click Save. Click Close when you are done.
-
To delete a template, select it and click Remove.
Important To delete a template, you must be in the partition or project where it was originally created.
When the Title Block Template has been validated, you can upload a set of drawings to the controlled folder. The files will be added to the working folder. You can review the extracted information in the working folder and make adjustments as needed. Once you are satisfied with the results, you can publish the files to the selected control folder.
Uploaded drawings can be in any orientation.
-
Review the header to ensure that you are in the correct project or partition.
-
Navigate to Apps > Document Management > File Manager.
-
Open the controlled folder where you want to place the drawings.
-
Add the drawing set to the folder. You can drag and drop the file into the folder or select Add Files from the action bar.
-
If this is a multi-page file, the option to split the file appears. You can select a start page and end page. You may want to modify these values if the file includes a cover page or pages at the end that do not include a title block. After making the appropriate selections, click Continue.
-
On the Add Files dialog, in the Get Document/Revision Info From field, select "Title Block using Working Folder".
-
Select the appropriate Title Block Template.
-
Update additional fields if desired and click Continue.
-
The extraction process begins in the working folder. When done, the drawings from the file are added to the working folder and the Extract Status is set to "Complete".
Note The working folder only appears to the user who created it and to users with Moderator permissions or above to the parent folder. Additionally it does not appear to any users performing traditional file manager activities such as Move, Copy, or Add Kahua Doc.
-
From the working folder you can review the attributes of the drawing file to ensure the values were correctly extracted. You can do so in one of the following ways:
-
Perform a multi-select edit to input many values in bulk.
-
Perform a multi-select edit to view the associated Title Block of each Drawing while viewing and having the ability to update individual attributes.
-
Individually enter or modify any value that needs to be adjusted or was not mapped.
-
-
When you have made all the necessary updates, you can publish the files back to the target folder. The publish dialog appears.
-
The Revision Number, the only required field, can be entered here if it wasn’t entered before the Publish process was initiated. Note that there are three options for entering the Revision Number in this dialog:
-
Individually entering the Revision Number in the grid
-
Setting the Revision Number to a specific value (making sure to first view what the ‘last Rev Number’ is)
-
Auto Incrementing the Revision Number
-
-
Click Ok when you are done. The drawing files are published to the target folder.
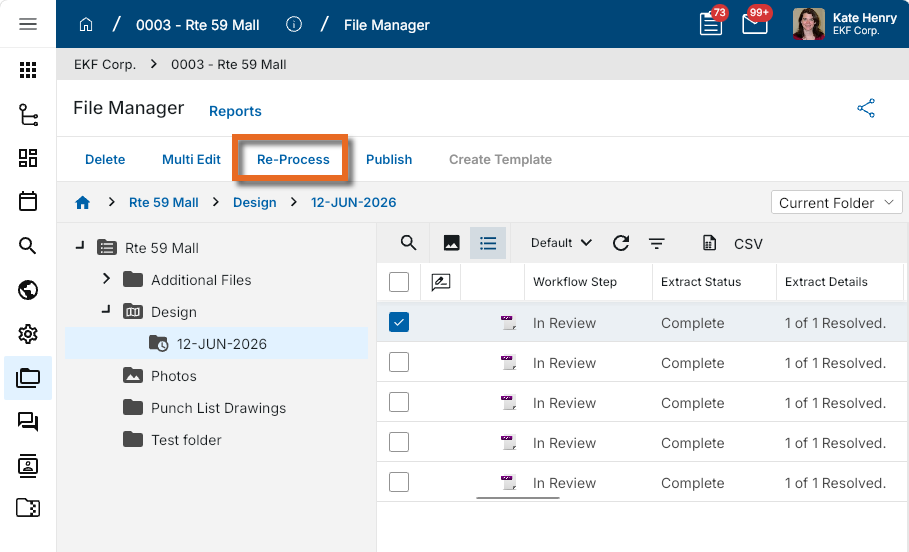
If you are not satisfied with the extraction of information from one or more drawings, you can modify your current Title Block Template or create a new one and perform the process again.
To re-apply a title block template and perform the extraction process again, complete the following steps:
-
Review the header to ensure that you are in the correct project or partition.
-
Navigate to Apps > Document Management > File Manager.
-
Open the controlled folder that contains the drawings.
-
Select the drawings you want to act on.
-
Select Re-Process from the action bar.
-
The Re-Process dialog appears.
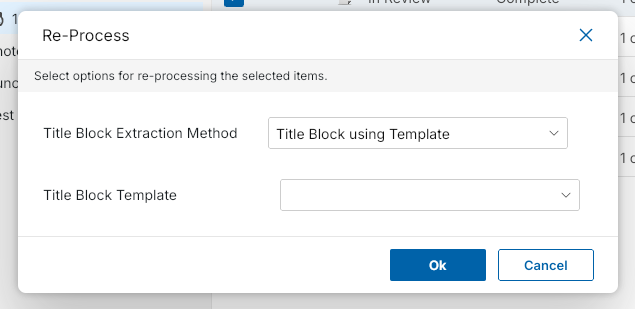
-
In the Title Block Extraction Method field, select "Title Block using Template".
-
In the Title Block Template field, select the appropriate template.
Note If you newly created a template, you may need to close and re-open the File Manager app to have it appear.
-
-
Click Ok. The title block extraction process is performed on the selected drawings.
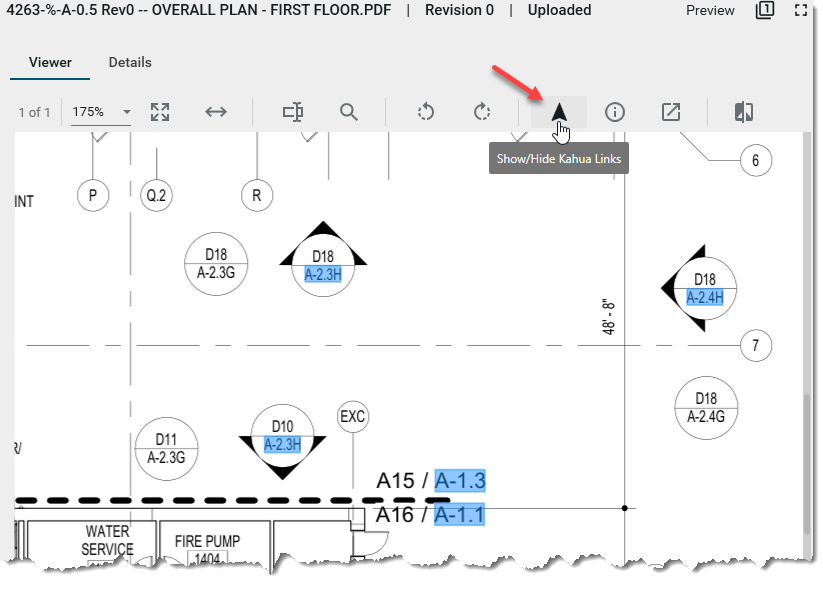
When this feature is enabled for your domain in conjunction with Title Block Extraction, hyperlinks are automatically created on drawings when they are uploaded to a Controlled Folder. These hyperlinks allow you to navigate to Section Callouts, Detail Callouts, and other types of Drawings references, and easily return back to the document where the hyperlink was initiated.
Enabling this feature also adds a tool to the markup panel that allows you to manually create new hyperlinks and modify existing ones any any file type in any folder, not just controlled folders.
Key elements of this feature include:
-
In controlled folders, drawing callouts are automatically created when drawings are uploaded.
-
Hyperlinks can be used to navigate to other drawings and return to the original drawing.
-
You can manually create new links on files of any file type in any folder type using the link markup tool
 .
.
-
You can modify existing links by double-clicking on them.
Important If you would like to add auto-generation of hyperlinks to your domain, reach out to support or your account representative.