File Manager
Notice Kahua is a very flexible and customizable platform. In your domain, this application may have been modified to meet your company's needs. The online help uses default field labels for field names and describes standard workflows. Please check with your domain administrator for specific information about working in your organization's domain.
The File Manager app allows you to store project-related files such as documents, spreadsheets, and images in Kahua and share them with others. The files are stored in folders and sub-folders. There is no storage limit and individual files up to 10GB in size can be uploaded.
Key concepts about the File Manager app are as follows:
-
The File Manager app allows you to store project-related files such as documents, spreadsheets, and images in Kahua and share them with others.
-
You can pin File Manager folders from any project to your launch bar. Once pinned, the folder can be opened directly from the launch bar without first opening the project or File Manager app. For more information, refer to Pin File Manager Folders to the Launch bar.
-
If you are working in the Kahua Commercial Network (KCN), you can collaboratively review and edit documents Microsoft 365 Documents on the web. Refer to Editing files with the Microsoft 365 Integration.
-
You can move files from one folder to another by using drag-and-drop.
-
If you have the appropriate permissions, you can send a file for signature using Docusign. Refer to .
-
If enabled for your domain, the File Manager app for a project can be made available for access when you are offline. Refer to Kahua Offline.
-
If enabled for your domain, you can use the Local Files Sync feature from the desktop host to work on files in their native applications and have the updated files synchronize back to Kahua when you save and close them. Refer to Using Local Files Sync.
How to . . .
You can create new folders from the action bar, and add sub-folders, or move, rename, copy, and delete folders from the folder right-click menu.
To add a folder or manage existing ones, complete the following steps:
-
Review the header to ensure that you are in the correct project or partition.
-
Navigate to the File Manager application (Apps > Document Management > File Manager).
-
When you first open a project, a top level container with the project name appears in the folder panel. You can add multiple folders below this level.
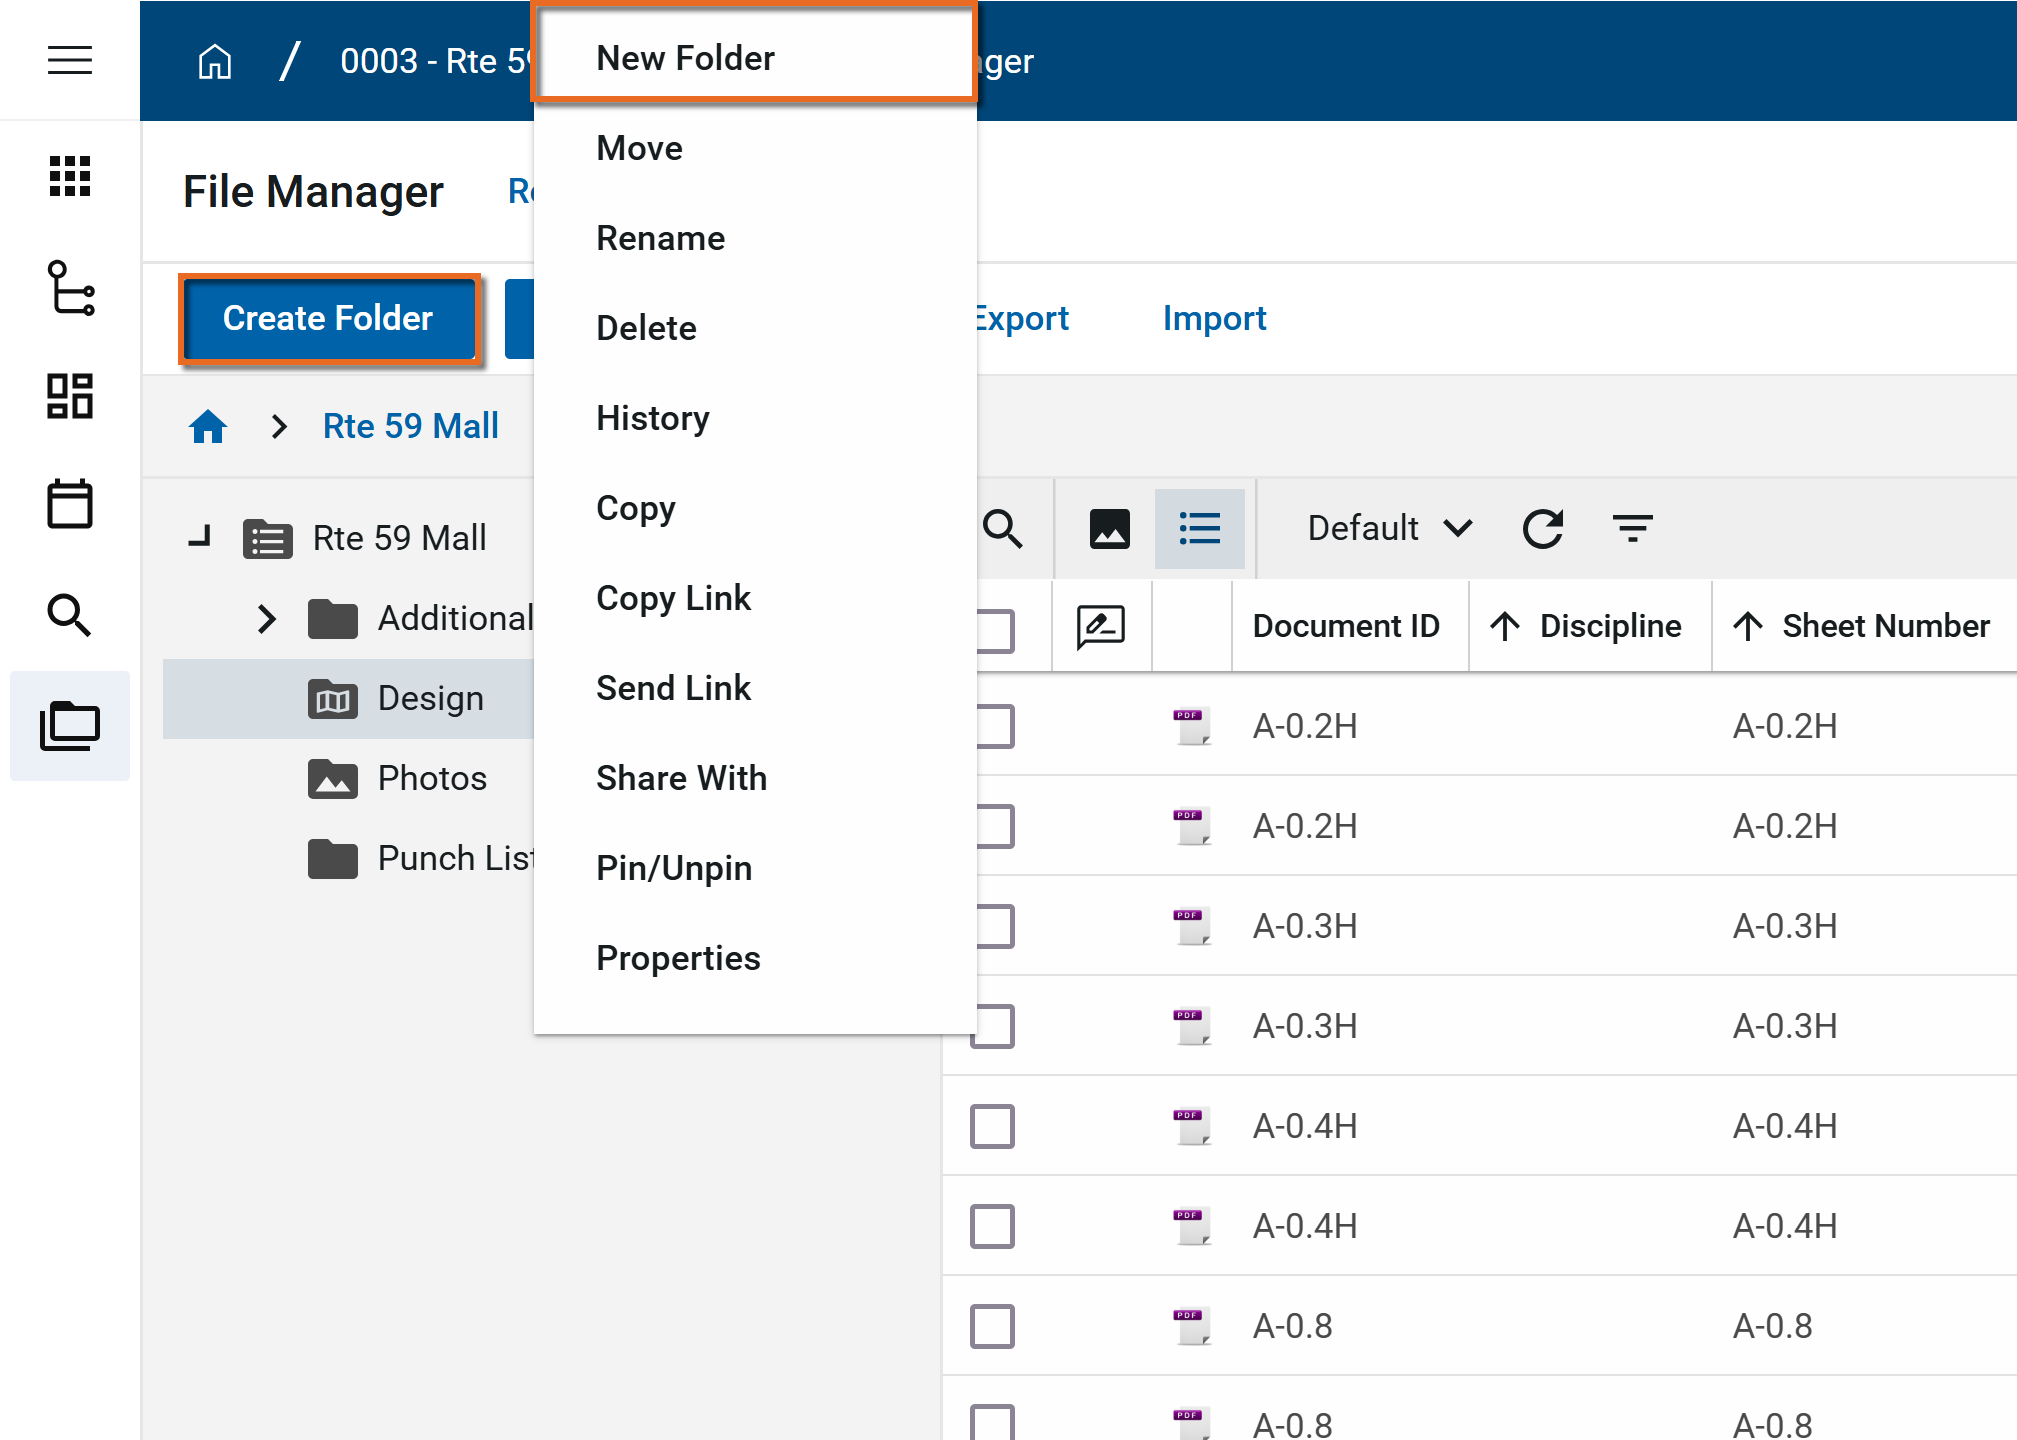
To add a new folder, select the folder location where you want the new folder to appear and select Create Folder from the action bar or right-click and select New Folder.
-
The New Folder page opens. Select the appropriate Folder Type and enter a Folder Name.
Note Folders appear in alphabetical order. To control the order in which they appear, consider appending numbers to the beginning of the folder names (e.g., "01 First Folder Name", "02 Second Folder Name", etc.)
The following folder types may be available, depending on how your domain administrator has configured your project:
-
Files
 - These are standard file folders that can be used to store any allowed file type. For information on allowable file types, refer to Supported File Types.
 -
Media
 - When media-related content such as photos and videos are added to folders of the type "Media", additional data about the files can be captured.
 -
Pinnable Drawings
 - These folders contain drawing files that are available for pinning from the Punch Lists and Assets applications. Refer to Pinning functionality in Punch Lists or Pinning functionality in Assets.
Note Pinning can also be used within the File Manager app in the other folder types, but it requires a different configuration. For more information on pinning in File Manager, refer to Pinning functionality in File Manager.
-
Controlled
 - These folders contain drawings and documents that use the Design Management process. For more information, refer to Controlled Folders.
-
-
Once created, you can use the right-click menu to modify the folder. Select one of the following actions as needed:
Action Description New Folder Select this option to add a new folder as a sub-folder to the current folder. Move Select this option to move this folder to another location in the folder structure.
A folder can be moved to any location in the folder structure for the currently open project.
Note When a folder is moved, all the files it contains and all of its sub-folders with the files they contain are moved with it to the new location.
Rename Select this option to rename a folder.
The name must be unique for that level of the folder structure (i.e., you can't have two folders named "Original Drawings" at the highest level of the folder structure. You could have two folders with the same name nested under different folders).
Delete Select this option to delete the folder and any files in that folder, as well as any sub-folders and any files in those sub-folders.
Note If a record was deleted in error, it can be recovered from the Recycle Bin application by an administrator. For more information, refer to Using the Recycle Bin.
History Select this option to view the history of this folder. Copy Select this option to make a copy of the folder and its contents in a selected location within the currently open project. Copy Link Select this option to copy a link to this folder to your clipboard. That link can be sent directly to a recipient to provide them access to the files contained in the folder.
For information on allowing the recipient to access the folder and its contents without logging into Kahua, refer to Public File Links.
Note Files contained in sub-folders are not included in the folder link. You must send a link for each sub-folder to send the files in those sub-folders to the recipient.
Send Link Select Send Link to open a new Kahua message with the folder link included. Complete the fields and click Send. All files contained in the folder will be included in the link.
Note Files contained in sub-folders are not included in the folder link. You must send a link for each sub-folder to send the files in those sub-folders to the recipient.
Sharing Select this option to open the Share page for the folder. Here you can add new shares and manage existing ones.
Pin / Unpin Select this option to pin this folder to your launch bar.
Once pinned, this folder can be opened directly from the launch bar without first opening the project or File Manager app. For more information, refer to Pin File Manager Folders to the Launch bar.
Properties Select this option to open the Properties page for the folder.
The permissions, notification settings, and configuration of folders can be modified. These elements follow the inheritance model, that is, the modifications made are inherited by folders lower in the folder structure until they are overridden. For more information, refer to Setting folder level properties in File Manager.
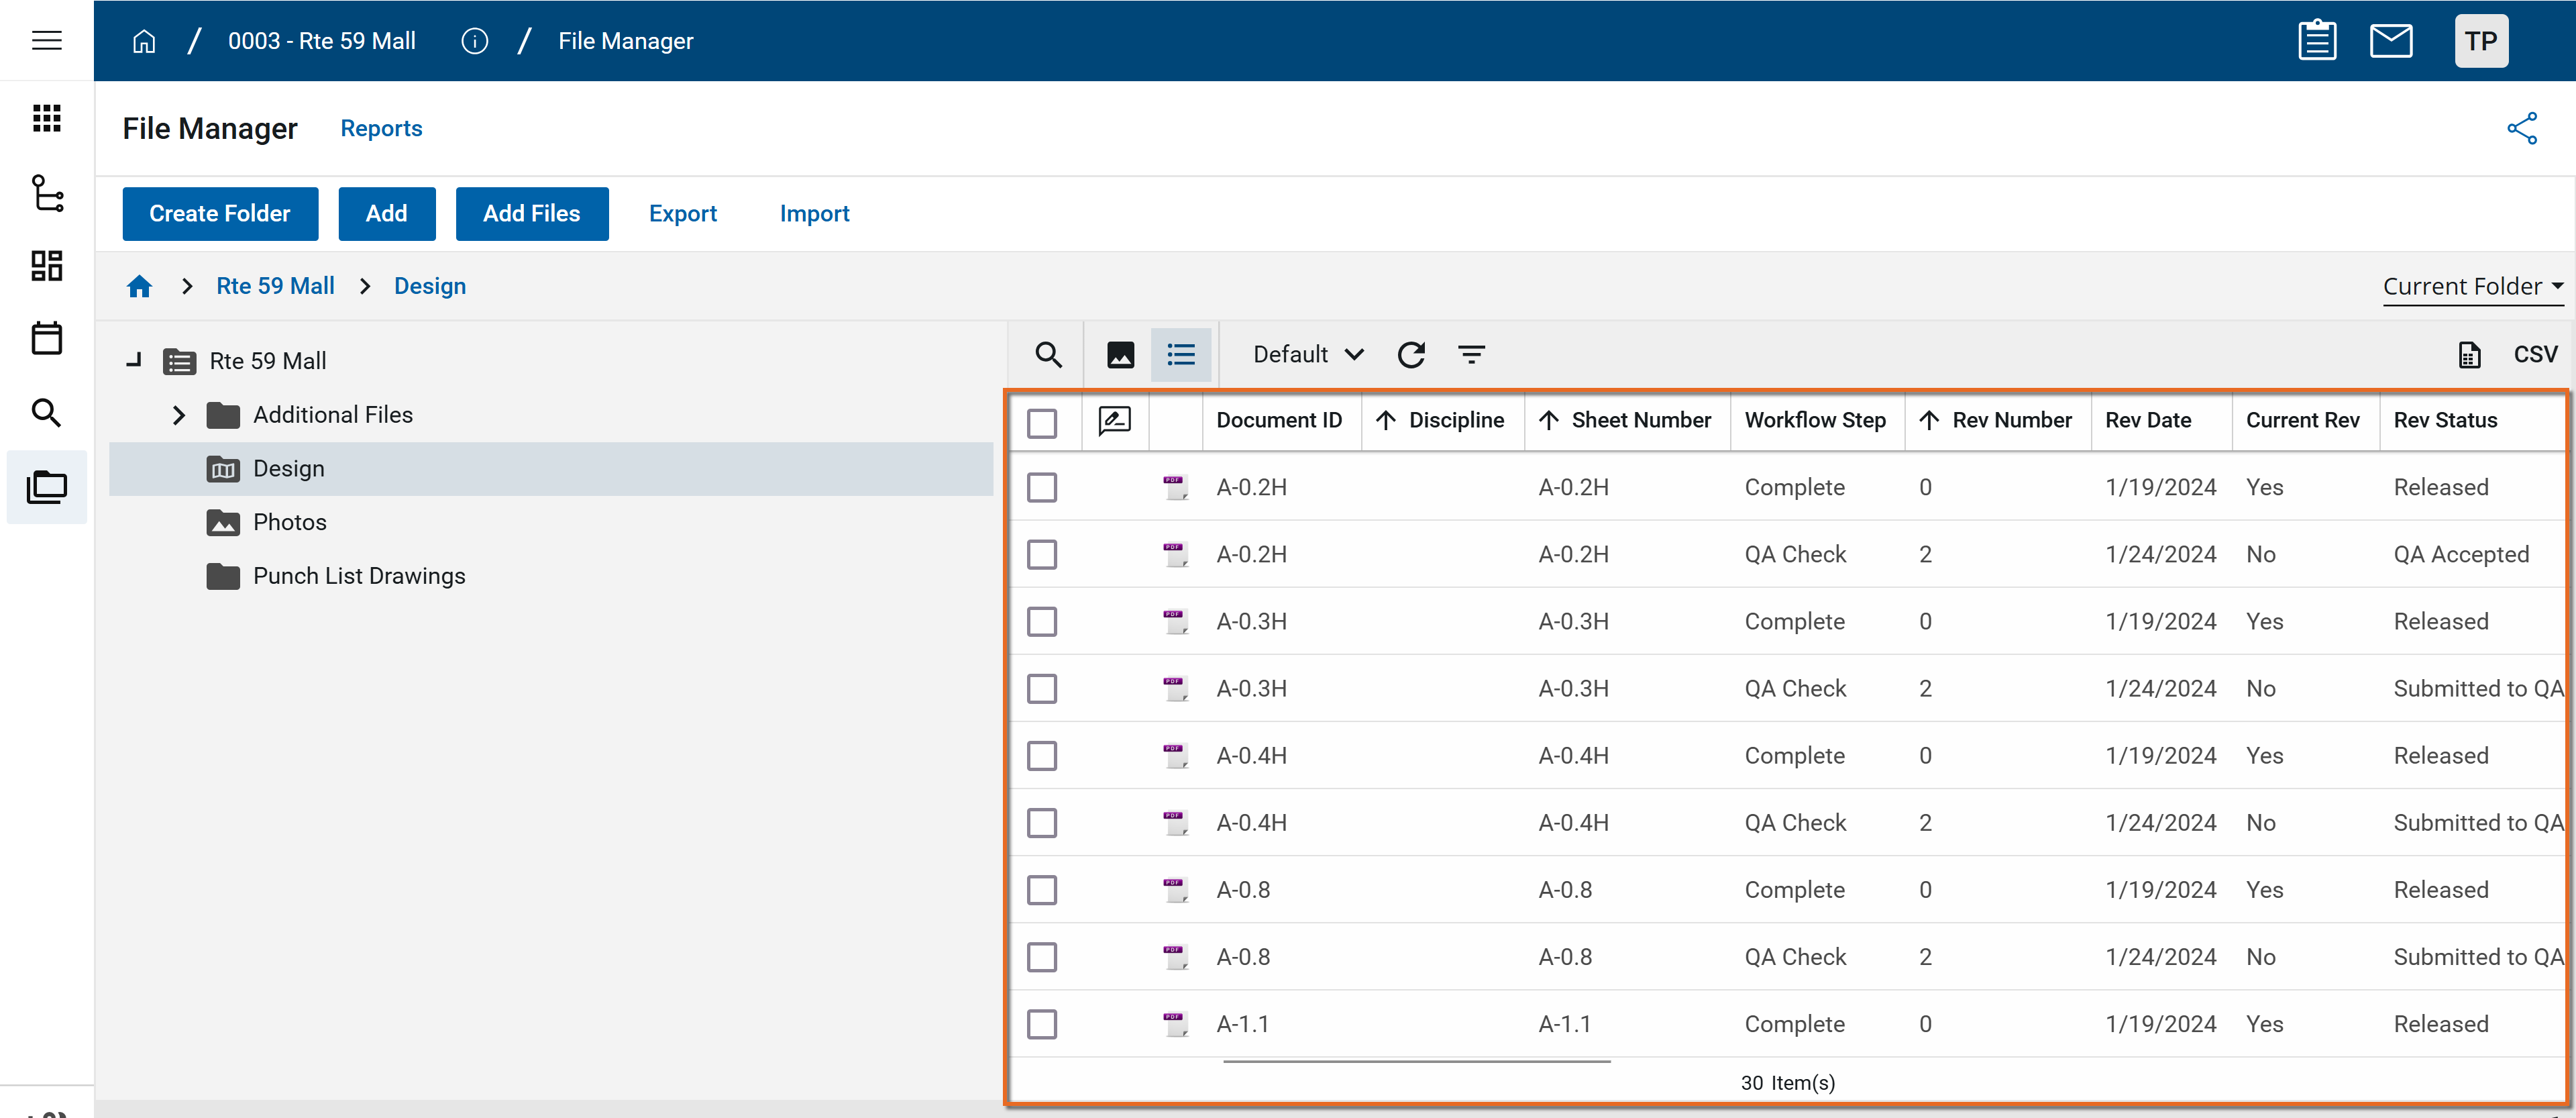
All files in File Manager are stored in folders and sub-folders.
Note There is no storage limit and individual files up to 10GB in size can be uploaded. For information on allowable file types and sizes, refer to File size and type restrictions.
To add a file to a file manager folder, complete the following steps:
-
Review the header to ensure that you are in the correct project or partition.
-
Navigate to the File Manager application (Apps > Document Management > File Manager).
-
In the left pane, select the folder where you want to add the file.
-
Use one of the following methods to add a file:
-
Drag and drop - Drag one or more files from your desktop or File Explorer to the panel on the right.
-
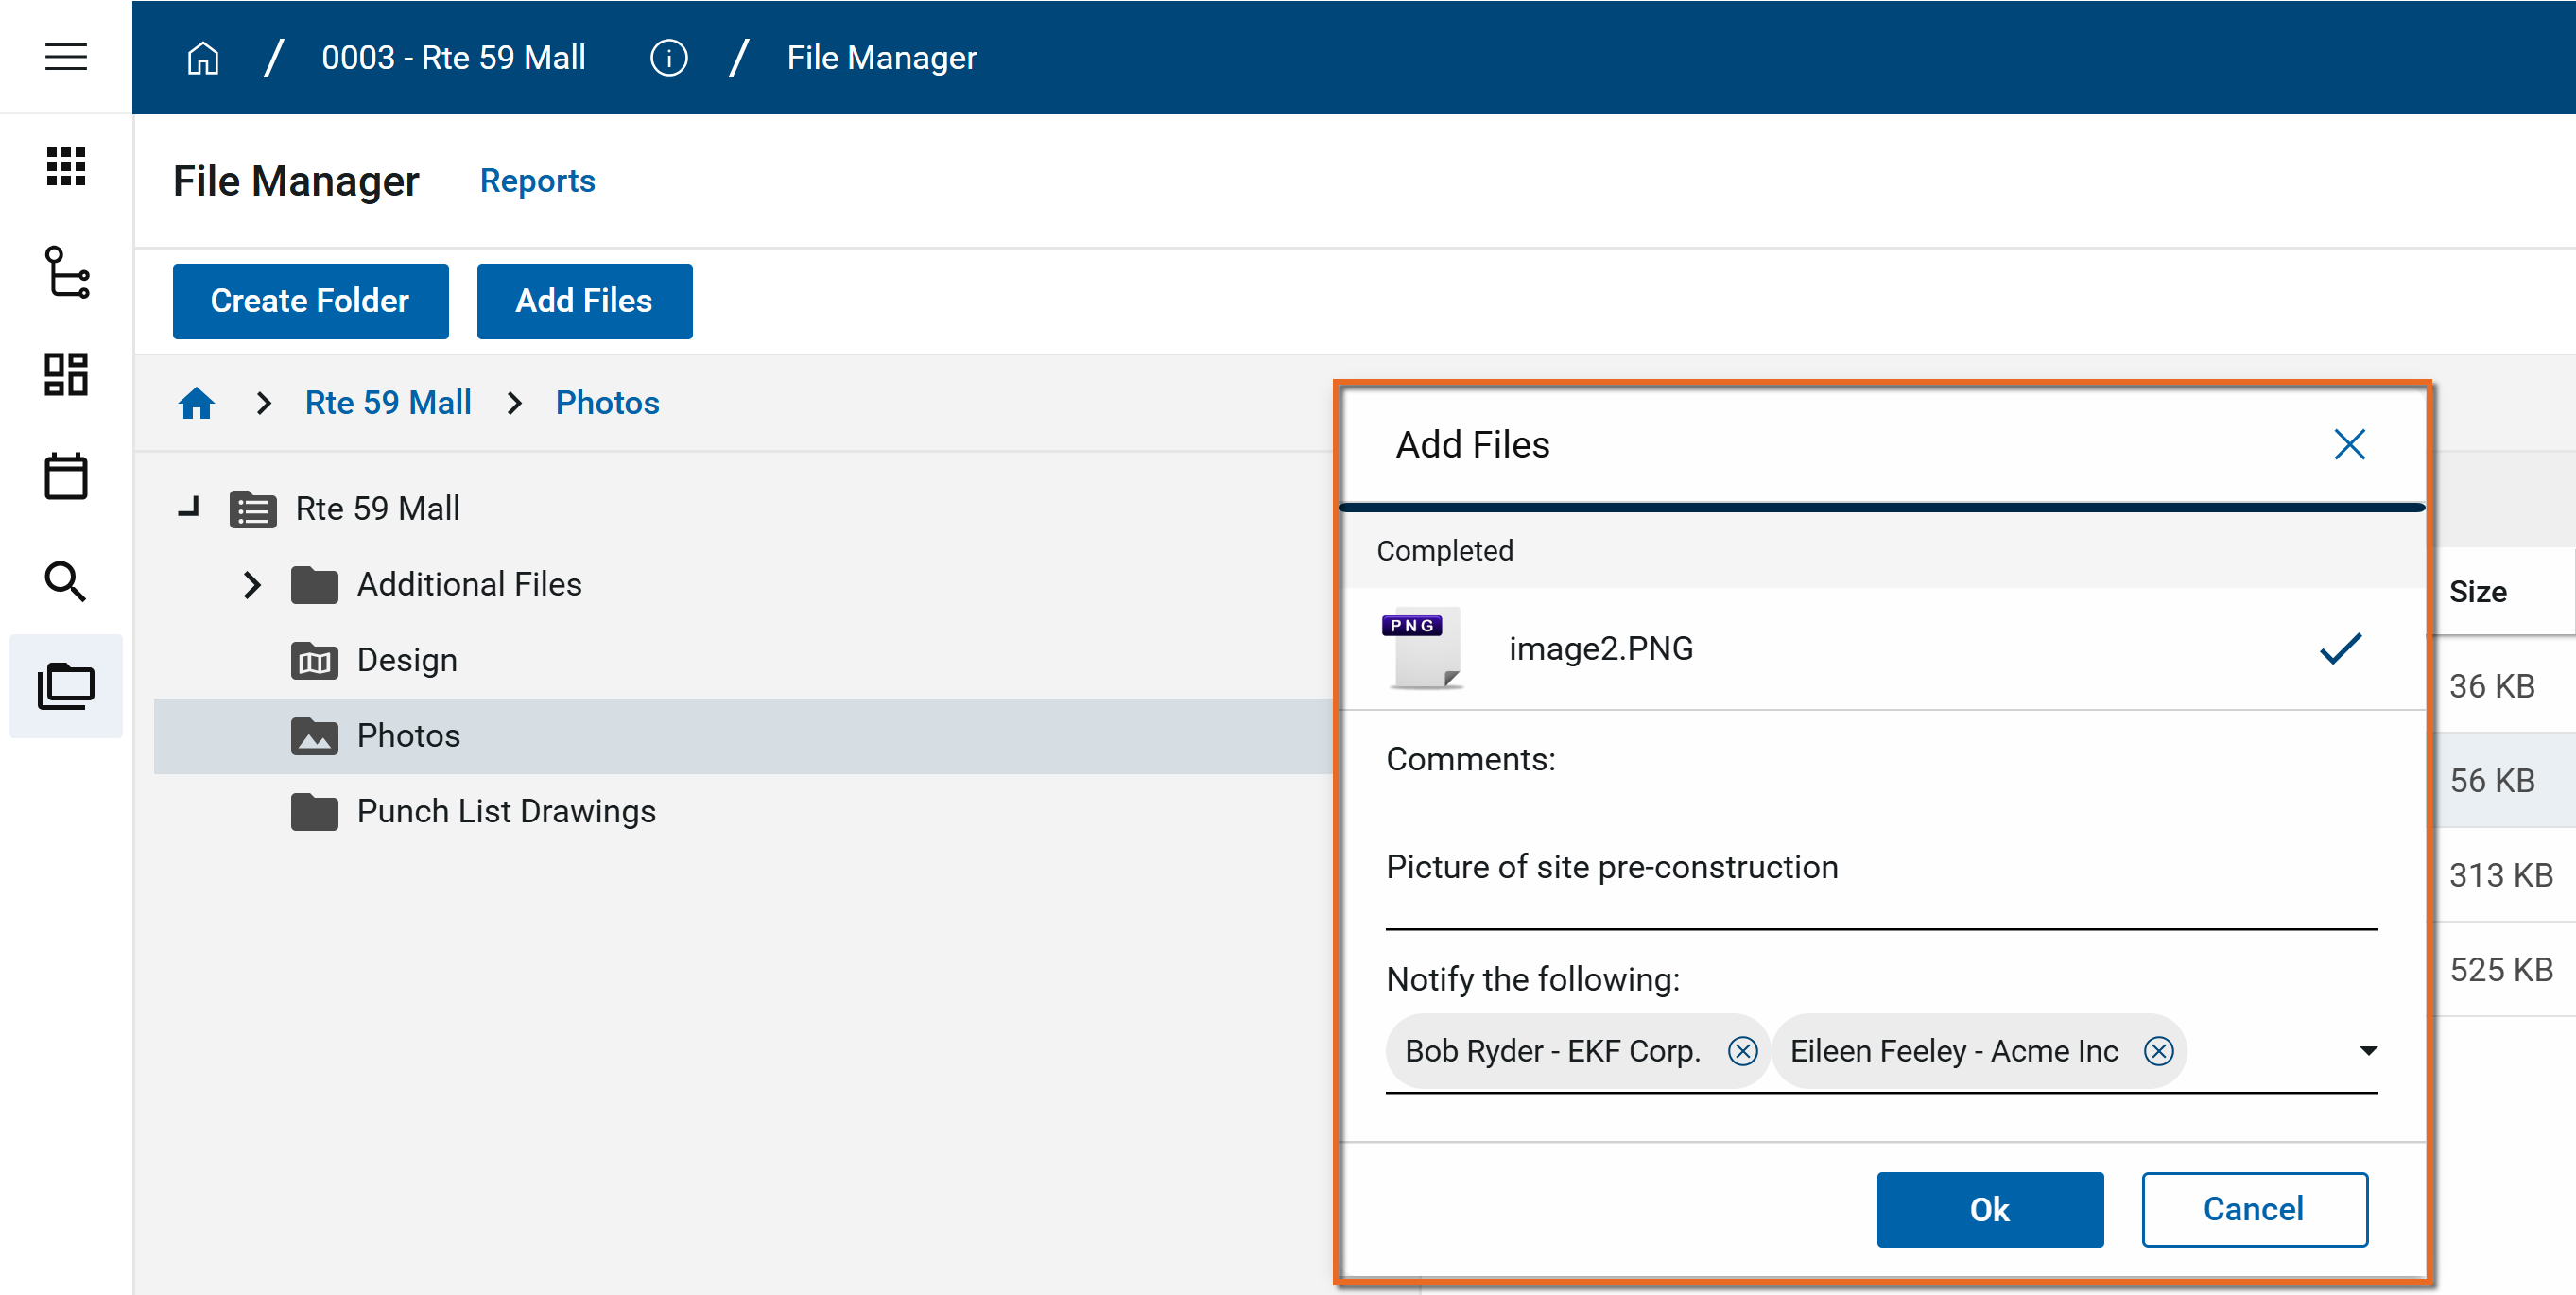
Add Files - Select the folder where you want to add files. Click Add Files on the action bar. If Google Drive uploads are enabled, select either From Computer or From Google Drive. Select one or more files and click Open.
Note For information on enabling Google Drive file uploads on the My Settings > General tab, refer to Enable Google Drive Uploads.
-
Add file in File Explorer - If you have enabled Local Files Sync, a copy of the folder structure from Kahua will appear in File Explorer on your computer. You can add files to those folders in your File Explorer and the files will sync the next time you log in to Kahua.
Note For information on setting up and using Local Files Sync, refer to Using Local Files Sync.
-
-
When using Drag and Drop or Add Files, the Add Files page appears once the file is ready to be uploaded. Enter any appropriate Comments and select contacts who should receive a notification that the file has been added to File Manager.
-
Click Ok when you are done.
You can also move, rename, copy, and delete files from the action bar or file right-click menu.
To manage files in File Manager, complete the following steps:
-
Review the header to ensure that you are in the correct project or partition.
-
Navigate to the File Manager application (Apps > Document Management > File Manager).
-
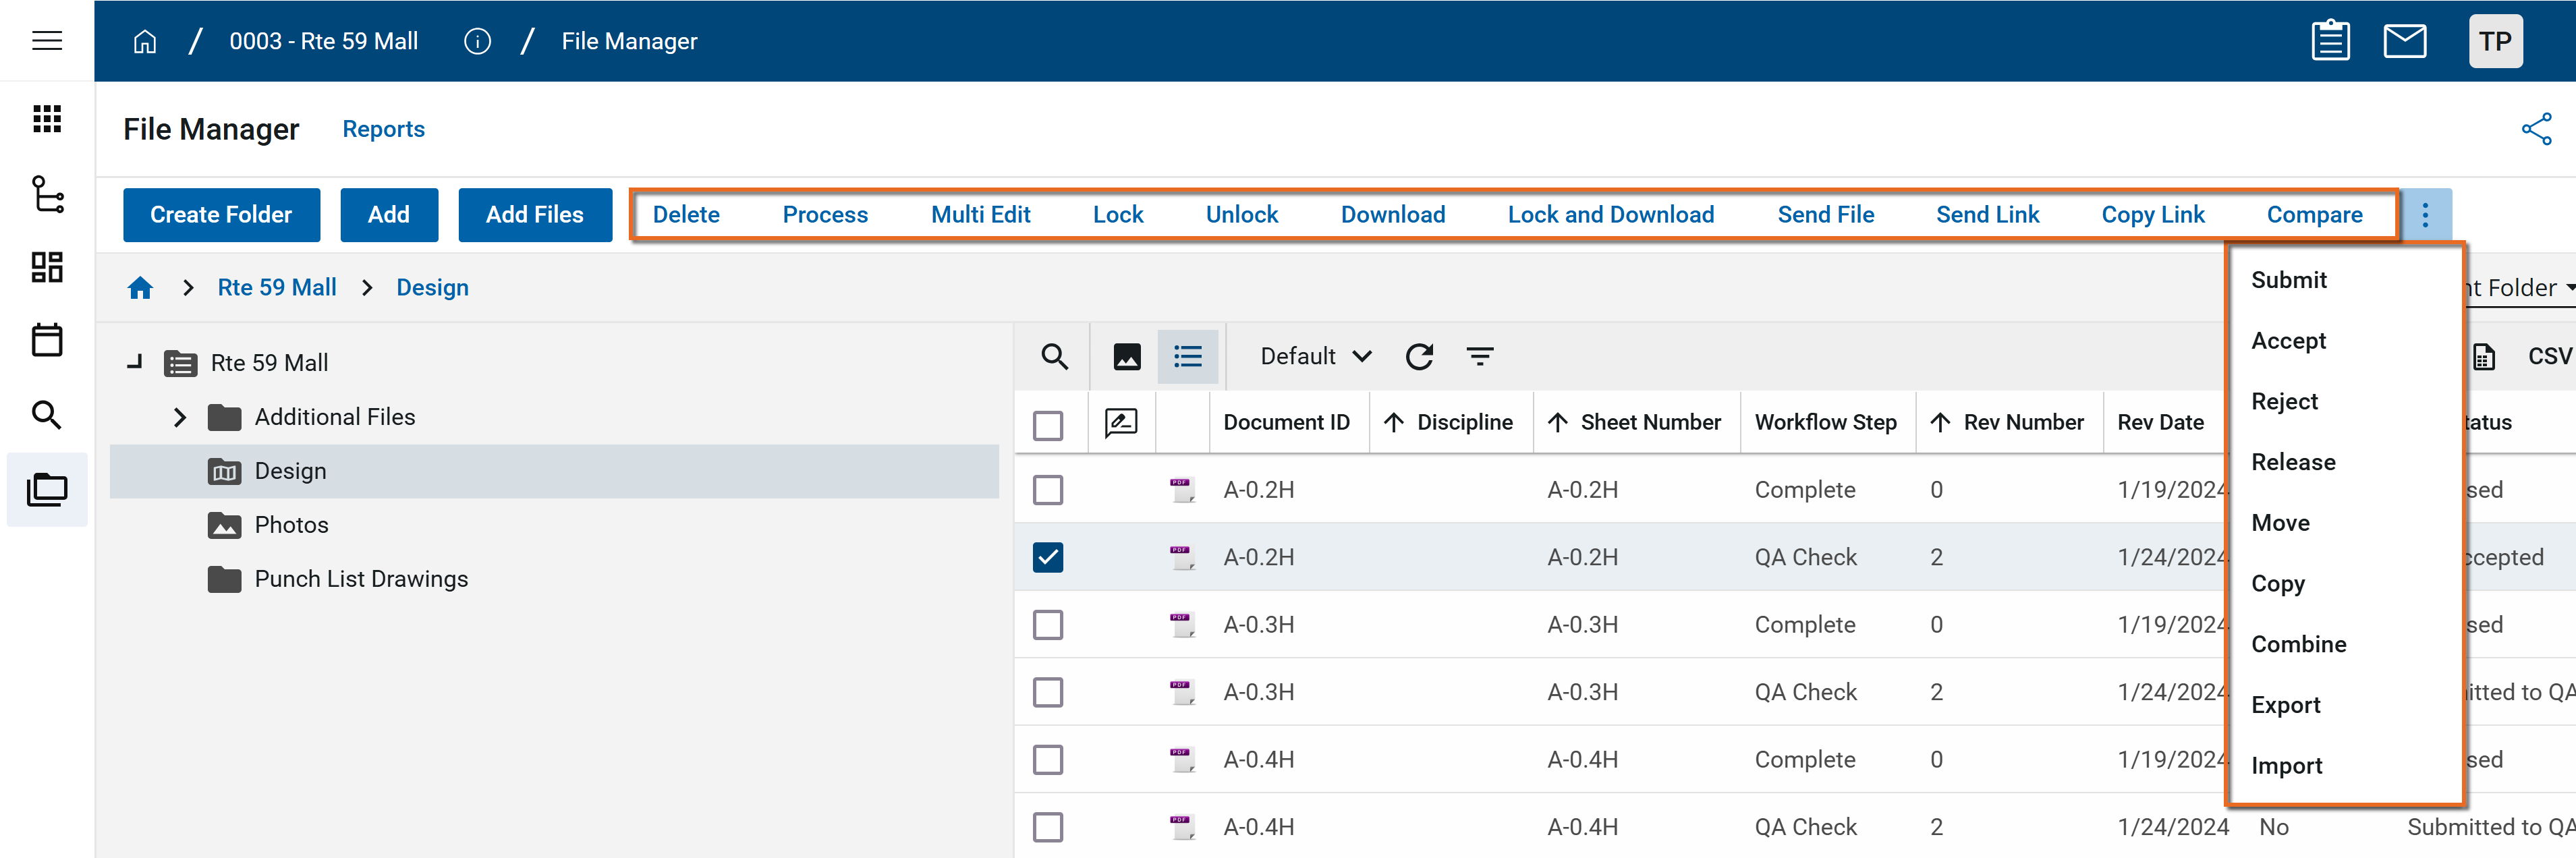
Open the appropriate folder and either right-click on a single file to open the right-click menu, or select the check box in the first column for one or more files to open the menu selection in the action bar.
Note In the action bar, click the More icon
 to show any additional options hidden for space reasons.
 -
Select one of the following actions as needed:
Note Depending on your permissions and the file selected, some actions listed here may not appear for you. Actions may appear in a different order.
Action Description Edit Select this option to edit data about the file.
Note To modify the file name, select Rename instead. Refer to Rename.
Process Select this option to process one or more files. In a controlled folder, this option can be used to process one or more drawings into a Design Review set.
Delete Select this option to delete the file.
Note If a record was deleted in error, it can be recovered from the Recycle Bin application by an administrator. Deleted records are available for restoration for a set number of days as configured in domain settings. For more information, refer to Using the Recycle Bin.
Multi Edit Select this option to edit to edit multiple files at one time.
Re-Process In a controlled folder, select this option to perform a title block extraction an additional time. Refer to Title Block Extraction.
History Select this option to view the history of this file.
Markup Select this option to open the file in Markup mode. For more information, refer to Using the Markup Tool.
Open Select this option to download the file to your device and open it in its native application.
View Select this option to open a view of the file within Kahua. Send File Select Send File to open a new Kahua message with the file included as an attachment. Complete the fields and click Send.
For more information on sending a message from within Kahua, refer to Create and send a new message from other applications in Kahua.
Send Link Select Send Link to open a new Kahua message with a link to the file included. Complete the fields and click Send. For more information on sending a message from within Kahua, refer to Create and send a new message from other applications in Kahua.
Note To send a link to the file to non-Kahua users, enable and use anonymous file linking. Refer to Public File Links.
Copy Link Select this option to copy a link to this file to your clipboard. That link can be sent directly to a recipient to provide them access to the files contained in the folder.
For information on allowing the recipient to access the folder and its contents without logging into Kahua, refer to Public File Links.
Send for eSignature Select this option to send the document for eSignature through Docusign. Refer to Send a file for eSignature.
Note You must be a member of a group with eSignature permissions for File Manager to use this option.
Important If this is your first time sending a document for eSignature through Docusign, you will be required to activate your account. For more information, refer to Activate your Docusign account to send signature requests.
Compare Select this option to visually compare one document to another by overlaying one on top of the other. For more information, refer to Using the Compare feature.
Move Select this option to move the file to a different folder within the current project or partition.
If a file with the same name already exists in the destination folder, you can choose to Skip moving that file, or Replace it. If you replace the existing file, the existing file will be deleted and placed in the Recycle Bin.
The moved file will appear in the destination folder in its entirety, which includes all its history, markups, versions, etc.
Note You can also move files from one folder to another by using drag-and-drop.
Important When moving a file, the destination folder must be of the same type as the folder where the file is being moved from, e.g., when moving files from a controlled folder, the destination folder must also be a controlled folder, from a files type folder to another files type folder, etc.
Copy Select this option to copy the file to a different folder within the current project or partition.
If a file with the same name already exists in the destination folder, you can choose to Skip moving that file, Replace it. or Save as Copy.
-
If you replace the existing file, the copied file will be added as a new version of the file that is in the destination folder, and include any markups from the copied file.
-
If you save the file as a copy, a new instance of the file is created and includes any history, markups, versions, etc. from the copied file. The new instance is renamed with Copy, Copy (1), Copy (2), etc appended as appropriate.
Note Files can be copied from one folder type to a different folder type.
Rename Select this option to modify the file name. When a file is renamed, a new version is created and the Version number increases. Lock / Unlock Select these options to lock or unlock the file.
Note When a file is locked, only administrators and the person who locked the file can edit it or unlock it. Other users can view or download the file.
Download Select this option to download a copy of the file to your device. Lock and Download Select this option to lock the file and download a copy of it to your device.
Note When a file is locked, only administrators and the person who locked the file can edit it or unlock it. Other users can view or download the file.
Combine Select this option to combine one or more files into a single PDF document. You can optionally include markups in the combined file. You can select any non-controlled folder in the project to receive the resulting file.
In Files and Media folder types, files are combined in alphabetical order by file name. In Controlled folders, they are combined in Sheet Number and Revision number order.
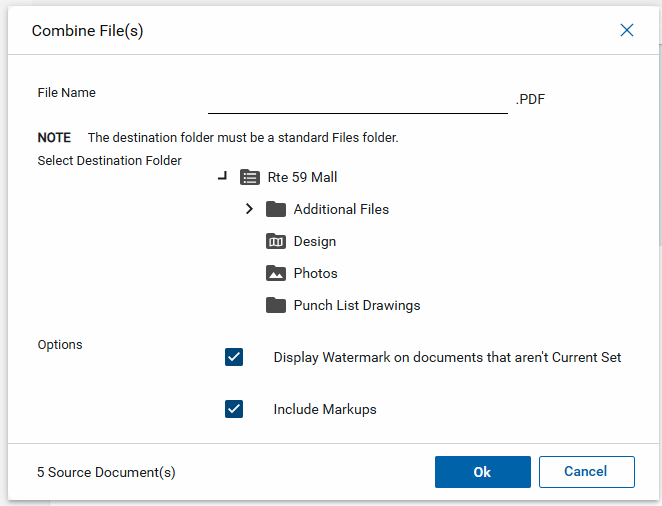
This option can be used in a controlled folder to create a current set of drawing files as a single multi-page PDF file. To do so, select the Current Revisions log view, select all the files by clicking the check box in the header, then select Combine from the action bar.
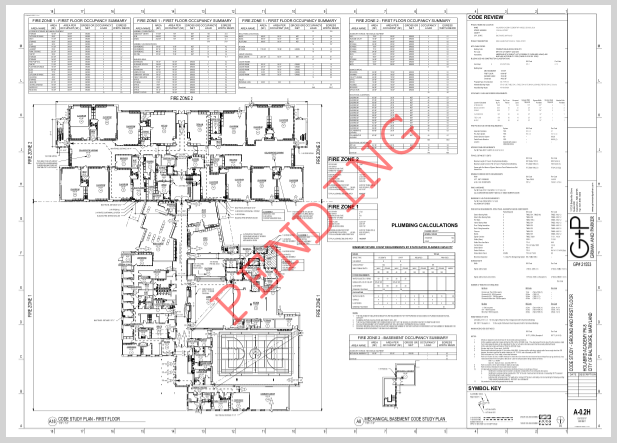
If you include previous revisions in the combined file, you can select Display Watermark on documents that aren't Current Set. When selected, previous revisions or drawings pending approval will include a watermark indicating their status.
Create Template Select this option to create a Title Block Extraction template. For more information, refer to Title Block Extraction. -
Like the rest of Kahua, file folders in File Manager follow the inheritance model. That is, permissions and configuration settings are inherited from the application settings and from the folders higher in the folder structure unless overridden. For information on modifying permissions, notifications, and configuration settings at the folder level, refer to Setting folder level properties in File Manager.
Domain Administrators can use the Permissions Explorer to review permissions for specific users and folders in the File Manager app.
To open the Permissions Explorer and review the results, complete the following steps:
-
Review the header to ensure that you are in the correct project or partition.
-
Navigate to the File Manager application (Apps > Document Management > File Manager).
-
On the launch bar, right-click on the app name or click the Open Overflow icon
 and select Permissions Explorer.
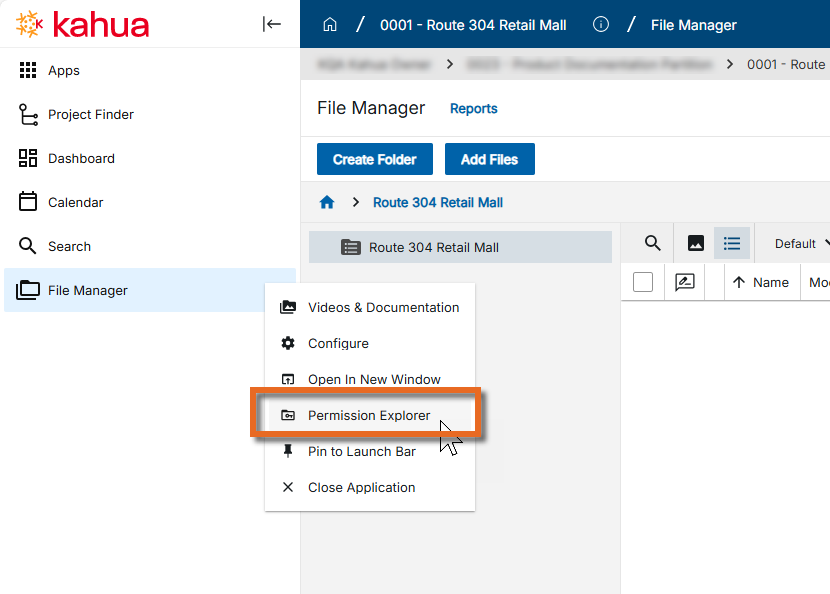
-
The Status Panel appears with the Permission Explorer selected. To adjust the size of the panel, click on the "grabber" icon
 on the lower-right corner.
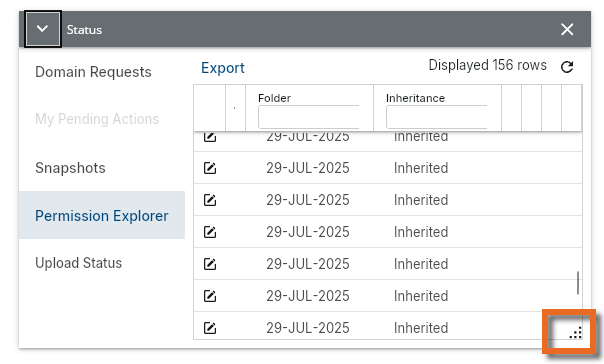
Column widths can be adjusted by clicking and dragging the boundary to the right of the column header.
-
You can review the list of folders and direct domain users, including the role assigned to each entry.
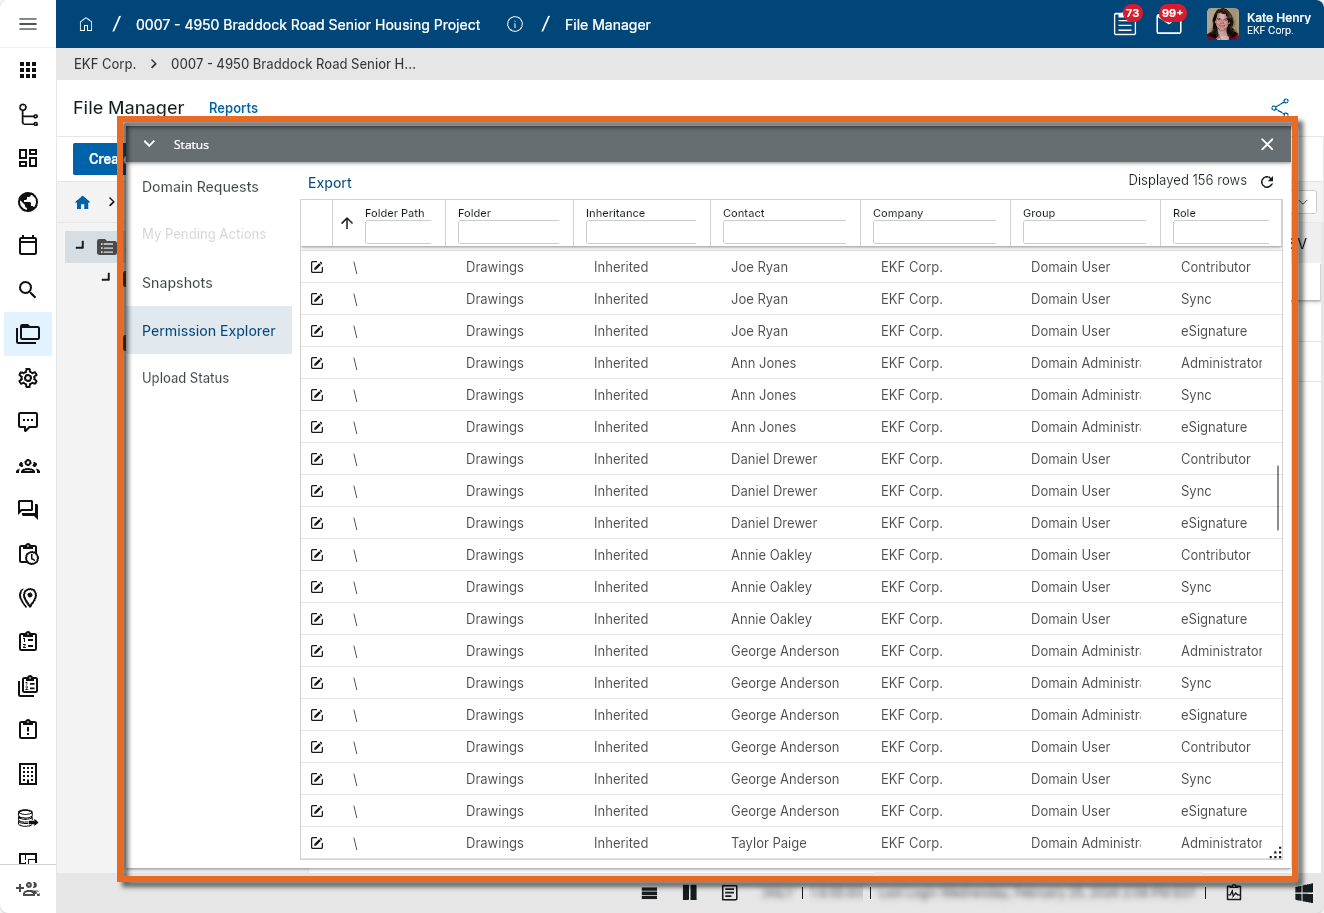
Note Only direct users on the domain are returned. Contacts that are not domain users, or users who access a folder via sharing, do not appear. Additionally, groups that do not have members associated with the project do not appear on the list.
-
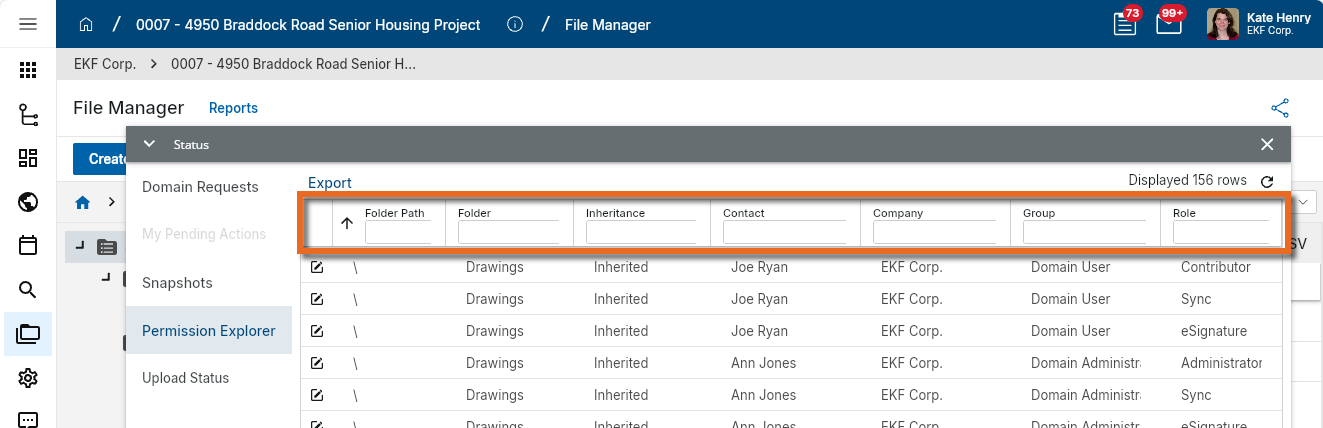
Up to 50,000 rows appear on the screen. You can apply filters in the column headers to narrow the results to specific users, folders, or roles.
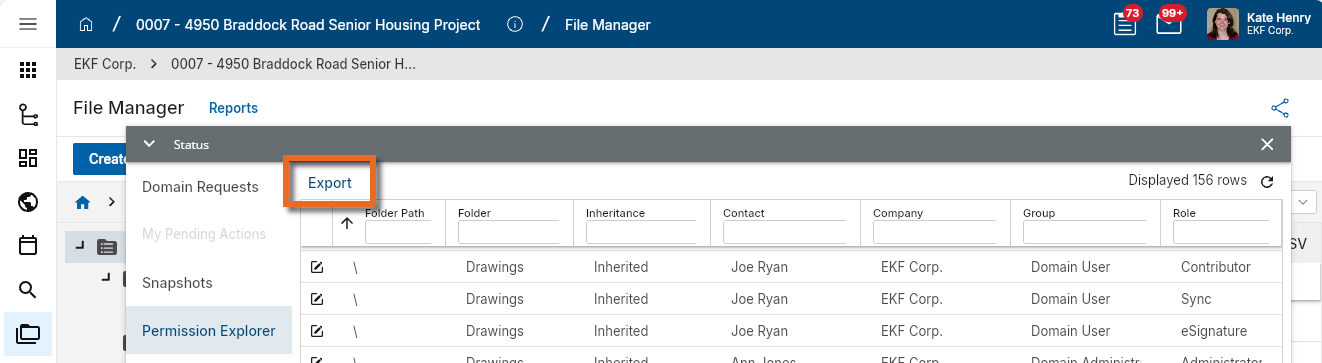
Alternatively, select Export to export filtered results up to 1,000,000 rows to a CSV file.
-
To open a folder for updates, click the folder navigation icon in the far-left column to go directly to that folder.
If you make permission changes, click the Refresh icon
 in the top-right corner to refresh the results.
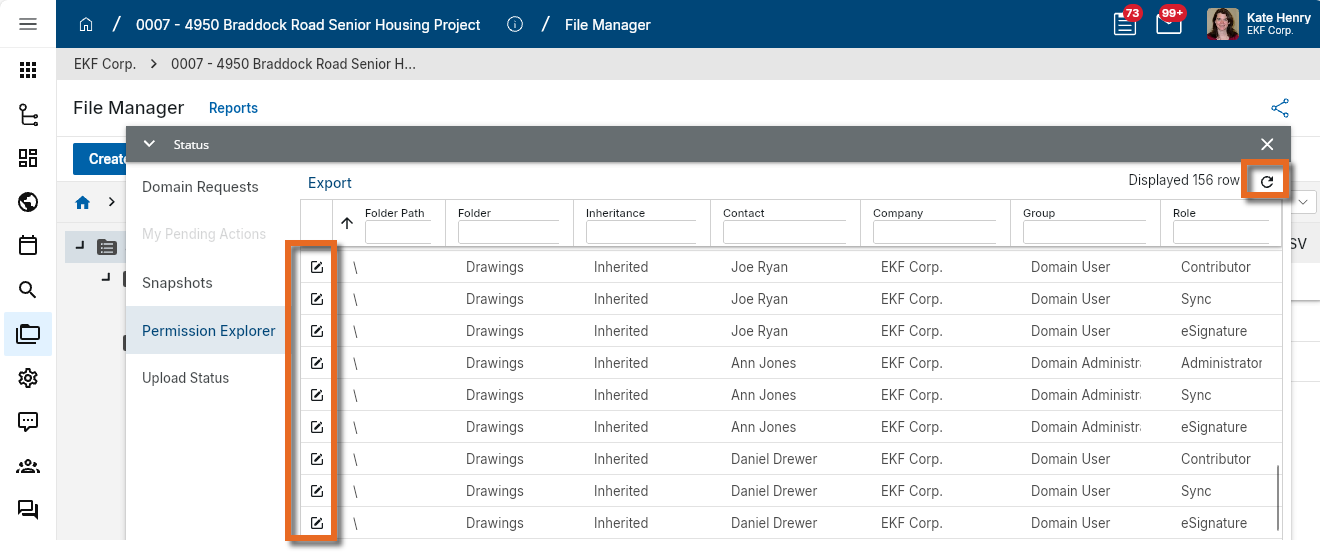
The File Manager app is unique in that it follows the standard options of managing permissions in the Groups app and settings in the Configuration app, but both permissions and settings can also be managed on the folder level in the File Manager app.
Information on managing permissions and configuration in both locations is as follows:
The File Manager app is unique in that permissions are managed in both the Groups application, and for individual folders in the File Manager app.
These are the permissions available for this application:
| Permission Options | Description |
|---|---|
| Administrator | Configure and perform all operations in the app (add, add file, configure, create folder, create report, delete file, delete folder, download, edit file, edit folder, export drawing log, import drawing log, lock/unlock all, markup, open app, process, send file, share, view file, view folder) |
| Contributor | Contribute content to the app (add, add file, delete file (contributor), download, edit file, lock/unlock, markup, open app, process, send file, view file, view folder) |
| Controlled - QA Accept/Reject | Users with this role can QA Accept and QA Reject documents in controlled folders. |
| Controlled - Release Document Revisions |
Users with this role can release document revisions from controlled folders. Note This role is separate from the Design Review process and does not impact documents that are processed into a Design Review set and then released through the completion of that Design Review. |
| Controlled - Supersede Document Revisions |
Users with this role can supersede document revisions from controlled folders. Note This role is separate from the Design Review process and does not impact documents that are processed into a Design Review set and then released through the completion of that Design Review. |
| eSignature | send for eSignature |
| Import/Export |
import drawing log, export drawing log Note This role allows you to grant non-administrators the ability to import and export records to and from a controlled folder. It should be combined with another non-administrator role. |
| Folder Administrator | Administrate group permissions in child folders (add file, create folder, delete file, delete folder, edit file, edit folder, open app, view file, view folder) |
| Folder Contributer | Same permissions as the Contributer role, with the added ability to create folders (add, add file, create folder, delete file (contributor), download, edit file, lock/unlock, markup, open app, process, send file, view file, view folder) |
| Moderator | Manage content in the app and perform maintenance operations (add, add file, create folder, delete file, delete folder, download, edit file, edit folder, lock/unlock, markup, open app, process, send file, share, view file, view folder) |
| Navigator |
Users assigned to a group with this role can open the File Manager application and navigate the folder structure, but they are not able to access any file content in the folder. Administrators can then grant permissions to specific folders and provide targeted access. |
| None |
No permissions. Note This selection supersedes any other group access which grants access to the File Manager app or specific folder. It ensures that users named in a group with this permission selected are unable to access the files managed by this setting. |
| Observer | View content in the app (download, markup, open app, process, send file, view file, view folder). |
| Publisher | add file, download, edit file, markup, open app, send file, view file, view folder |
| Sync | Enables sync (sync folders). Refer to Using Local Files Sync. |
| ViewOnly |
View only (open app, view file, view folder) Users with this permission can open the File Manager app and view folders and files. They cannot download, send, or perform any other action that would provide direct access to the file. Note This selection supersedes any other permissions granted to the user by their membership in other groups. |
| Filtering |
Filtering allows you to control what files a user has access to, based on criteria such as "Created by Current User's Company", "User Company Named on Record", "Contributor Company OR Status: Released, Superseded", etc. Once Filtering is selected, you can apply filters for the following two groups of folder types:
The following filter options are available for the Filtering Controlled folders setting:
|
Your domain administrator or another user with the appropriate permissions can configure the File Manager app in the Configuration application.
Important When working in the Configuration app, it is important to review the header and ensure that you are working at the correct level in the hierarchy, either the root domain or at a partition or project level.
Settings that you establish at the root domain or lower levels will inherit down the hierarchy until they are overridden. For more information on the hierarchical structure of Kahua, refer to Understanding the hierarchical structure of Kahua.
The Configuration app can be accessed directly through the apps list (Apps > Administration > Configuration), or by right-clicking on an application in the launch bar and selecting Configure. When you select Configure for an app from the launch bar, the detail view of the configuration page for that application opens automatically.
For information on configuring this app in Configuration, refer to Application configuration.
The following items are specific to the File Manager application:
| Options | Description |
|---|---|
| General | |
| In addition to the standard Enabled selector, the General tab contains settings to manage public link file access for the current partition or project. For more information on these settings, refer to Configuring Public File Links. | |
| Workflow | |
| Enabled |
Select which of the following folder types are available for the current partition or project:
|
| Settings | |
| Display 'Permissions' tab for Contributor/Moderator role |
By default, the Permissions tab on the File Manager Folder level is available to administrators. Selecting this option makes it available in view-only mode to users with the Contributor and Moderator roles. This allows Contributors and Moderators to review which user groups have access to which folders, and which user groups have the ability to do a local file sync on selected folders in this partition or project. |
| Files & Media | |
| Copy Markups to new File Versions |
Select how you want to handle copying markups to new versions of an uploaded file in File Manager folders of type "Files" and "Media". The following options are available:
Click Save when you are done. |
| Controlled Documents | |
| File Name Nomenclature section - Enforce Nomenclature | Selecting this option requires the drawing name to follow the structure set up in the File Name Definition field. The drawing name is automatically created based on the attributes selected in the definition. |
| File Name Definition | Enter the attributes that will be used to create the name of the file. |
| Reapply to Existing Files | Selecting this option will reapply the File Name Definition to existing files. |
| File Consolidation section - Enforce Consolidation | |
| Allowable Primary File Extensions | |
| Required Secondary File Extensions | |
| Other Settings section - Check for Revision Gaps during Submit | |
| Copy Markups/Comments from Current Set to New Revisions |
Select how you want to handle copying markups and comments to new revisions of an uploaded file in Controlled folders. The following options are available:
When "Copy all Markups and Comments" or "Copy Markups and Comments not Closed" is selected, markups are copied to the new drawing revision when submitted for QA review and when the Status field is changed directly from "Draft" to "Released". |
| Copy Markups from Previous Version to New Version of that Revision |
Select how you want to handle copying markups and comments to new versions of the same revision of an uploaded file in Controlled folders. The following options are available:
|
| QA Duration | |
| Allow Tagging in Released Status | Select this option to allow users to tag assets to Controlled documents that have a status of "Released". |
| Copy Tags from Current Set to New Revisions |
Select this option have asset tags on files in controlled folders be carried forward to new document revisions. Any asset tags associated with a drawing revision will be copied to the new revision when the file is moved out of "Draft" status. This functions similarly to the Copy Markups to New Revision feature. |
| Discipline Abbreviations | |
| Start Position of Discipline Abbreviation |
This selection is used during Title Block Extraction to use determine the location of the Discipline Abbreviation in a drawing number to assign a discipline to a drawing automatically. The number refers to the position of the discipline in the drawing number. Example For example, you would select 1 where drawings are numbered such as M101 for the first Mechanical drawing. On a project with drawings with a number pattern such as 01-M101, where the initial 01 prefix represents a project area and the Discipline is in the fourth position, you would select 4 as the Start Position of the Discipline Abbreviation. |
| Discipline Code / Discipline |
By default, Kahua comes preloaded with the twenty-one disciplines as defined by the United States National CAD Standard® -V6; a product of the National Institute of Building Sciences buildingSMART alliance™. These values can be modified.
Note For more information on working with grids, refer to Item Grids. |
| Review Statuses (for Files) | |
|
This tab is where you can configure the Recommended Review / Review Status fields to match the needs of your organization. You can enable or disable existing items. To add a new Review Status, select Insert in the grid. Note Once a Review Status is created, it cannot be deleted. It can, however, be modified or disabled. |
|
| Enabled |
Select or clear this field to enable or disable this status. Note Once a review status is created, it cannot be deleted but it can be disabled or modified. |
| Sort Order | Use this field to control the order in which the Review Statuses appear. |
| Review Status Label |
Enter or modify the label for the review status. The label can be modified to match your organization's preferred terminology. This label will appear for selection in the Review Status field. |
| Review Status Rule for Revisions/Versions |
Select the appropriate rule to be associated with each Review Status. This selection determines the business logic for the Files for Review Revision upon completion of the design review. Choose one of the following:
For information on versions vs revisions, refer to Understanding Versions vs Revisions in Controlled Folders. |
| Inc in Release Msg |
Select this option to include this status in release messages. Release messages are sent out at the completion of the review to all reviewers, the identified information manager, and contributing contact in the identified work package on your files for review. Note Typically, release messages include all Review Statuses. |
| Release Msg Label | Enter or modify the label used for this Review Status in Review Messages. |
| Inc in Dist Msg |
Select this option to include this status in distribution messages. Distribution messages are sent out at the completion of the review to contacts identified for Distribution and Client notifications. Note Typically, Distribution Messages include Review Statuses where the file for review is marked as the "Current Revision". |
| Dist Msg Label | Enter or modify the label used for this Review Status in Distribution Messages. |