CMMC Readiness app
The CMMC Readiness app is a domain-level app designed to help Department of Defense (DOD) contractors prepare for and maintain compliance with CMMC Level 2 certification. Through the CMMC Readiness app, you can self-assess your organization’s preparedness for your certification assessment by tracking your progress directly against DOD required controls and assessment objectives.
Within the CMMC Readiness app, you can invite others within your organization or outside of it, such as a CMMC consultant, to collaborate with you in a single workspace. You’ll be able to manage your controls and objectives, track progress through control and objective-level statuses, set due dates, and assign controls to owners within your organization.
The app is available for use both by existing Kahua customers and external organizations seeking a streamlined approach to CMMC compliance. If you are currently a Kahua customer, reach out to your Kahua point of contact to request access. If you are not currently a Kahua customer, you can request a demo by visiting https://www.kahua.com/cmmc-readiness-app/ to learn more about the app and discuss how to get started.
Note Non-Kahua platform customers who are only using the CMMC Readiness app can review the Quick Start Guide for Non-Platform CMMC Users for more information.
Key elements of the CMMC Readiness app include the following:
-
You can use the app to track your company's CMMC readiness for a Level 2 certification.
-
The app follows the DOD structure for control families, individual controls, and the objectives that are part of each individual control.
-
Controls are the security requirements that your organization is required to implement to achieve CMMC certification. Objectives are sub-components of each control. They are the milestones your organization will be assessed against.
-
You can invite internal team members and your CMMC consultant to work in the app and collaborate with them.
-
You can assign responsibility for individual controls to yourself or other users.
-
If desired, you can track start dates and due dates for each of the controls.
-
Controls and objectives that are assisted by Kahua's platform are marked by the Kahua logo
 .
. -
You can upload documents to be used as evidence for individual assessment objectives in a control. A document can be associated with multiple assessment objectives under different controls.
-
All uploaded evidence documents can be managed in the Evidence Manager, regardless of where they were uploaded. You can view a document directly within the app, download it, or upload a new version.
-
You can easily review your progress towards certification assessment readiness in the Status Overview section of the dashboard and manage assigned due dates in the Due Date Tracker.
How to . . .
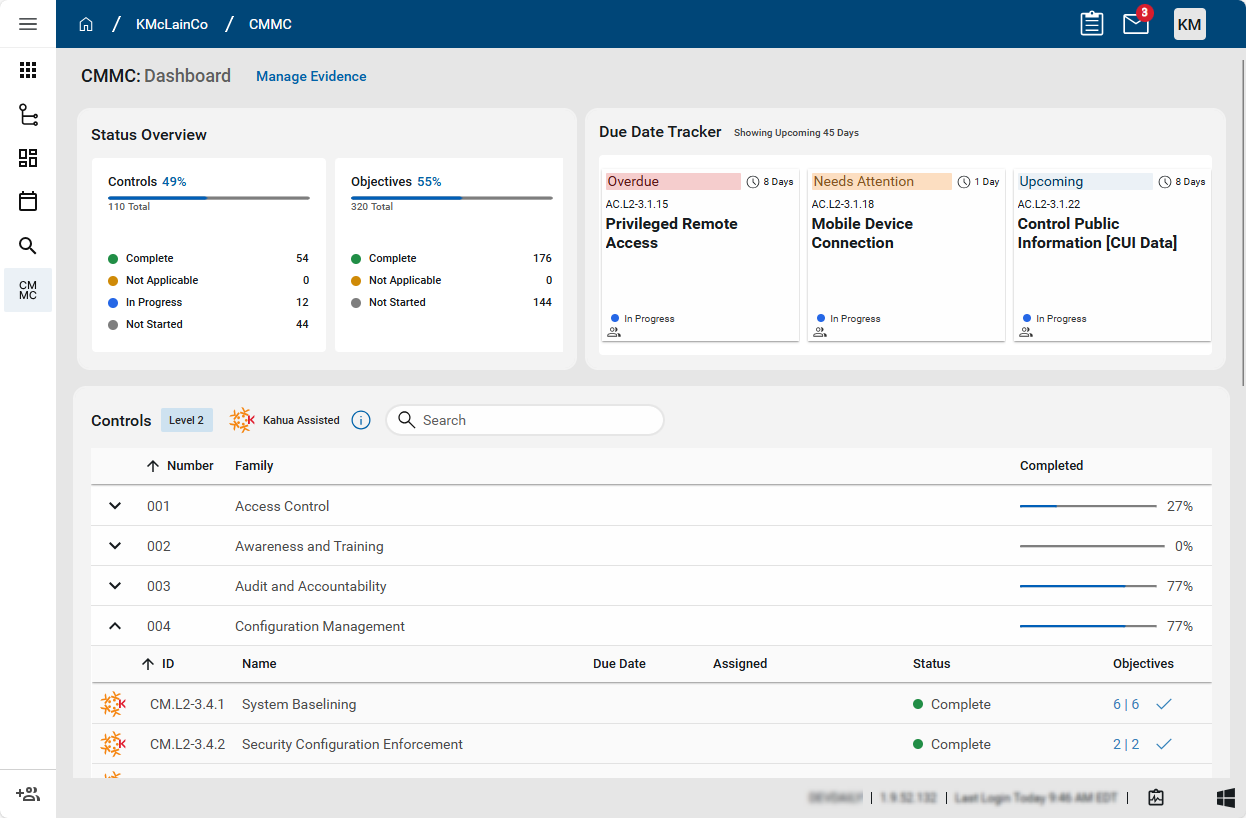
When you open the CMMC app, your dashboard appears. The dashboard is composed of three sections: Status Overview, Due Date Tracker, and Controls. You track your work in the Controls section. The Status Overview and Due Date Tracker show you how far along you are in the process and what components are overdue or are coming due.
To review your dashboard, complete the following steps:
-
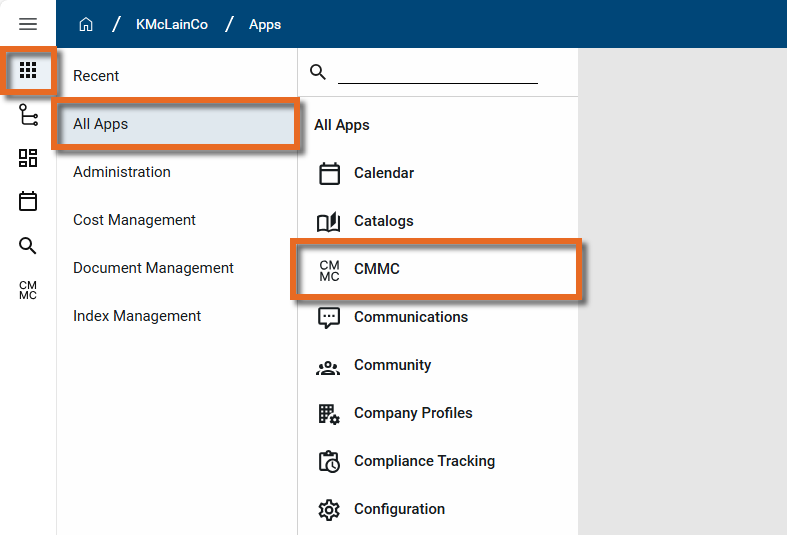
Log in to Kahua and open the CMMC app by navigating to Apps > All Apps > CMMC.
Note If your organization is a current Kahua customer and you are using the CMMC app in your Kahua domain, ensure that you are in the root domain.
-
Review the Status Overview. The Status Overview has two sections:
-
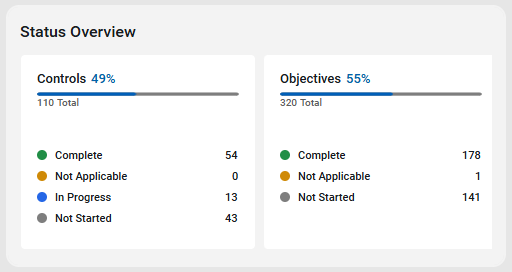
Controls - Controls are the security requirements that your organization is required to implement to achieve CMMC certification. This section informs you what percentage of the work for Controls is complete. The percent complete represents the number of controls set to "Complete" and "Not Applicable", divided by the total number of controls. Below that percentage, the individual numbers of "Complete", "Not Applicable", "In Progress", and "Not Started" controls are shown.
-
Objectives - Objectives are the milestones your organization will be assessed against. They are sub-components of each control. Objectives progress allows you to track your certification preparation at a more granular level. The percent complete represents the number of objectives set to "Complete" and "Not Applicable", divided by the total number of objectives. Below that percentage, the individual numbers of "Complete", "Not Applicable", and "Not Started" objectives are shown.
-
-
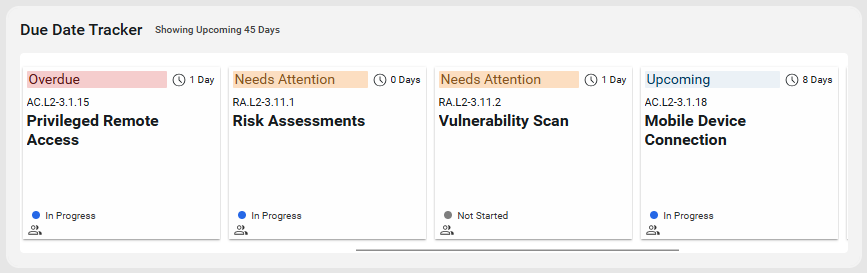
Review the Due Date Tracker. Controls that are overdue or due in the next 45 days appear here, in one of the following three categories in the following order:
-
Overdue - Controls with a due date prior to today.
-
Needs Attention - Controls with a due date of today or within the next seven days.
-
Upcoming - Controls with a due date after seven days from today but within the next 45 days.
Each tile contains information about the control, including how many days it is overdue or the number of days until the due date, its name and number, the status, and which, if any, user it's been assigned to. Click on the tile to open the control record.
-
-
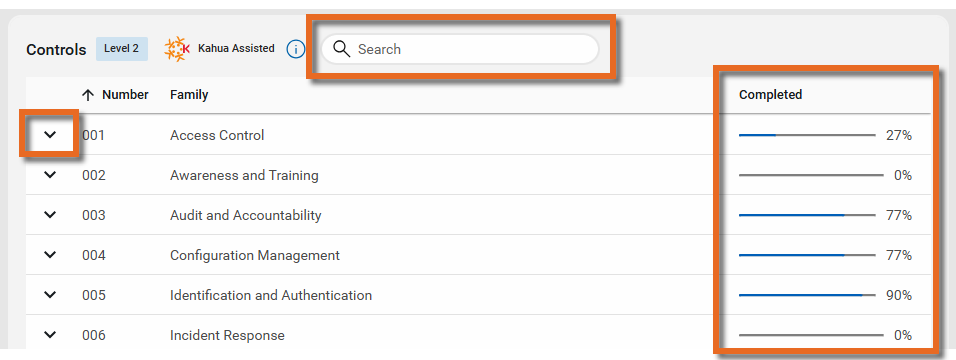
Review the Controls section. This section lists all the controls for the level of certification you are seeking. They are organized by Control family. Select the Expand icon
 to open a list of the individual controls in each family. For each individual control, you can view the ID number, Name, Due Date, Assigned user, Status, and the number of "Complete" or "Not Applicable" objectives and total number of objectives for that Control item.
The Completed column for each Control family shows the percentage of controls set to "Complete" or "Not Applicable" in that family, divided by the total number of controls in that family.
Click anywhere on the line of an individual control to open the record for that control. The control record includes the individual objectives that are part of that control, links to evidence documents, and general information on the status and assignments for that control.
Controls and objectives that are met when using Kahua's platform are noted with the Kahua logo icon ![]() .
.
The Status field for these objectives is set to "Complete" by default. For controls where all the objectives are satisfied by the use of Kahua, the control's Status field is also set to "Complete" by default.
This value is editable for both controls and objectives and can be modified as desired.
On the control record, you can update the status, set an inheritance designation, add dates, assign ownership to yourself or others, and manage the related objectives, including linking evidence to the control or individual objectives on that control.
To review and manage the control record, complete the following steps:
-
Log in to Kahua and open the CMMC app by navigating to Apps > All Apps > CMMC.
Note If your organization is a current Kahua customer and you are using the CMMC app in your Kahua domain, ensure that you are in the root domain.
-
In the Controls section of the Dashboard page, select the Expand icon
next to the appropriate control family and click on the line for the appropriate control. Alternatively, enter a search term to search the list of controls and select the appropriate control from the results list.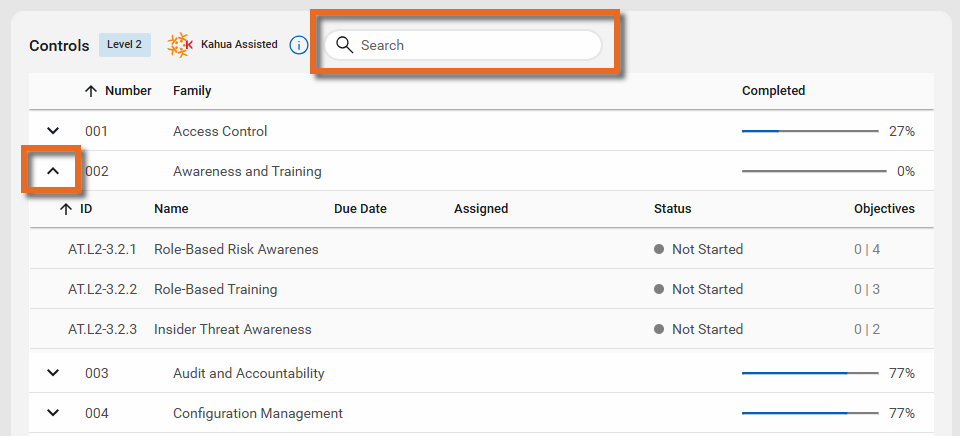
-
The page for the selected control's record appears. Note that the Details section includes the read-only ID, Name, and Description of the control. Review this information to confirm that you have selected the appropriate control. If desired, click the Details header to collapse the section.
Note If you have selected the incorrect control, click the Close icon
 in the upper right corner to close the page and return to the Controls section of the dashboard to select the correct control.
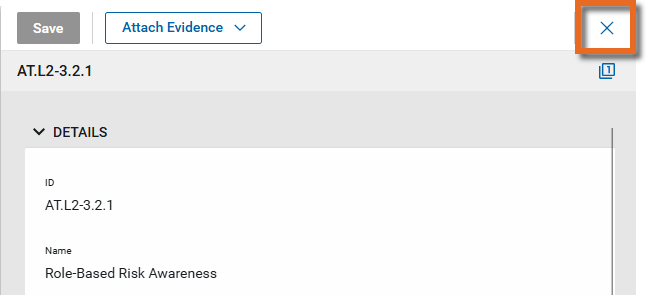
-
In the Manage section of the form, complete the following fields as appropriate:
Field Description Status Select the appropriate status:
-
Not Started -Select this option to indicate review of this requirement has not begun.
-
In Progress - Select this option to indicate review of this requirement has started.
-
Not Applicable - Select this option if this requirement is not applicable to your organization. This control will be included in the progress percent complete calculations.
Note There are specific situations where certain CMMC Controls or Objectives may be deemed “Not Applicable” (N/A). For example, if your systems do not have publicly accessible components within the CMMC Assessment Scope, controls related to such components may be marked as "Not Applicable".
Important When marking a Control or Objective as N/A, CMMC Third Party Assessor Organizations (C3PAO) will look for a provided reason for that designation. We recommend you utilize the Reason field within the Control Form when marking Controls or Objectives as N/A.
-
Complete - Select this option when all objectives have been reviewed and this control is ready for assessment.
Important The Status field for each control is entered manually. Once all the individual objectives on a control are complete, you should review the remaining fields in this section and only select "Complete" once you are satisfied that all fields, including the Designation and Reason fields for the control and each objective where appropriate, have been completed correctly.
Designation Use this selection to denote if some or all elements of this control are managed by a third party, and therefore you inherit their status.
Select one of the following values as appropriate:
-
(blank) - Leave this line blank if all elements of this control are managed by your organization.
-
Inherited - Select this option if all of the elements of this control are inherited from a third party.
-
Partially Inherited - Select this option if some of the elements of this control are inherited from a third party.
Note This field will not appear if the selected Status is "Not Applicable".
Reason Enter an official statement explaining your selections in the Status and Designation fields. For example, if you selected "Not Applicable" in the Status field, provide an explanation as to why this control is not applicable to your organization. If you selected "Inherited" in the Designation field, clarify how this control is inherited and from which third party.
Important When marking a Control or Objective as N/A, CMMC Third Party Assessor Organizations (C3PAO) will look for a provided reason for that designation. We recommend you utilize the Reason field within the Control Form when marking Controls or Objectives as N/A.
Start Date If desired, select a start date for this item. Due Date Select a due date for this item. This value will be used in the Due Date Tracker. Assigned to Select a user to be responsible for this item. This name will appear in the Assigned column in the Controls section of the dashboard and on the Due Date Tracker. Notes Enter any relevant notes regarding this control item. -
-
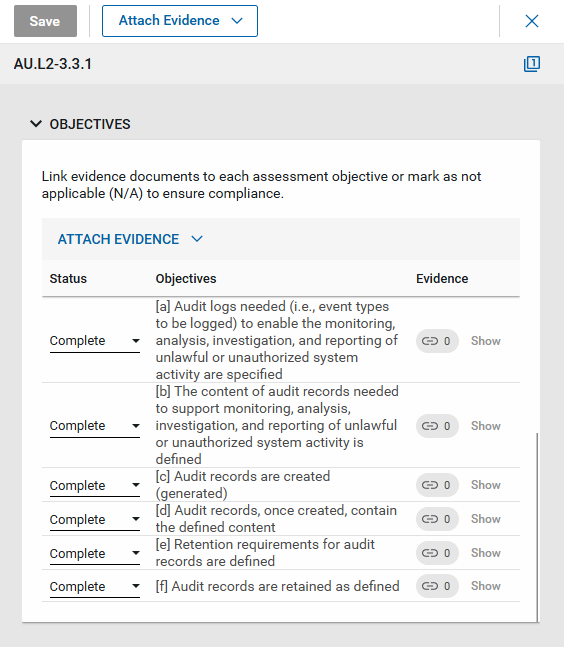
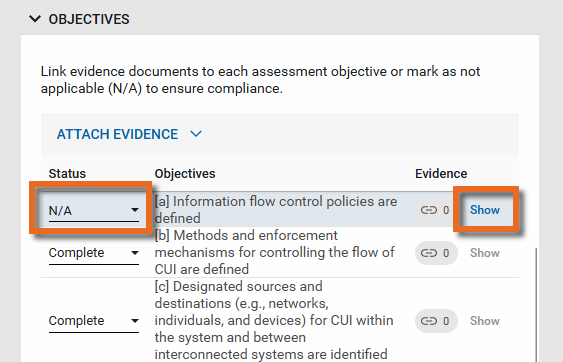
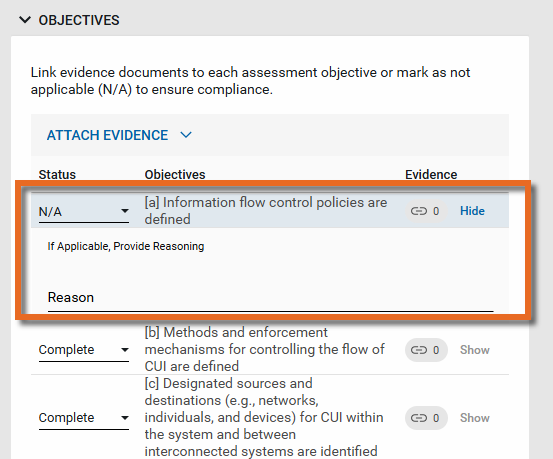
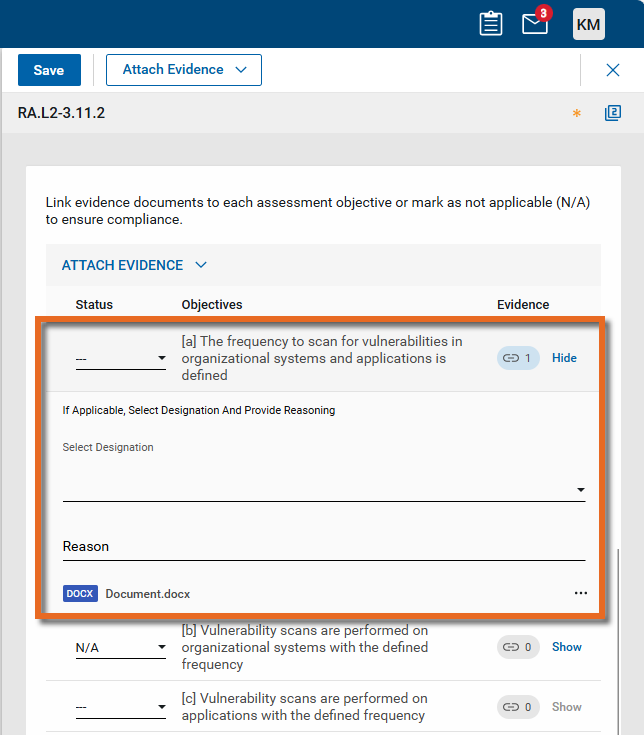
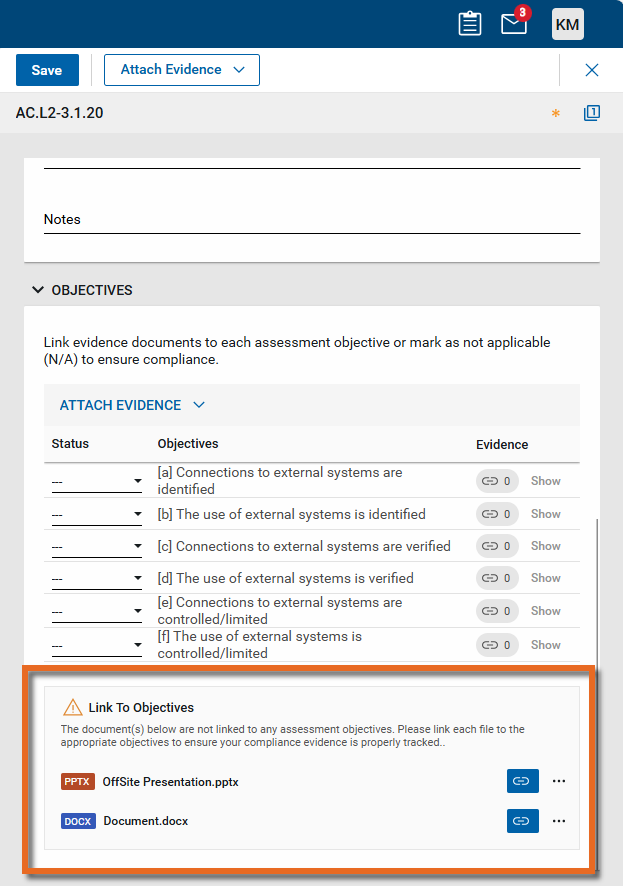
Review the Objectives section. In the Objectives section you can upload evidence and link it to individual objectives, manage the status, select an inheritance designation, and enter a Reason for the inheritance designation or selection of N/A (Not Applicable) for an objective.
-
Select the appropriate Status for each objective from the following list:
-
Complete - Select this option when the review of this objective is complete and any necessary evidence has been uploaded and linked.
-
N/A - Select this option if this requirement is not applicable to your organization. If you select this option, click Show to expose the Reason field and enter an explanation for your selection.
Note There are specific situations where certain CMMC Controls or Objectives may be deemed “Not Applicable” (N/A). For example, if your systems do not have publicly accessible components within the CMMC Assessment Scope, objectives related to such components may be marked as "N/A".
Important When marking a Control or Objective as N/A, CMMC Third Party Assessor Organizations (C3PAO) will look for a provided reason for that designation. We recommend you utilize the Reason field within the Control Form when marking Controls or Objectives as N/A.
-
--- - Select this option when the objective is still under review.
-
-
Select Show to select an inheritance Designation and provide a Reason for the Status or Designation selection.
Important The Show option is only enabled when the Status selected is "N/A" or an evidence document has been linked to the objective. You must link an evidence document to set the inheritance Designation. Refer to Attach evidence documents to controls and objectives.
Click Hide to close the section when you are done.
-
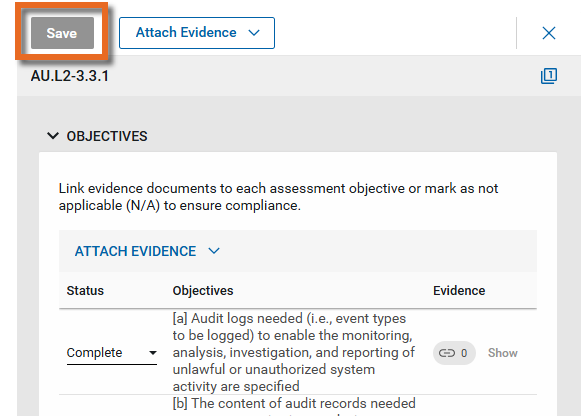
When you are done reviewing the control and its objectives, click Save to save and close the page.
Supporting Evidence documents can be securely uploaded and managed from the Manage Evidence page, or from an individual control or objective.
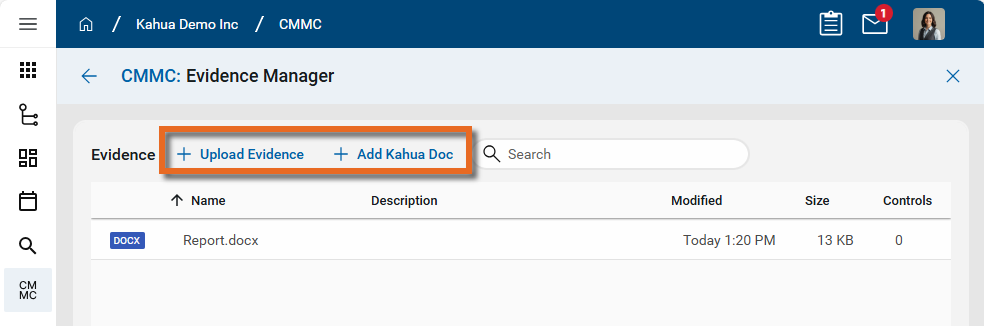
To upload a document on the Manage Evidence page, complete the following steps:
-
Log in to Kahua and open the CMMC app by navigating to Apps > All Apps > CMMC.
Note If your organization is a current Kahua customer and you are using the CMMC app in your Kahua domain, ensure that you are in the root domain.
-
From the CMMC: Dashboard, select Manage Evidence.

-
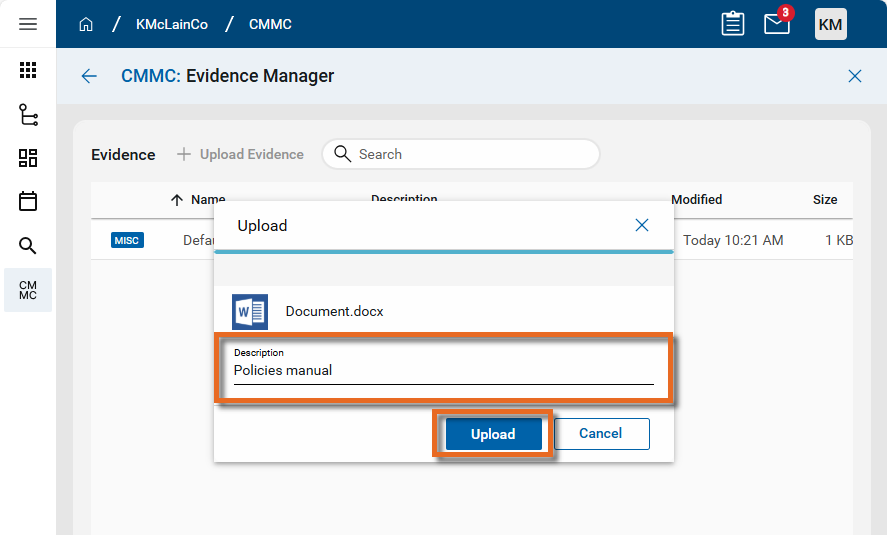
Use one of the following options to add evidence:
-
Click Upload Evidence. From your file explorer, select a document to upload.
-
Click Add Kahua Doc. Select a Kahua record or file previously uploaded to Kahua's File Manager. For more information, refer to Add Kahua Doc.
-
-
Enter a Description if desired and click Upload.
-
The selected document is now available for assignment to a control or objective.
To upload a document directly from a control or objective, complete the following steps:
-
Log in to Kahua and open the CMMC app by navigating to Apps > All Apps > CMMC.
Note If your organization is a current Kahua customer and you are using the CMMC app in your Kahua domain, ensure that you are in the root domain.
-
In the Controls section of the Dashboard page, select the Expand icon
next to the appropriate control family and click on the line for the appropriate control. Alternatively, enter a search term to search the list of controls and select the appropriate control from the results list.
-
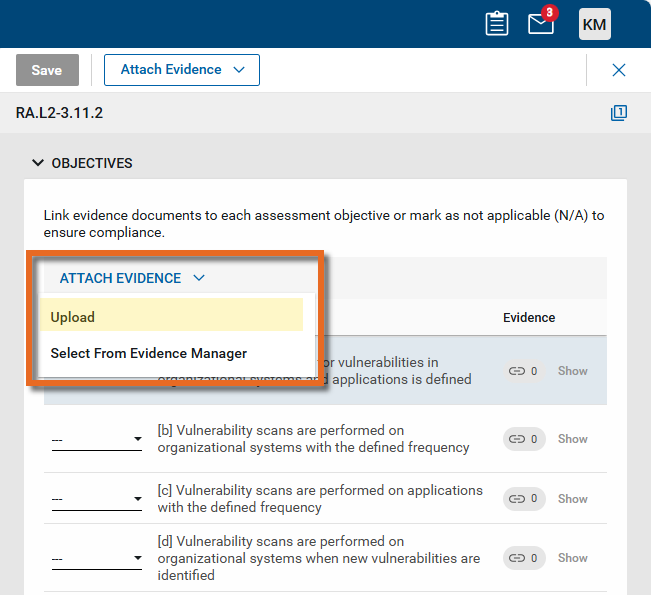
The page for control's record appears. Evidence can be uploaded from one of the following locations:
-
Select Attach Evidence > Upload or Add Kahua Doc at the top of the control record.

-
Select Attach Evidence > Upload in the Objectives section of the control record.
-
-
Complete the upload process as described above. When uploaded from a control, the document is automatically associated with that control. The document can also be reviewed and managed in the Evidence Manager.
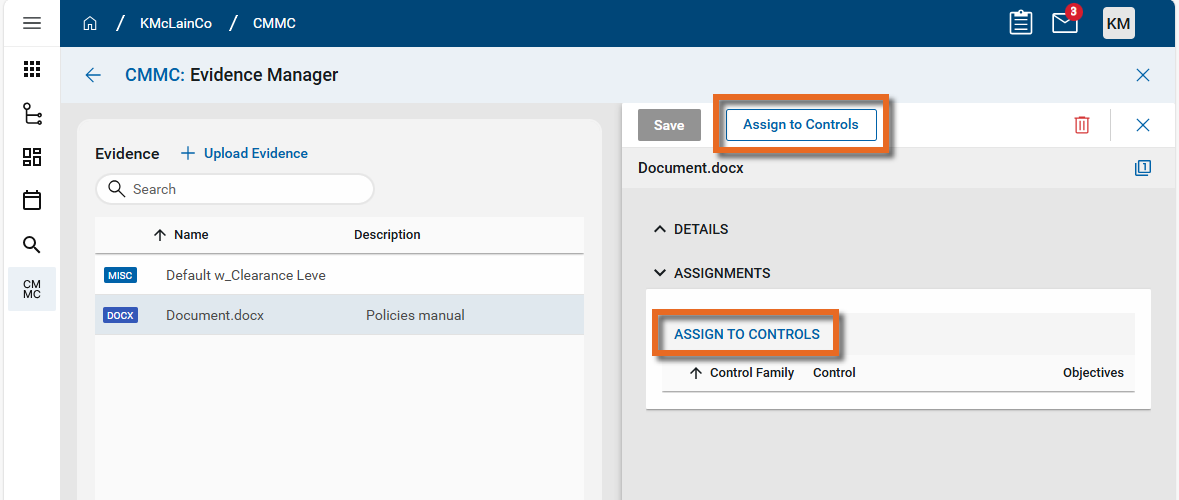
You can associate evidence documents to specific controls or assessment objectives throughout your certification preparation process. Documents can be linked to specific controls or objectives through the Evidence Manager or directly on the control record.
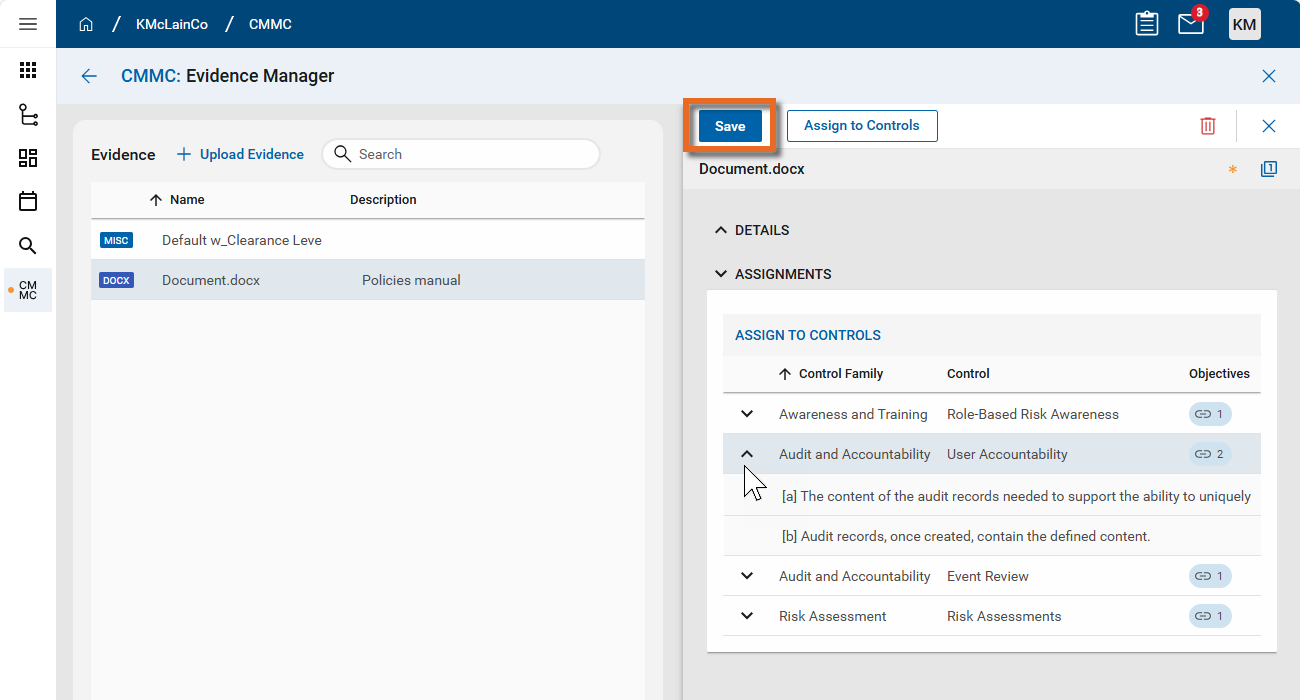
To associate a document with controls and objectives from the Evidence Manager, complete the following steps:
-
Log in to Kahua and open the CMMC app by navigating to Apps > All Apps > CMMC.
Note If your organization is a current Kahua customer and you are using the CMMC app in your Kahua domain, ensure that you are in the root domain.
-
From the CMMC: Dashboard, select Manage Evidence.
Note For information on uploading additional evidence, refer to Upload evidence documents.
-
Click on a document to manage its association with controls and objectives. The detail pane opens.
-
Select Assign to Controls from the top action bar or from the Assignments section. Both selections open the same Assign Document page.
-
In the Assign Document page, select check boxes next to the appropriate controls or objectives to associate with the document. Click the Expand icon
 to expand the list of controls within a control family. Alternatively, use the search field to locate a control or control family. Click the information icon
  next to the control name to review its description and associated objectives.
-
Click Assign when your selections are complete. The Assign Document page closes and you are returned to the document's detail pane. The selected controls and objectives appear in the Assignments section.
-
To assign the document to additional controls or objectives, click Assign to Controls again and repeat the steps above.
-
When you are satisfied with the assignments, click Save to save and close the page.
Documents can also be associated with controls and objectives from the control's detail page. To do so, complete the following steps:
-
Log in to Kahua and open the CMMC app by navigating to Apps > All Apps > CMMC.
Note If your organization is a current Kahua customer and you are using the CMMC app in your Kahua domain, ensure that you are in the root domain.
-
In the Controls section of the Dashboard page, select the Expand icon
next to the appropriate control family and click on the line for the appropriate control. Alternatively, enter a search term to search the list of controls and select the appropriate control from the results list.
-
The page for control's record appears. You can select or upload evidence from two locations:
-
Select Attach Evidence > Upload, Select from Evidence Manager, or Add Kahua Doc at the top of the control record.
-
Select Attach Evidence > Upload or Select from Evidence Manager in the Objectives section of the control record.
-
-
If you are uploading documents, complete the upload process as described above. Otherwise, select the appropriate documents from the list.
-
Once the documents are uploaded or selected, they appear at the bottom of the Objectives section. From here you can link them to individual objectives in this control.
-
Select the Link icon
 . The Link to Assessment Objective(s) dialog appears. Click the drop-down menu and select the appropriate objectives. Click Link when you are done.
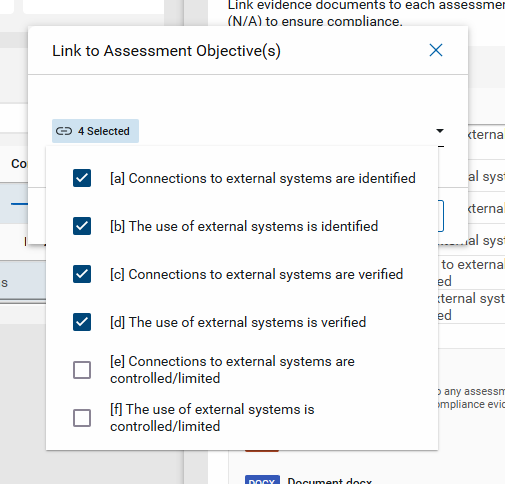
-
The number of documents linked to each objective appears in the Evidence column.
-
To view the documents associated with an objective, click Show. The documents appear below the Reason field.
-
To add the document to other objectives for this control, click the More icon
 and select Manage Linked Objectives.
 -
To remove the document from this objective, click the More icon
and select Remove From Control. 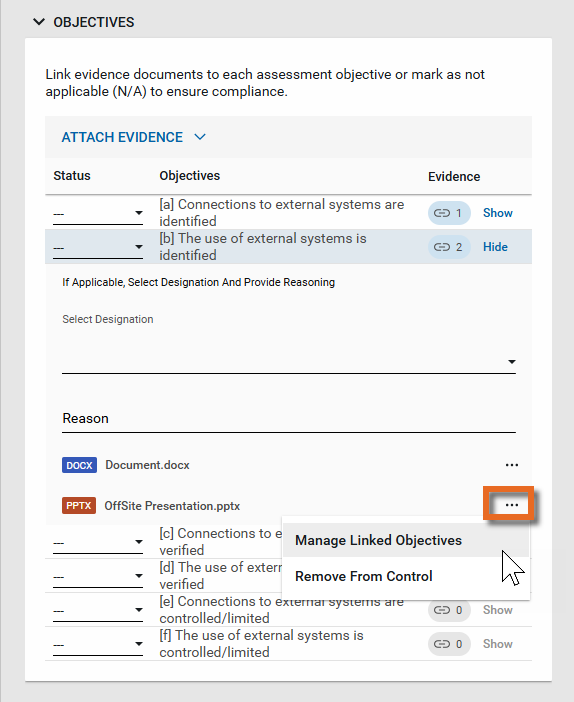
-
-
When you are satisfied with the assignments, click Save to save and close the page.
All uploaded supporting documents appear and can be managed in the Evidence Manager, whether they were uploaded directly to the Evidence Manager or from a control or objective.
To manage the uploaded documents, complete the following steps:
-
Log in to Kahua and open the CMMC app by navigating to Apps > All Apps > CMMC.
Note If your organization is a current Kahua customer and you are using the CMMC app in your Kahua domain, ensure that you are in the root domain.
-
From the CMMC: Dashboard, select Manage Evidence.
-
The list of evidence documents appears. You can sort by any column in the list. To search for a document, filter the list by entering a search term from the file name or description field in the Search field.
-
Locate the document you want to manage and click on it to open the detail pane.
-
To control the width of the detail pane, hover over the dividing line and click to adjust the width.
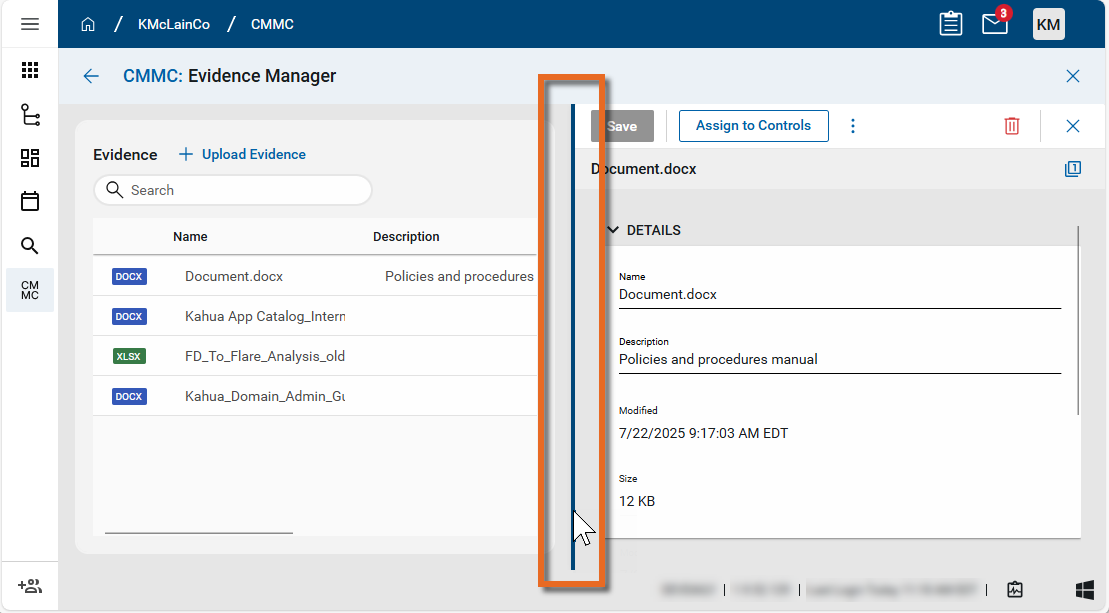
-
To act on the document, select one of the following items from the action bar. You may need to select the More icon
 to view additional options.
 Action Description Assign to Controls Select this option to assign the document to one or more controls or objectives. Refer to Attach documents from the Evidence Manager. Upload New Version Select this option to upload a new version of this document. Download Evidence Select this option to download a copy of the stored file. View File Select this option to view a PDF rendering of the latest version of the document. For more information on using the viewer, refer to Viewing files in File Manager. Some viewer options that may be helpful to you include the following:
-
Page # of # - Click here to enter a page number to jump to.
-
Search
 - Click here to open a text search window. When you enter the search criteria, the total number of search results will appear with the results highlighted in yellow on the page. You can use the arrows to scroll through the results on the image.
 -
Open PDF
 - Click here to open the PDF file in the default browser.
Delete 
Click on the Delete icon
in the upper right corner to remove this document from the Evidence Manager.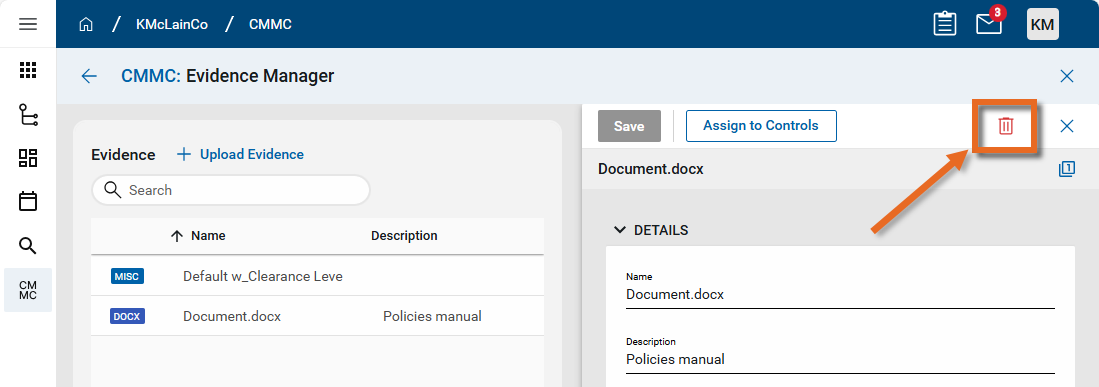
-
-
When you are satisfied with your changes, click Save to save and close the page.