Navigating Apps
When you are working in Kahua, you will be using multiple apps to enter and review data. While each app has a different purpose and different features, many of them have some similarities in how they function and how you will interact with them.
For information on the larger elements such as the launch bar and header, refer to Navigating Kahua.
The application title bar appears below the header. The following items appear on the application title bar:
-
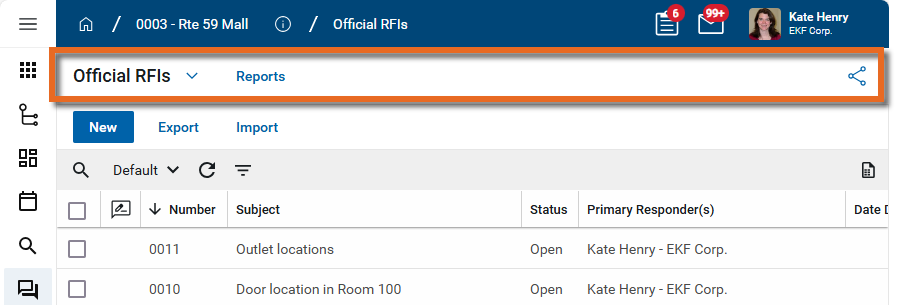
App name with available lists and list shares - The name of the currently open app and, if applicable, currently open list appears here. Click the app name or Expand icon
 to open a list of available applications and list shares.
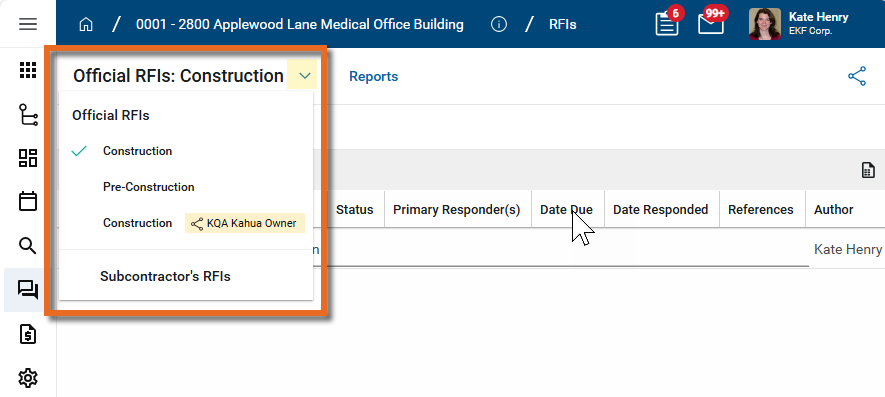
-
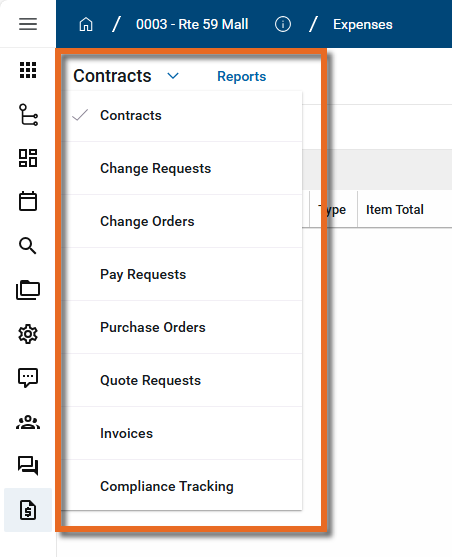
Applications- Some applications are grouped together in app groups. For example, the Expenses app group contains apps such as Contracts, Change Requests, Change Orders, Pay Requests, and so on. You can select another application in the app groups by clicking on the app name here and selecting another app from the list.
-
Lists - Some apps, such as RFIs, Submittals, and Punch Lists, permit multiple list views. When utilized, records in the app will appear on one list but not any others. For example, in the RFIs app, you can have a "Pre-Construction" list and a separate "Construction" list. Your domain administrator can configure the lists to use different number schemes, such as applying a prefix to pre-construction RFIs. For more information on lists, refer to Lists.
-
Shares - If an app has been shared with you from another organization's domain, the list of records from their domain will appear here. For more information on shares, refer to Understanding how Kahua sharing works.
-
-
Reports - Select this option to open a list of reports for this app. For more information on running reports, refer to Viewing Reports.
-
Share icon
 - Select this icon to open the application sharing page. Here you can add, edit, or delete shares for this app. For more information, refer to Manage sharing in an app.
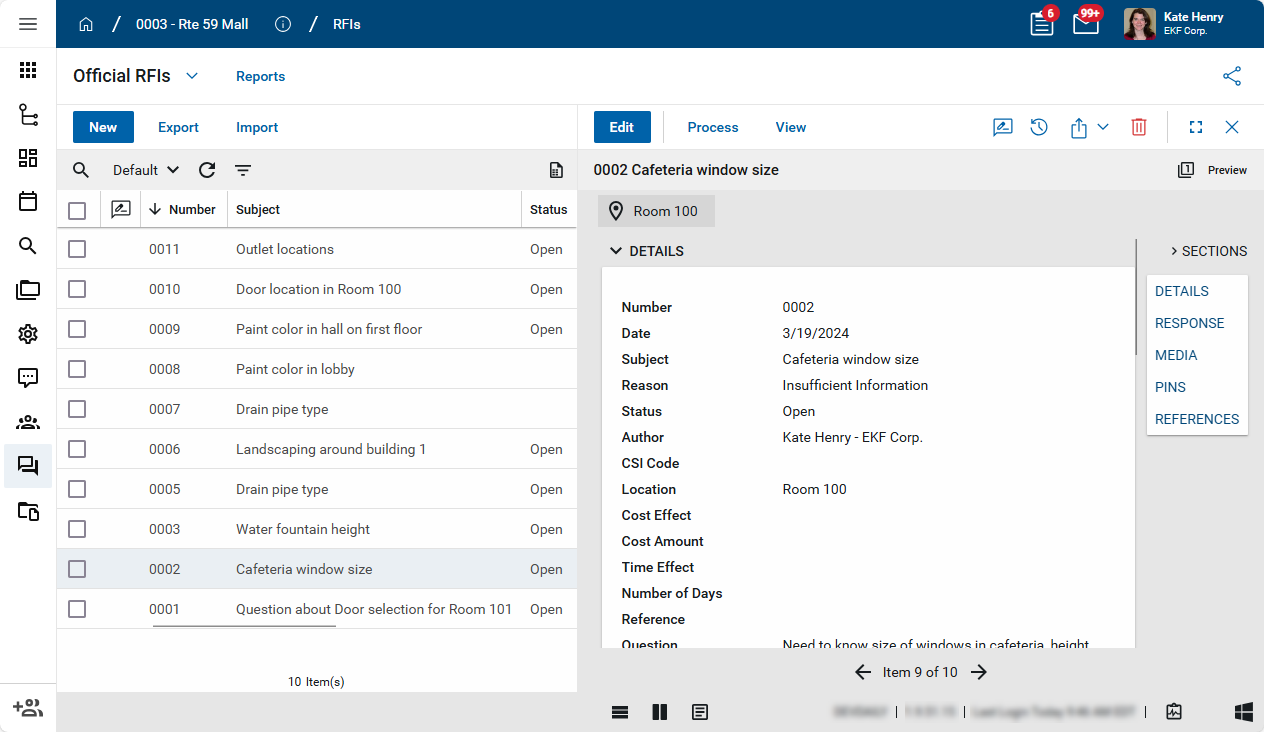
The action bar appears below the application title bar. Here is where you will find actions to perform on records selected in the log view. The available actions may change as you select records in the log view.
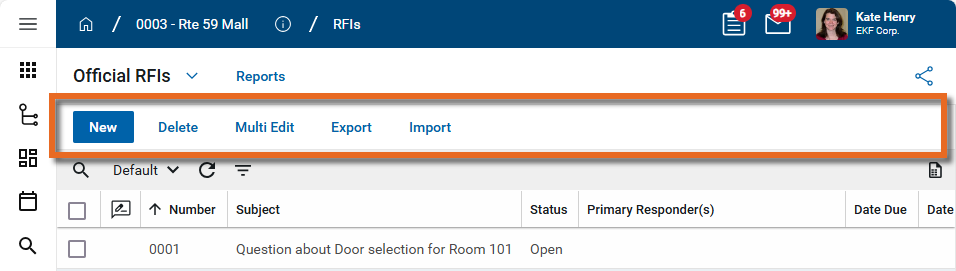
The actions available to you will depend on the app you are in and which, if any, records have been selected. Commonly available actions are New, Add, Delete, Move, Multi Edit, Export, Import, and others.
Note Some actions, such as Delete or Multi Edit, only appear once one or more items have been selected in the log view.
When you are in the log view, the grid header appears below the action bar. The format may vary, depending on the app you have open.

Common elements are as follows:
-
Search
 - Select this icon to open the grid search. In most applications you can select a field to search in and enter a value to search for.
 -
Log views - The name of the currently selected log view appears here. Most apps have a Default view that includes all the records in that app for the currently selected project or partition. Click on the log view name to select a different log view or to select Manage Views. Users with the appropriate permissions can select Manage Views to create or edit views that can be made private or available to everyone. For more information, refer to Log Views and Log Reporting.
-
Refresh
 - Select this icon to refresh the log view. In most applications, the log view will auto-refresh after a certain period of time, but selecting this icon forces the view to update.
 -
Quick Filter
 - Some apps have quick filters available. A quick filter allows you to select one or more values to filter the log view by. For more information, refer to Apply a quick filter.
 -
Report
 - Select this icon to generate a report from the current log view. The report will contain a list of records appear in the view at that moment, including any applied searches or sort order changes. For more information, refer to Generate a report from a log view.
 -
Select all
 - Select this check box in the header to select all the records in the current log view. You can then act on these records. If available, the Multi Edit action opens an editable grid containing the selected records, allowing you to make edits to multiple records at one time.
 Note You can select a range of items in the log view by using Shift + Click.
-
Column headers - Click on a column header to sort by that column.
-
Column "locking"

 - When you hover on a column header, the unlocked icon will appear. You can click the icon to move that column to the first available position on the left and "lock" it in place. You can lock multiple columns.
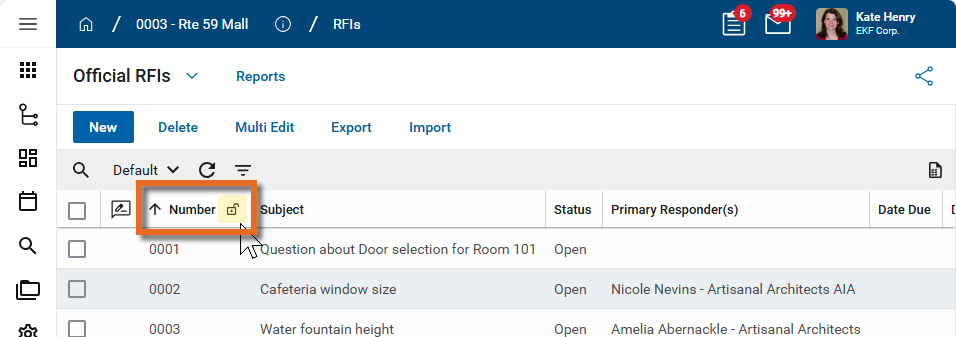
Locked columns remain in the left-most position on the grid, allowing you to scroll to the right and the locked column remains visible. To unlock a column, hover on the column header and select the locked icon
. The column will return to its original position as defined in the log view.
In most applications and depending on the option you've selected in your user settings and preferences, the log view, split screen view, and full-page view selector appears at the bottom of the page:
![]()
-
Log View
 - Select this icon to see the log view.
 -
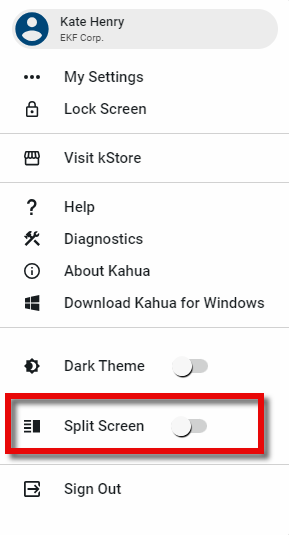
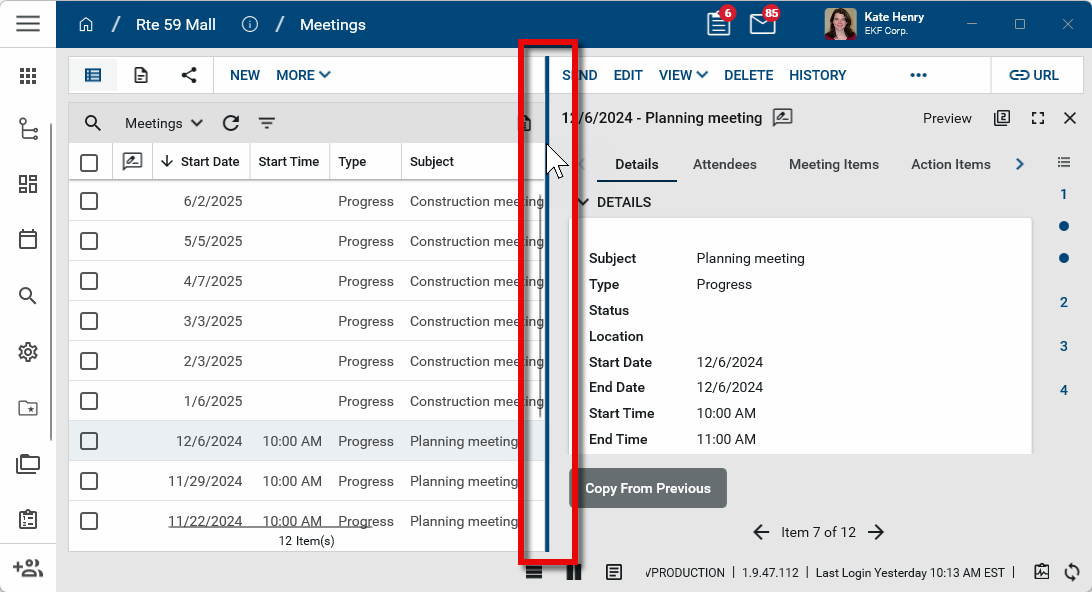
Split Screen View
 - Select this to see the log view on the left-side of the page and the detail view on the right side of the screen.
Note If this option is not available to you, enable it by updating your preferences. Click on your profile icon in the header and select Split Screen to enable the Split Screen view. For more information, refer to Split Screen.
In split screen view, hover over the dividing line between the log and detail view to adjust the width of each.
-
Full-page View
 - Select this to open the detail pane to be the full-width of the page.
When you open a record, the detail view appears. Depending on your settings, it will either open in the split screen view or the full-page view. Refer to Log view/Split View/Detail View.

Common elements are as follows:
Action bar - Similar to the action bar for the log view, various action items appear here. Which actions will be available will depend on the app you are in, which record is selected, and your user permissions. Commonly available actions are Edit, Process, View, Move, and others. Select the More icon ![]() to access action items that are hidden for space reasons.
to access action items that are hidden for space reasons.
Action bar icons - Common actions are accessed through icons on the action bar. Universal action icons are as follows:
-
Discussions
 - Clicking this icon opens the Discussions panel. If enabled in your domain, the discussions feature allows you to participate in public or private conversations associated with specific records. For more information, refer to Discussions.
 -
History
 - Select this icon to open the History page for the record. The history page provides details regarding all activity (creation, edits, saves, etc.) performed on the record. Click view edit to drill down into more detail on a specific action. Click hide edit to close the action detail. Click the Close icon
  to close the history page.
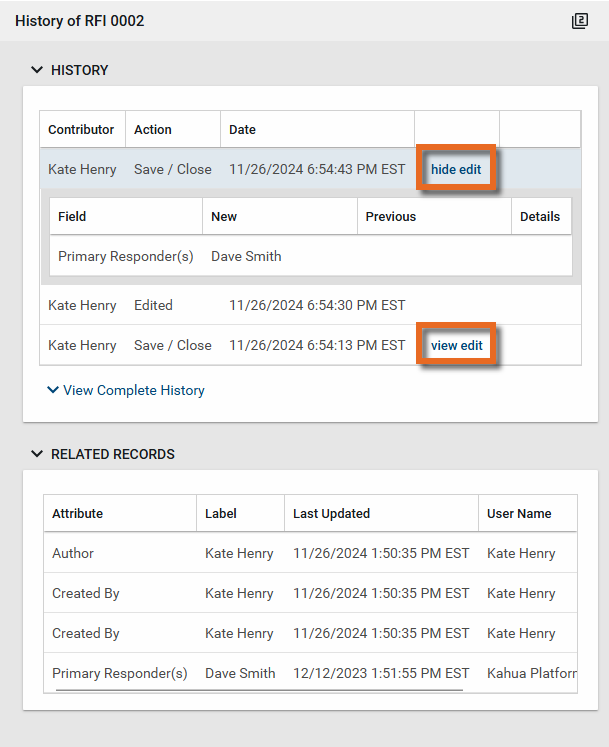
-
Send actions
 - Click this icon to select an appropriate Send action for the record. The following options may be available to you:
-
Copy Link and Copy Portable View Link - Select this option to copy a URL link for the record or record's portable view to your clipboard. This link can be sent outside of Kahua. Users with the appropriate permissions will be able to open Kahua directly to that record or portable view by using the link.
-
Copy QR Code and Copy Portable View QR Code - Select this option to generate a QR code for the currently open record or record's portable view. The QR code can be shared directly from your screen, or copied to your clipboard to be shared as appropriate. This QR code can be shared outside of Kahua. Users with the appropriate permissions will be able to open Kahua directly to that record or portable view by using the link.
-
Send - Select this option to open a new Kahua message with the open record included as an attachment. References with the Include on Send value set to "Yes" are also included. For more information, refer to Messages app.
-
-
Delete
 - Select this option to delete the open record. You must agree to the confirmation message before the record is deleted.
Note If a record is deleted in error, your domain administrator may be able to recover it through the Recycle Bin app. For more information, refer to Using the Recycle Bin.
-
Open in a new window
 - Select this option to open the current record as read-only in a new window (desktop host) or browser tab (web host). This allows you to navigate to other records in the original Kahua instance while keeping the read-only window or tab open for reference. To re-open the record on the read-only window or tab in Kahua, select Open in the header.
-
Maximize
 and Minimize
  - Select Maximize to open the record to a full screen view. From the full screen view, select Minimize
  to return to the original view.
 -
Close
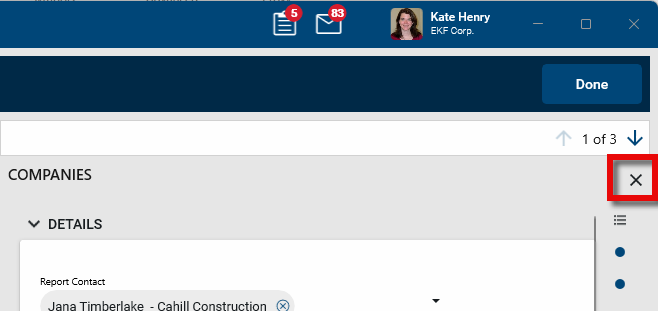
- Select the close icon to close the currently open item.
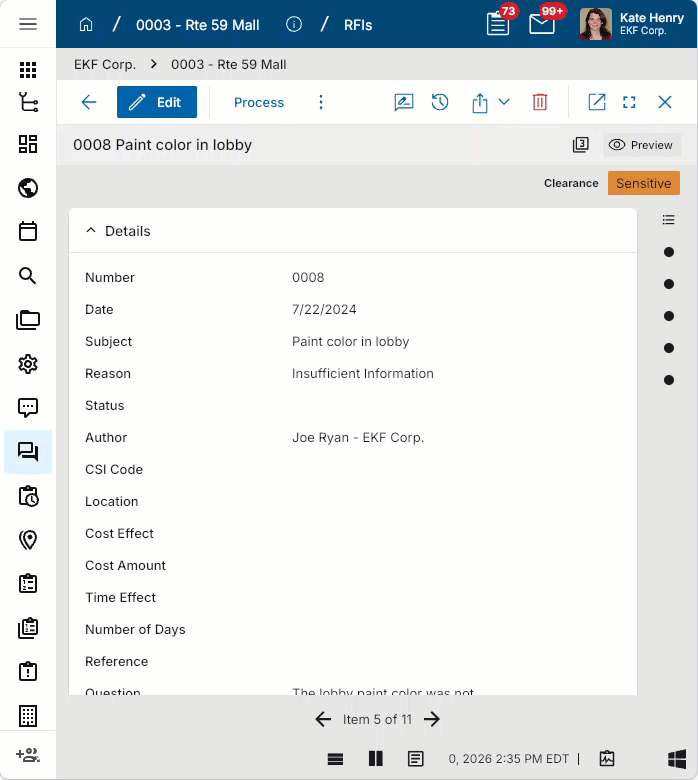
Record Name, Items count, and Preview/Edit - Typically, the name of the open record and an indication of the mode it is in (Preview, Edit, etc.) appears directly below the action bar.
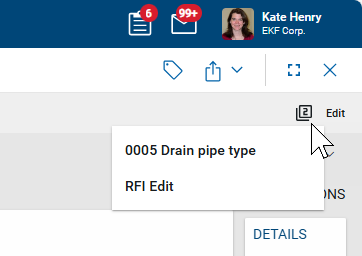
Items count
![]() - As you open and work in records, the number of open items appears here. Click on the Items icon
- As you open and work in records, the number of open items appears here. Click on the Items icon ![]() to see a list of currently open records. Note that selecting Edit on a record will open a new page and increase the number of open items by one, as the original record in Preview mode remains open.
to see a list of currently open records. Note that selecting Edit on a record will open a new page and increase the number of open items by one, as the original record in Preview mode remains open.
Section headers appear on the right side of an open record. You can click on one of the headers to jump to that section. You can expand or collapse the section headers by clicking on Sections.
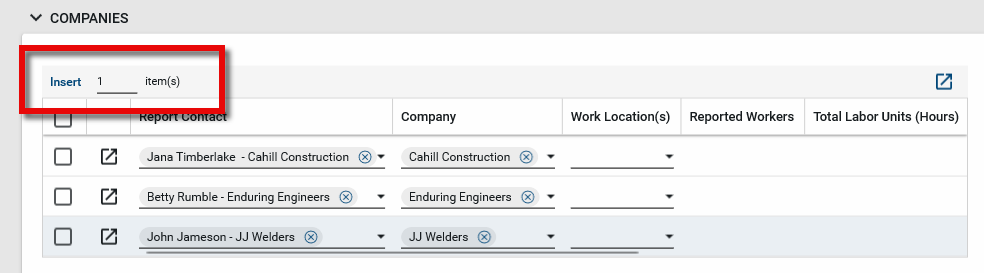
Many records have an item grid. Item grids are present when a single record, such as a daily report, contains information about multiple items, like all the companies working on site that day.
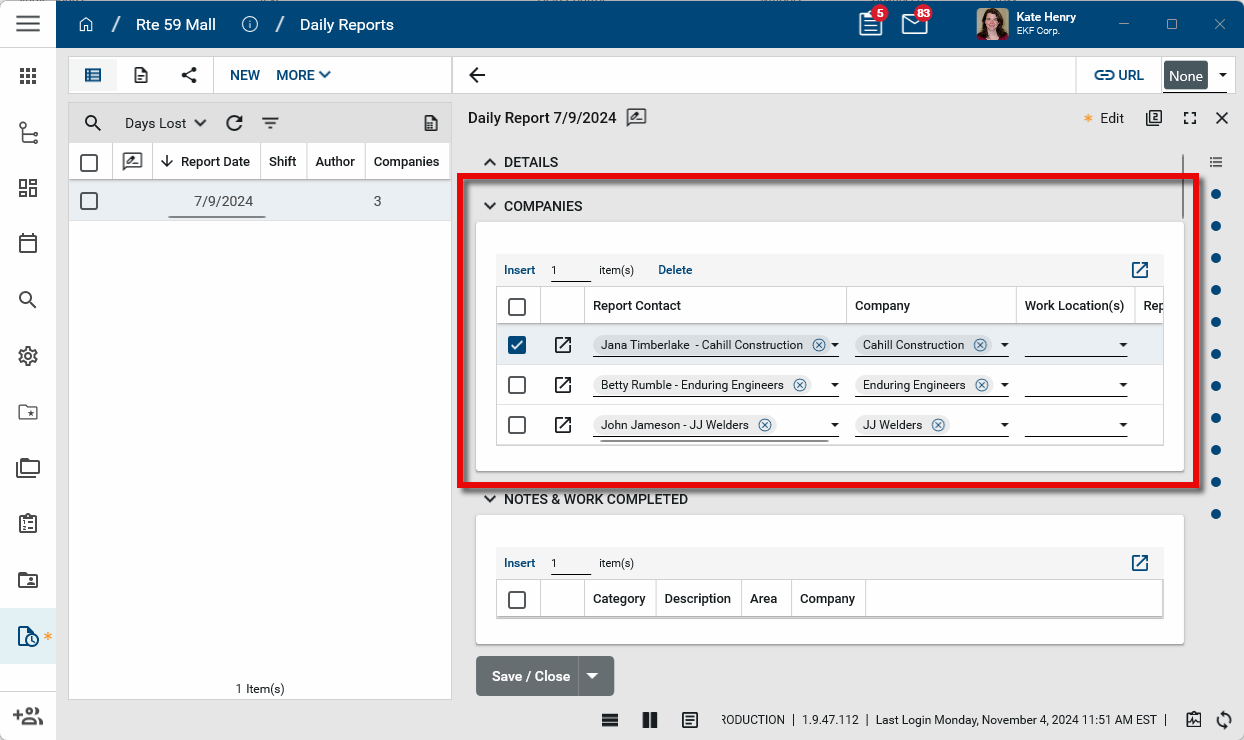
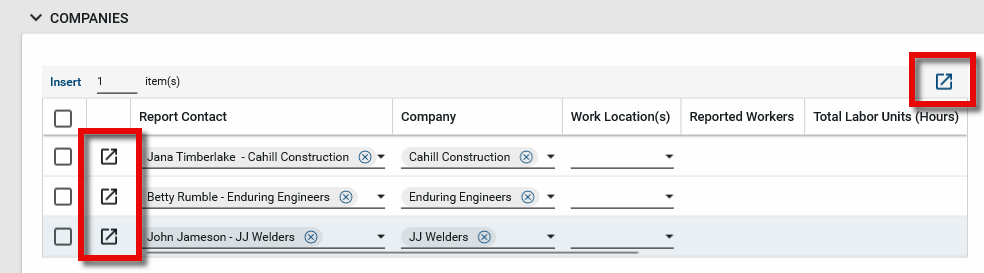
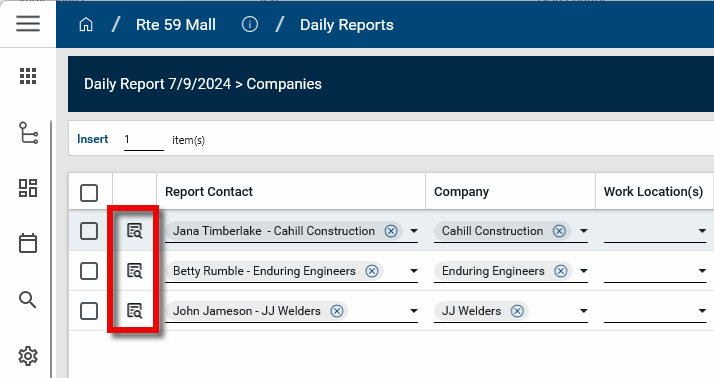
Item grids have two views. The grid view appears on the record itself. The items grid detail view is accessed by selecting the expand icon ![]() . The items grid detail view provides a larger area for data entry, and depending on the record type, additional fields may be available when you open the detail view of the item itself. Select the View Details
. The items grid detail view provides a larger area for data entry, and depending on the record type, additional fields may be available when you open the detail view of the item itself. Select the View Details ![]() icon to open the detail view.
icon to open the detail view.
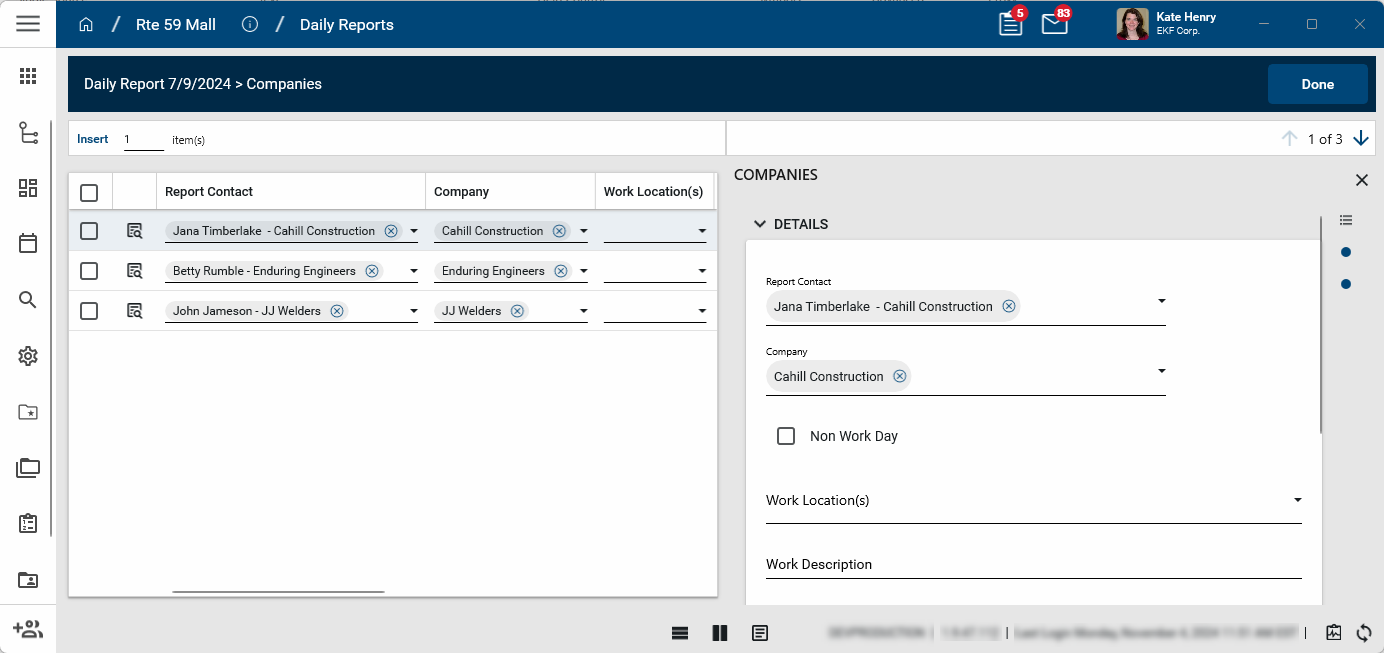
From the item grid on a record, you can complete the following actions:
| Action | Steps |
|---|---|
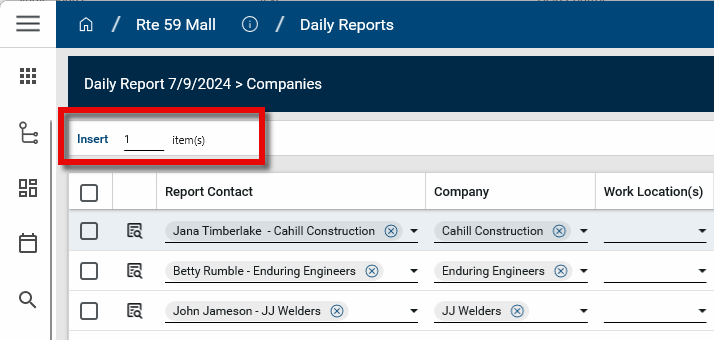
| Add lines to an item grid |
Enter the number of lines you want to add. Select Insert from the grid header.
|
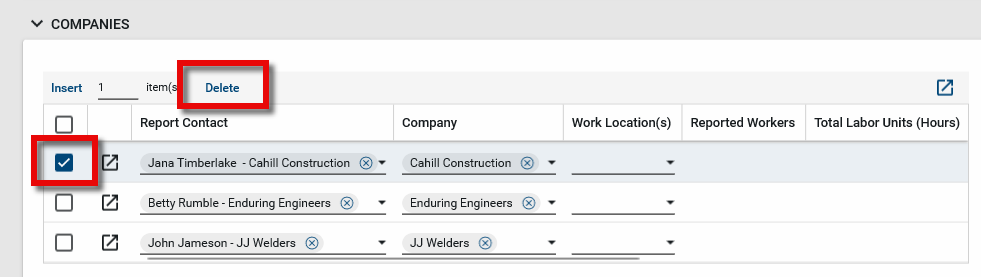
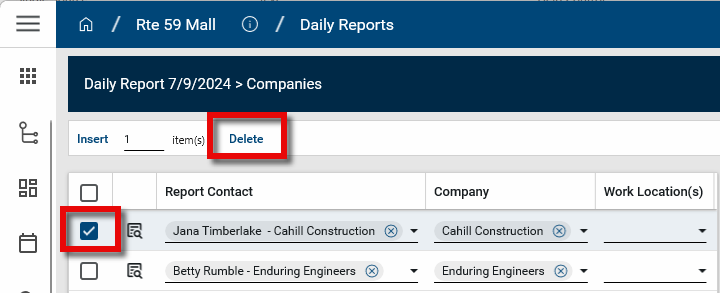
| Delete a line from an item grid |
Select the check box for the line you want to remove. Select Delete from the grid header.
|
| Open the Item Grid Detail panel |
To open the grid panel with no detail pane showing, select the Expand icon To open the grid panel and the detail view for an item, select the Expand icon
|
| Move a column to the left and lock it in place |
When you hover on a column header, the unlocked icon Locked columns appear in the left-most position on the grid, allowing you to scroll to the right and the locked columns remains visible. To unlock a column, hover on the column header and select the locked icon |
In the Item Grid detail panel, you can complete the following actions:
| Action | Steps |
|---|---|
| Add lines to an item grid |
Enter the number of lines you want to add. Select Insert from the grid header.
|
| Delete a line from an item grid |
Select the check box for the line you want to remove. Select Delete from the grid header.
|
| Open the line item detail |
Select the View Details icon
|
| Switch between log, split, and detail view | Click on the appropriate selection at the bottom of the page |
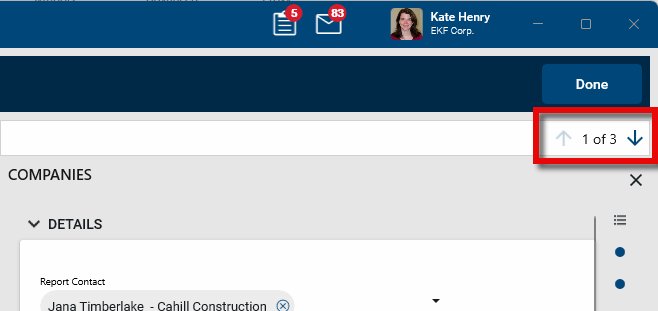
| Scroll through records |
With the detail view open, you can use the arrows in the header to scroll through the items list.
|
| Close the line item detail view |
Click the close icon on the item detail
|
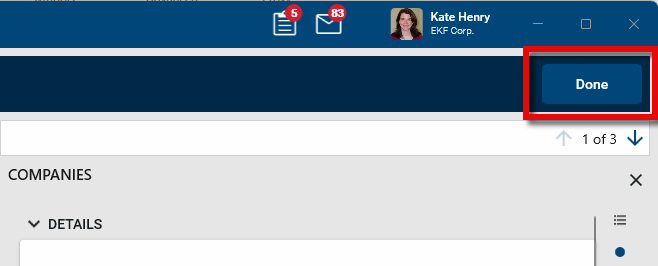
| Close the item grid detail panel |
Click Done.
Important The changes made in the item grid detail panel are not saved until you save the record. |
| Move a column to the left and lock it in place |
When you hover on a column header, the unlocked icon Locked columns appear in the leftmost position on the grid, allowing you to scroll to the right and the locked columns remains visible. To unlock a column, hover on the column header and select the locked icon |
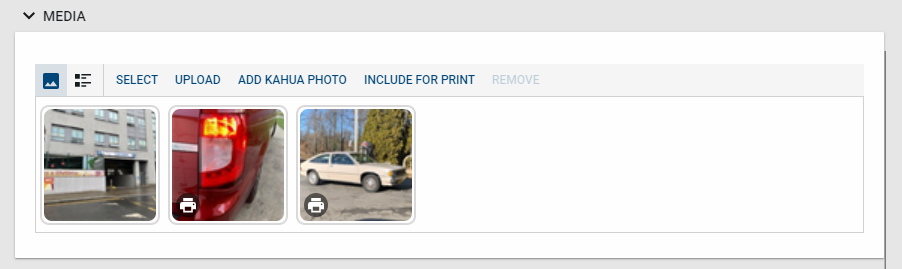
The Media section is where you can upload and access image files related to the current record. Only image files can be saved in the media section. Files uploaded here are also available in the Media Manager app for the project or partition where they have been uploaded. For more information, refer to Media Manager.
Note The maximum file size upload limit for all apps is 10GB. For information on uploaded file restrictions, refer to File size and type restrictions.
The Media section appears on some but not all record types in Kahua. The majority of these apps include similar actions and options in the Media section.
Applications where records have a media section include the following:
-
Communications
-
Daily Reports
-
Field Observations
-
Issues
-
RFIs
-
Punch Lists
-
Safety Suite (Auto Incidents, General Liability Events, Toolbox Talks, and Training Register)

The following options are typically available in the Media section action bar:
| Column Name | Description |
|---|---|
| Thumbnails View |
Select Thumbnail View |
| Select/ Select All | Click Select to open Select mode. Once in Select mode, click on an image to select it, or click Select All to select all the media files. Click Done when you are finished. |
| Upload |
Select Upload to upload one or more files from File Explorer. You can also use drag and drop to add a file to the Media section. After selecting Upload, navigate to the appropriate files through File Explorer and select Open. Only acceptable media file types will appear for selection in File Explorer. Acceptable media file types include PNG, JPG, GIF, and TIF files. Note Note that if you are using Microsoft Edge as your browser, you may be able to take advantage of the Upload from Mobile feature to access files on your mobile device. For more information, refer to https://www.microsoft.com/en-us/edge/features/mobile-upload. |
| Take Photo |
If a camera is detected on your device, the Take Photo option will appear. Select Take Photo to open a live camera preview and capture the image. Select Use Photo to save the image to the record. Select Retake to try again or Cancel to exit. If multiple cameras are detected, you can select your preferred device before capturing the image. Note Camera permissions are managed by your browser or Windows privacy settings. If access is denied, follow the guidance for your device on how to re-enable it. |
| Add Kahua Photo | Select Add Kahua Photo to link to a file from the Media Manager app. Once added here, the file cannot be deleted from Media Manager. For more information, refer to Media Manager. |
| Include for Print |
You can choose which images to include in a portable view that has a media section. Click Include for Print, then select images to be included, or clear the selection box to remove images from inclusion. By default, all images are selected for inclusion when initially uploaded. When you are finished, click Done. The print icon appears on files selected for inclusion Note The selected portable view must include a media section for the images to appear. Note The record must be in Edit mode to select Include for Print. |
| Remove |
Click Select to enter Select mode. Select the image or multiple images, then select Remove to remove the file from the record. Click OK on the confirmation message. Click Done when you are finished. Important The record must be in Edit mode to allow a file to be removed. |
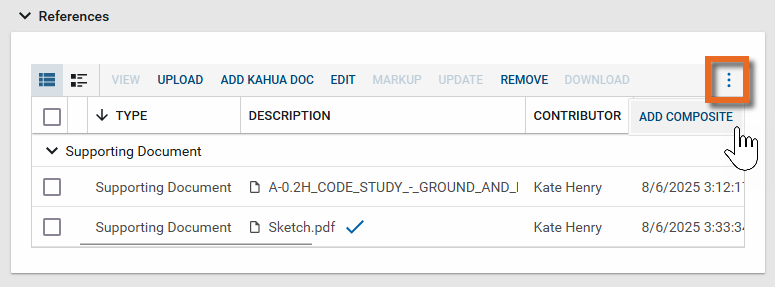
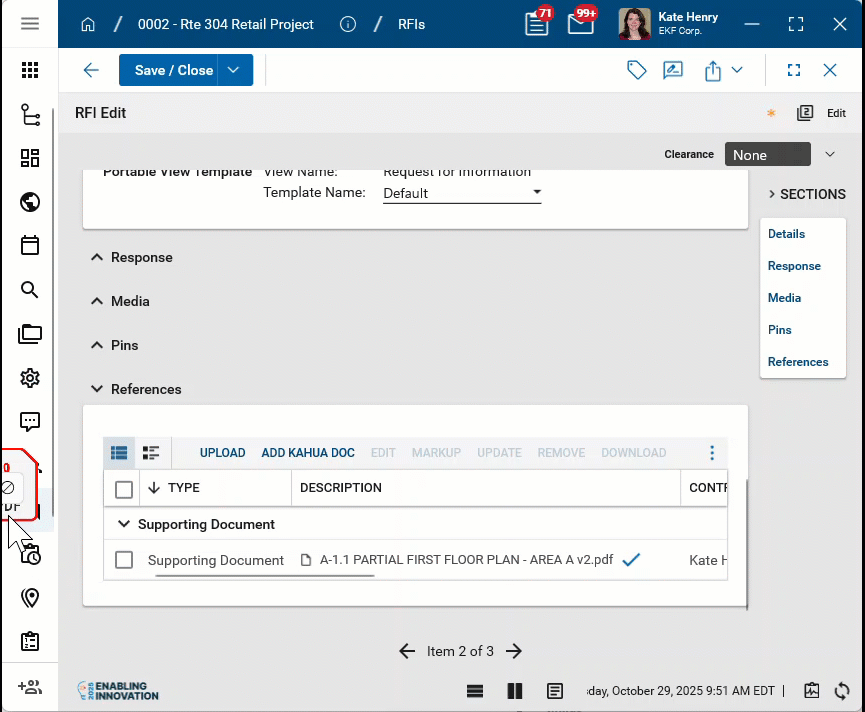
The References section is where you can upload and access files related to the current record. If you have enabled the related configuration setting, files uploaded to the References section of a record can also be added to non-controlled folders in File Manager during the upload process.
The References section appears on many record types in Kahua. The majority of apps include similar actions and options in the References section.
You may need to click the More icon ![]() to access all the available options on the References action bar.
to access all the available options on the References action bar.
Note The maximum file size upload limit for all apps is 10GB. For information on uploaded file restrictions, refer to File size and type restrictions.
Uploaded and added reference files are grouped first by document type (Supporting, Composite, Approval, etc), then listed by date and time added. You can click on any column header to sort by that column within the document type grouping.
The following options are typically available in the References section action bar:
| Column Name | Description |
|---|---|
| Hide Thumbnails |
Select Hide Thumbnails |
| View | The View option is available when a document is uploaded and the Preview Status is "Rendered". Select a document and click View to open the document in the markup view. Refer to Using the Markup Tool. |
| Upload |
Select Upload to upload a file. You can upload one or more documents from your computer. If you have enabled uploads from Google Drive in My Settings > General tab > Enable Google Drive Uploads, you can also upload one or more documents from your Google Drive. Refer to General tab. Additionally, you can use drag and drop to upload a file from your computer.
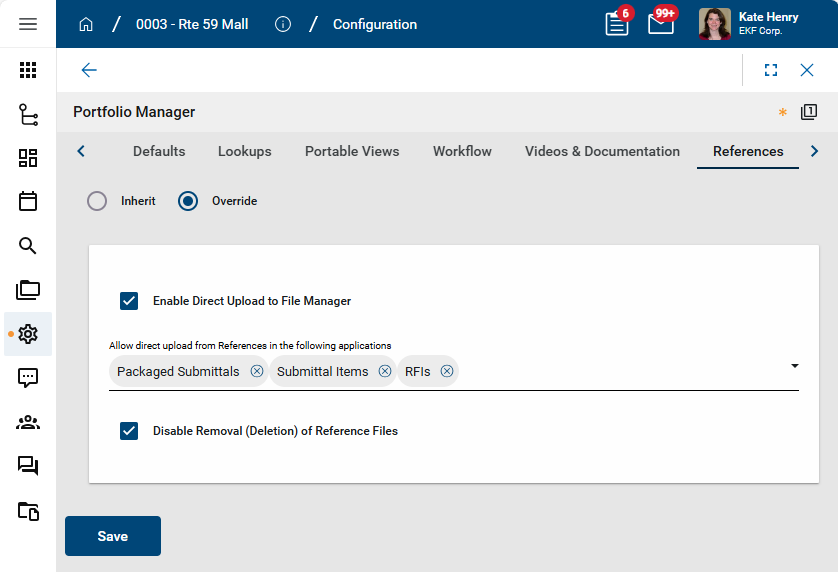
Note Note that if you are using Microsoft Edge as your browser, you may be able to take advantage of the Upload from Mobile feature to access files on your mobile device. For more information, refer to https://www.microsoft.com/en-us/edge/features/mobile-upload. Important If the Enable Direct Upload to File Manager setting is enabled on the Configuration app > Applications tab > Portfolio Manager > References tab for this application, you can upload files directly to a non-controlled folder in File Manager when they are uploaded to References. Refer to Enable direct uploads to File Manager. |
| Take Photo |
If a camera is detected on your device, the Take Photo option will appear. Select Take Photo to open a live camera preview and capture the image. Select Use Photo to save the image to the record. Select Retake to try again or Cancel to exit. If multiple cameras are detected, you can select your preferred device before capturing the image. Note Camera permissions are managed by your browser or Windows privacy settings. If access is denied, follow the guidance for your device on how to re-enable it. |
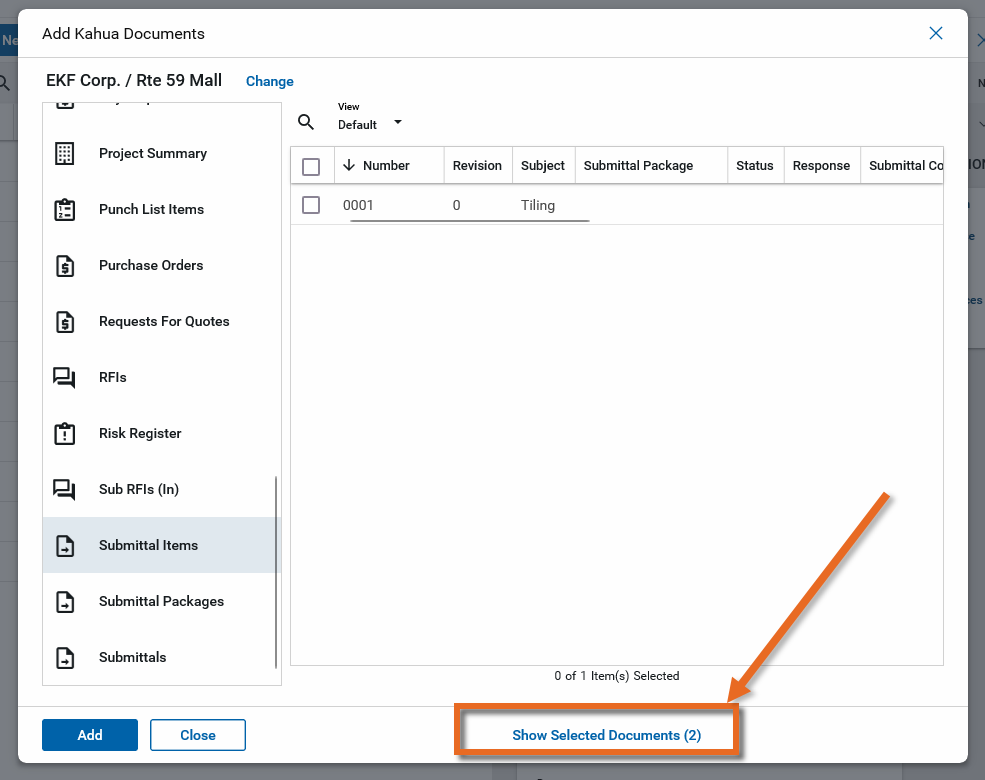
| Add Kahua Doc |
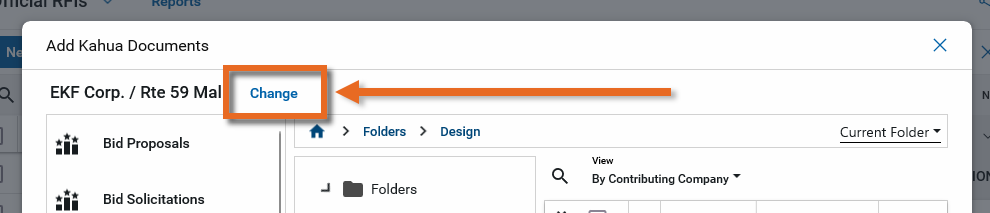
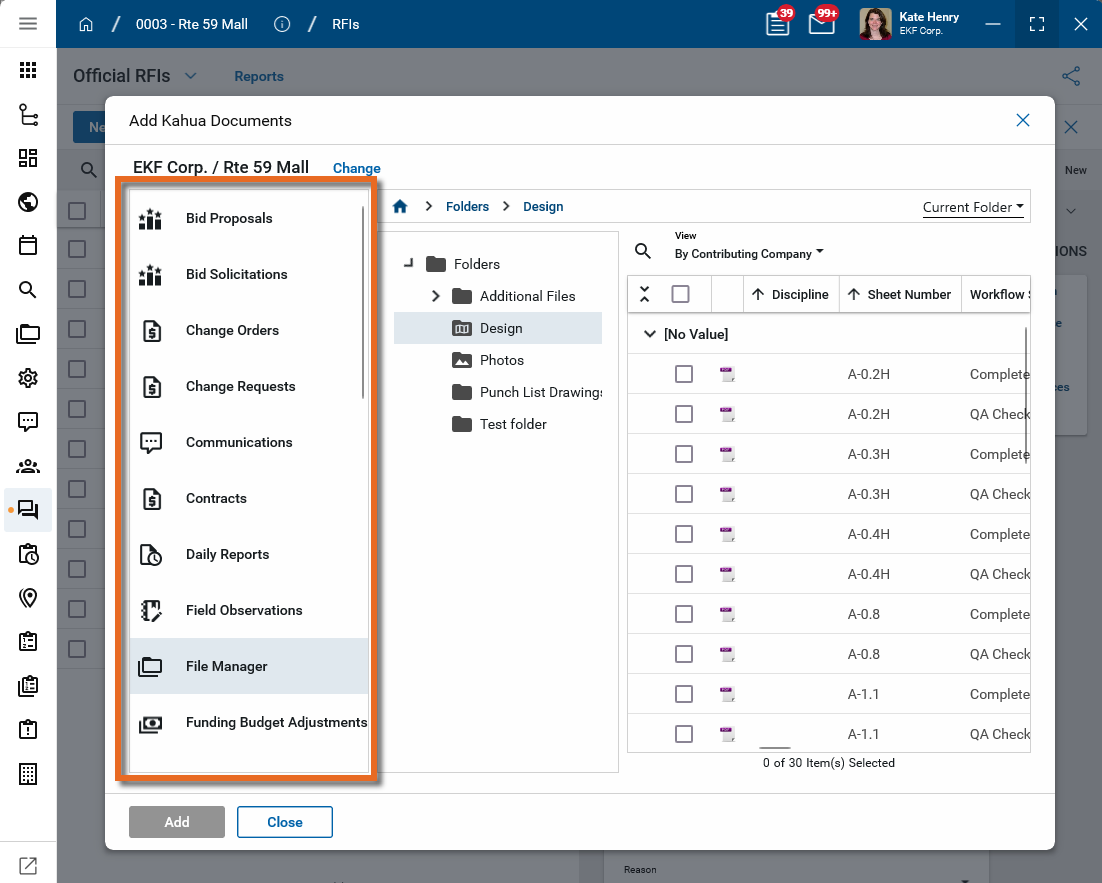
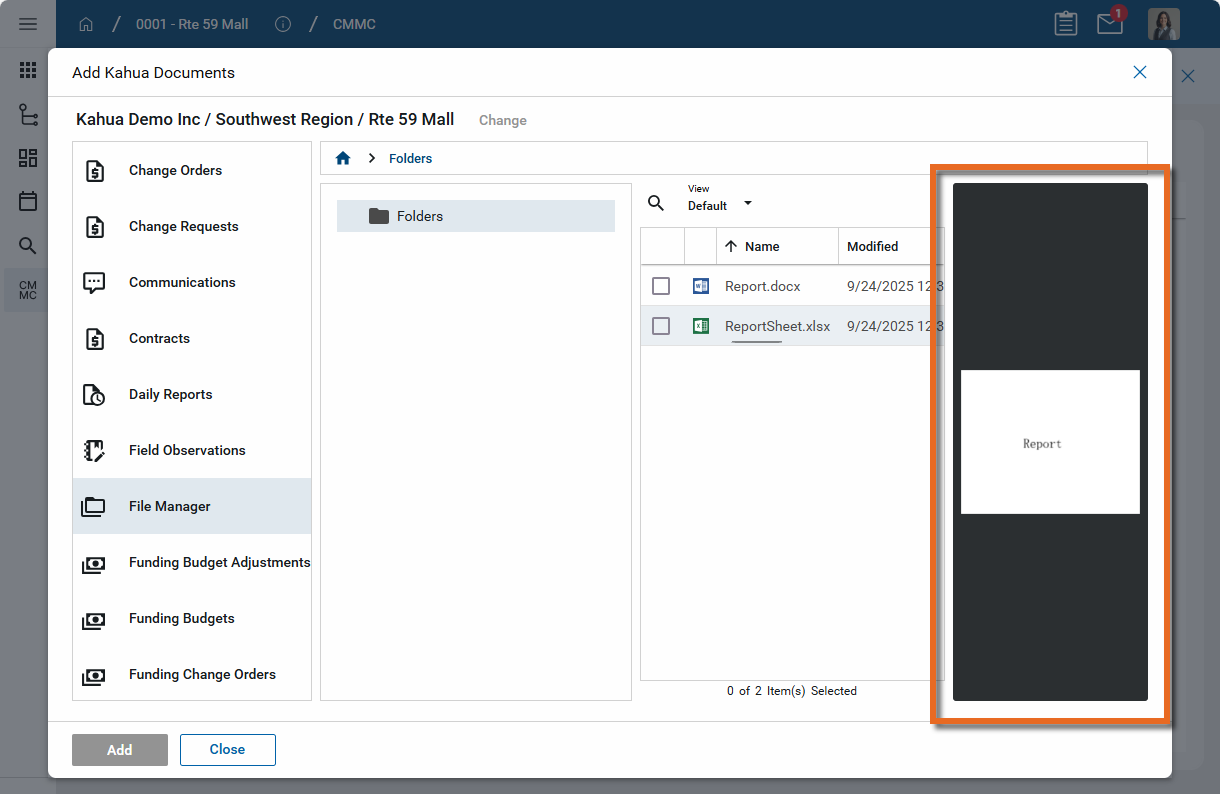
Select Add Kahua Doc to link to a record or uploaded file in Kahua. In most applications, you can select multiple records or uploaded files from different apps to add at one time. Selected items can be viewed by clicking Show Selected Documents at the bottom of the page before clicking Add.
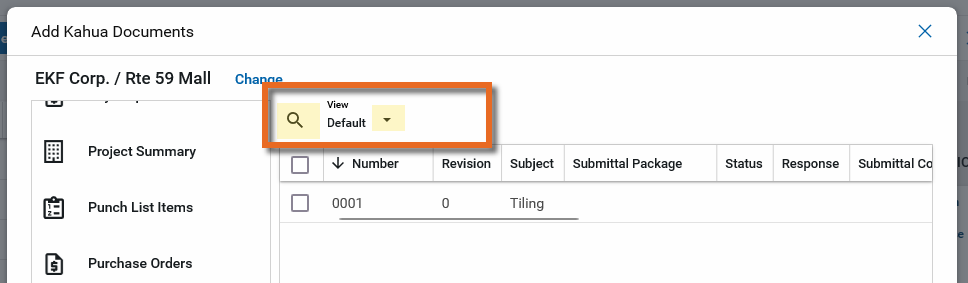
On the Add Kahua Documents page, navigate to a different partition or project by selecting Change next to the current project name.
Select the appropriate app from the list on the left.
To search for a specific record, click on the search icon
In File Manager, click on a record to open a preview.
Important If CUI is enabled on your domain, there are limitations on the selection of records with a CUI "Restricted" label. Refer to Additional impacts of a Restricted label on a record. |
| Edit | Select Edit to modify any of the following fields for a reference file: Description, Reference Type, Include on Send, Include Markup on Send. |
| Markup |
Select Markup to open the document in the Markup editor. Refer to Using the Markup Tool. Note Markups cannot be added to composite documents. Add markups to the original files prior to creating the composite. Refer to Add Composite. |
| Update | Select Update if the value in the Is Current field for a file is "No". If the Is Current value is "No", that indicates that the reference file was added from another location in Kahua, the original file was updated, and this reference file is out of date. Selecting the file and selecting Update will update the reference file and bring it current. |
| Remove | Select Remove to remove the file from the record. If this option is not available to you, you may be able to void the record instead. Refer to Void. |
| Download | Select Download to download the reference file to your device. If you select more than one file to download, they will be saved in a single ZIP file. |
| Add Composite |
Select Add Composite to create a single multi-page PDF file that contains selected documents. The composite document can include a portable view of the current record, reference files, and any other documents that you have access to in the domain. The document will be saved as a PDF file in the References section. You must provide a name for the file and determine the Include on Send value. You can control the order in which they appear in the resulting PDF file. After you click Complete, the composite document will appear as an additional reference file. For more information on adding composite documents, refer to Composite Documents. Important The composite document reflects the state of the source documents at the time the composite is created. If a source document is updated after a composite is created, those changes will not be reflected in any composites created before those changes to the source documents were made. |
| Add Form Letter |
If available, select Add Form Letter to generate a PDF form letter attached as a reference. Form letter templates are set up in the Form Letters app. For more information, refer to Form Letters. |
| Add Approval Doc |
Select Add Approval Doc to create a single multi-page PDF file that contains documents which are be used in support of an approval process. You can include a portable view of the record and files from the References section of the record, from File Manager, and from your computer. You can control the order in which the files appear in the resulting PDF file. When complete, the approval document is saved in the References section of the record in an Approval Documents section. For more information, refer to Create an approval document. Important An Approval Document may be required for the approval process in your application. This is determined in the approval setup in the Configuration app. For more information, refer to Use Approval Document. |
| Void |
Select this option to void one or more selected documents. You must enter a reason for voiding the documents. The reason for the void, who voided the document, and when the void occurred, are stored and appear when Show Voided is selected. Application administrators and moderators can undo a void by editing the record and selecting Restore for the appropriate references. The Void flag is removed and the Voided By, Voided Date, and Voided Reason fields are cleared. Important This option only appears if the Disable Removal (Deletion) of Reference Files setting in Configuration app > Applications tab > Projects or Portfolio Manager (the available option depends on your domain setup) > References tab is enabled. Refer to Disable Removal (Deletion) of Reference Files. |
| Restore |
Application administrators and moderators can undo a void by editing the record and selecting Restore for the appropriate references. The Void flag is removed and the Voided By, Voided Date, and Voided Reason fields are cleared. |
Columns appear when you select the Hide Thumbnails ![]() grid view. You can sort by a column by clicking on the column name in the header. You can adjust the width of column by dragging the divider between two columns in the header.
grid view. You can sort by a column by clicking on the column name in the header. You can adjust the width of column by dragging the divider between two columns in the header.
The columns typically available in the References section are as follows:
| Column Name | Description |
|---|---|
| Select | Select the check box in the grid header to select all the documents. You can also select one or more documents in the grid individually to act on them. |
| Type | The type of document. To edit the type of document, select Edit in the grid's action bar. |
| Description | The Description field is populated with the filename when the file is initially uploaded. To modify the Description field after a file has been uploaded, select Edit in the grid's action bar. |
| Contributor | The name of the person who uploaded the file. |
| Date | The date and time the file was uploaded. |
| Size | The size of the file. This field will not be populated if the document is a Kahua document (i.e., added by selecting Add Kahua Doc originally) |
| Markup? | Indicates Yes if the file has markups applied, No if there are no markups. |
| Include on Send | If Yes, the file will be included when the record is acted upon, depending on the application workflow. Additionally, the file is included in the resulting portable view PDF file when View w/References is selected from the record's View action. If No, the file is not included. |
| Include Markup on Send | If Yes, any markups on the file will be included when the file is included on send, including when View w/References is selected. If No, the markups on the file are not included. |
| Is Current | If the Is Current value is "No", that indicates that the reference file was added from another location in Kahua, the original file was updated, and this reference file is out of date. Select the file and select Update to update the reference file and bring it current. |
| Preview Status |
The Preview Status field indicates where the document is in the process to becoming viewable. Possible statuses include:
|
| Comments | Comments added when the file was initially uploaded appear here. If a document was voided, the void Reason appears here. |
| Voided By / Void Date | If a document was voided and Show Voided is selected, the user who voided the document and the date the void occurred appears here. The Void Reason appears in the Comments column. |
To enable direct uploads to non-controlled folders in File Manager, navigate to Configuration > Applications tab > Portfolio Manager and click on the References tab. Select Enable Direct Upload to File Manager. In the field below, enter the app name to search for and select which apps this feature will be available for.
Note This function is only available when uploading files from your computer. It is not available from mobile devices or via Google Drive upload.
With this setting enabled, the process to upload files to a References section is as follows:
-
Select Upload From Computer.
-
Select one or more files to upload and click Open.
-
As the files upload to References in the background, a dialog box appears allowing you to select which files to add to File Manager and which folder to add them to. Make your selections and click Ok.
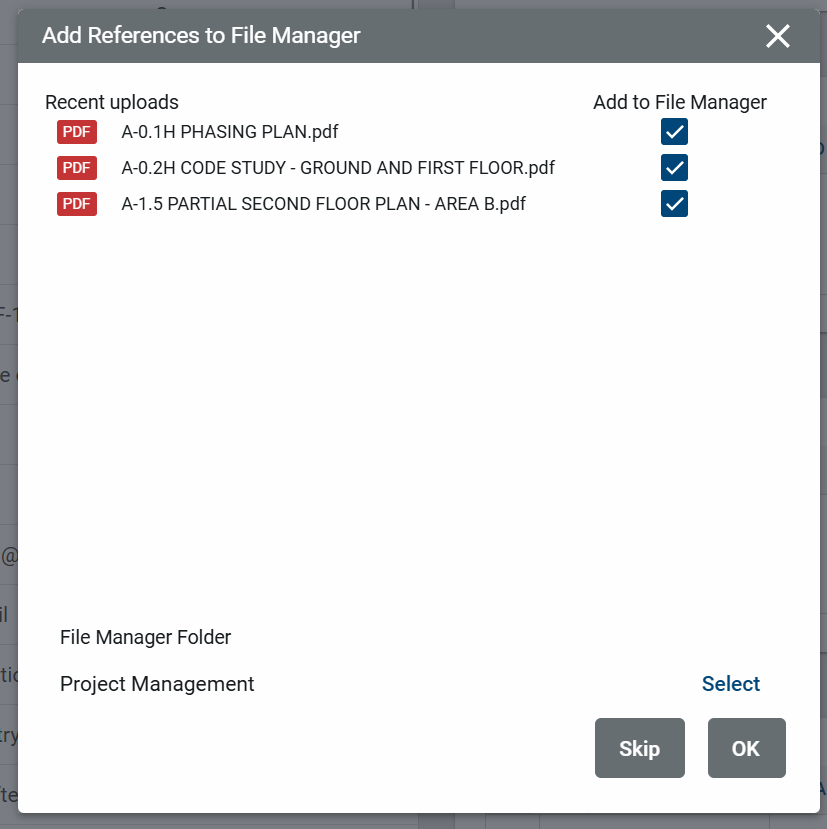
-
Click Save on the document. The files will be uploaded to the specified folder in File Manager.
Exhibits are set up in the Exhibits app, and can be linked to contracts on the Exhibits section of a contract record. For more information on setting up Exhibits, refer to Exhibits.
Note The contract record must be in Edit mode to make changes to the Exhibits section. You can use View and Download when the contract record is in Preview mode.
You may need to click the More icon ![]() to access all the available options on the Exhibits action bar.
to access all the available options on the Exhibits action bar.
The following options are typically available in the Exhibits section action bar:
| Column Name | Description |
|---|---|
| View | The View option is available when a document is uploaded and the Preview Status is "Rendered". Select a document and click View to open the document in the markup view. Refer to Using the Markup Tool. |
| Upload |
Select Upload to upload one or more files from File Explorer. After selecting Upload, navigate to the appropriate files through File Explorer and select Open. Note Note that if you are using Microsoft Edge as your browser, you may be able to take advantage of the Upload from Mobile feature to access files on your mobile device. For more information, refer to https://www.microsoft.com/en-us/edge/features/mobile-upload. |
| Add |
Click on this option to add an exhibit from the Exhibits app. The Select Exhibit(s) dialog appears. Choose one or more exhibits to add to the contract and click Select. |
| Edit |
Select this option to modify the Include on Send option. For exhibits that were uploaded directly to this section, rather than being selected from the Exhibits app, you can also modify the Exhibit Type and Exhibit Name fields. |
| Update |
Select Update if the value in the Is Current field for a file is "No". If the Is Current value is "No", that indicates that the original file in the Exhibits app was updated, and this exhibit file is out of date. Selecting the file and selecting Update will update the exhibit file and bring it current. |
| Update Template |
|
| Remove |
Select one or more items and click Remove to remove the items from the record. Click OK on the confirmation message. Click Done when you are finished. |
| Download |
Select one or more items and click Download to save the items to your computer. If more than one file is selected, the files are saved as a single zip file. |
When saving a record, you can select one of several options from the Save menu.
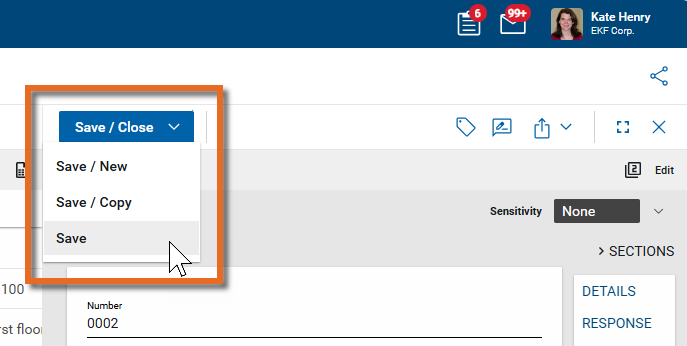
The following options are typically available when creating or editing a record:
-
Save/Close saves the record you are editing and closes the record's Edit page.
-
Save/New saves and closes the record you are currently editing and opens a new one.
-
Save/Copy saves and closes the record you are currently editing and opens a new one that is a copy of the original one.
-
Save saves your work so far on the record you are currently editing and allows you to continue editing.