Calendar app
The Calendar app allows you to create one or more calendars that are configured to show a weekly view of records associated with selected dates for multiple apps.
Example For example, you could set up a "Due Date" calendar that shows all RFIs, Submittals, and Punch List Items by their due dates, and a separate "Meetings" calendar that shows all meetings by meeting date.
Key elements of the app are as follows:
-
You can create and use multiple calendars.
-
The Calendar app is a domain level app. Calendars can be made available to all projects, or to the current project or partition and any projects below the current partition.
-
The data that appears in a calendar can be from just the currently open project, or it can include projects below your current level in the hierarchy, depending on how the calendar is configured.
-
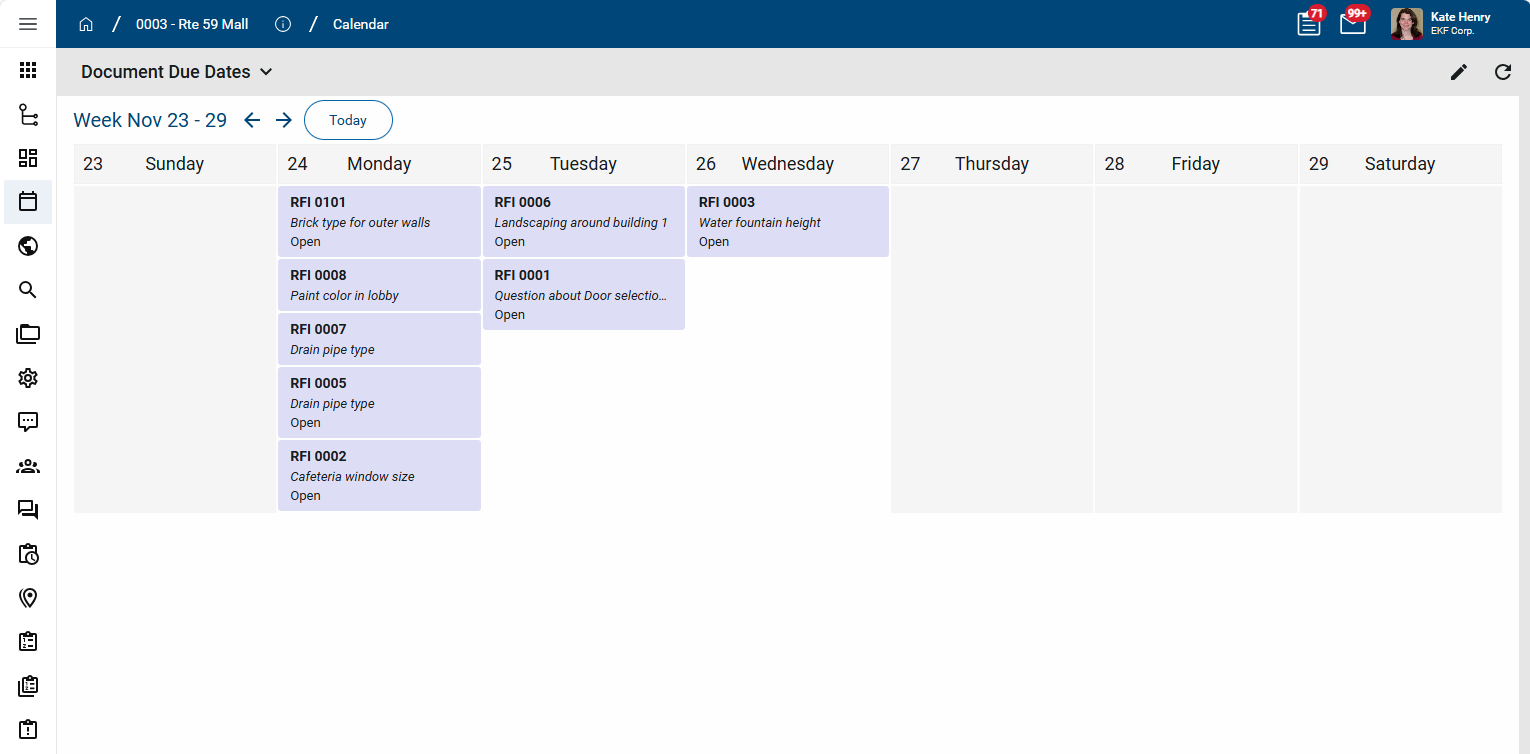
The calendar appears in a weekly view. You can scroll ahead and back to other weeks in the calendar.
-
Calendars can be configured to show which days are non-working days, as configured for the project on the Configuration app > Work Days tab. Refer to Work Days.
-
A user can click on an item in a calendar to drill through to the record in the application.
-
Users with the appropriate permissions can create calendars for themselves, or they can share calendars with one or more groups. Permissions are managed in the Groups app, just like any other app. Refer to Setting up groups.
How to . . .
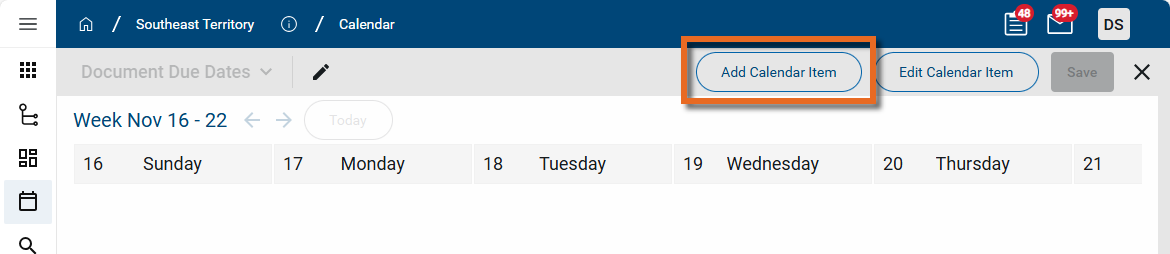
To view or manage an existing calendar, complete the following steps:
-
Navigate to the Calendar application (select the Calendar app icon
 from the launch bar or select Apps > All Apps > Calendar).
 -
To review the list of existing calendars, click on the current calendar name. Select the appropriate calendar to view.
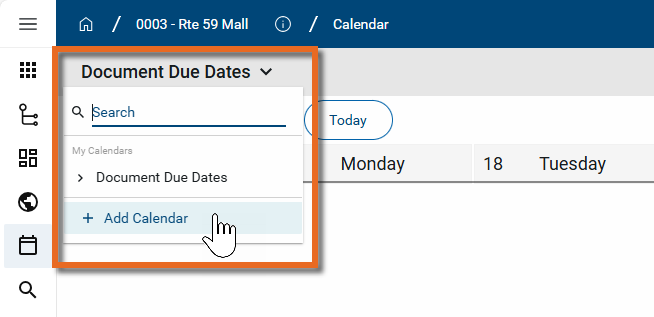
Note Users with the appropriate permissions will have the Add Calendar option.
-
The calendar opens to the current week. On the calendar, complete any of the following actions as desired:
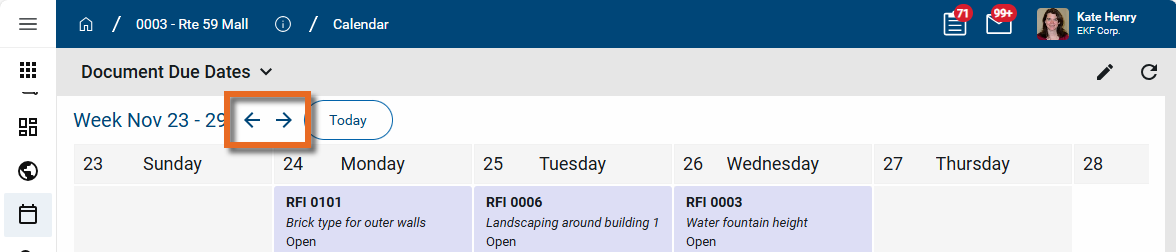
Action Description Previous Week / Next Week Click on the arrow keys to scroll through the calendar weeks.
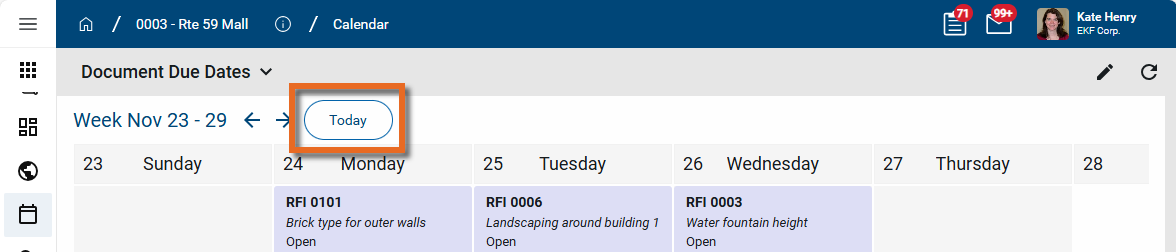
Today Click on the Today option to jump to the current week.
Edit Click the Edit icon
 in the upper right corner to open the calendar for editing.
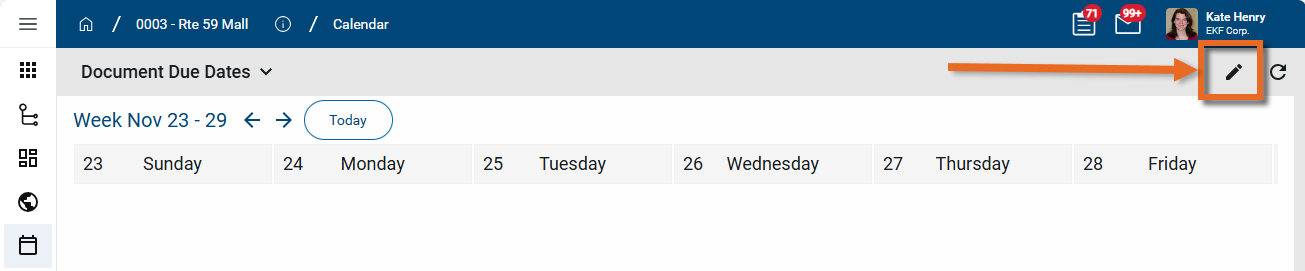
Note For more information, refer to Create or edit a calendar.
Refresh Click the Refresh icon
 to refresh the data.
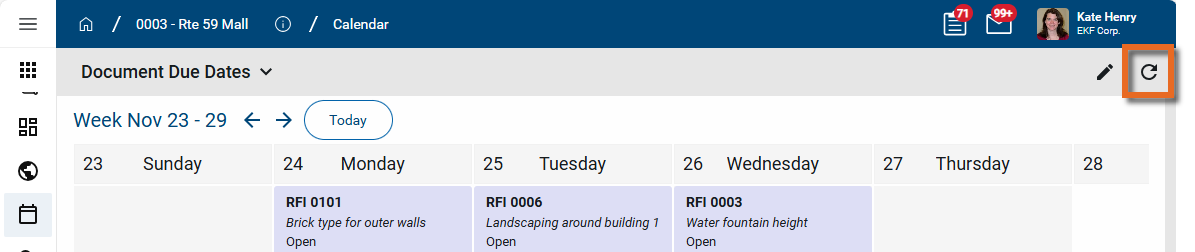
Delete the calendar Select the Edit icon
. Once the calendar is open for editing, if you have the appropriate permissions, the Delete icon  appears next to the calendar name. Select the Delete icon and click Ok on the confirmation message to delete the calendar.
 Important Deleted calendars cannot be recovered in the Recycle Bin app.
Calendars are available in the Calendar application. Depending on your permissions, you may be able to view, edit, or create calendars. Like all other Kahua apps, permissions are managed in the Groups app. Refer to Setting up groups.
To create a new calendar, complete the following steps:
-
Navigate to the Calendar application (select the Calendar app icon
from the launch bar or select Apps > All Apps > Calendar). -
If this is your first calendar, the page below appear. Click the Add button to create a new one.
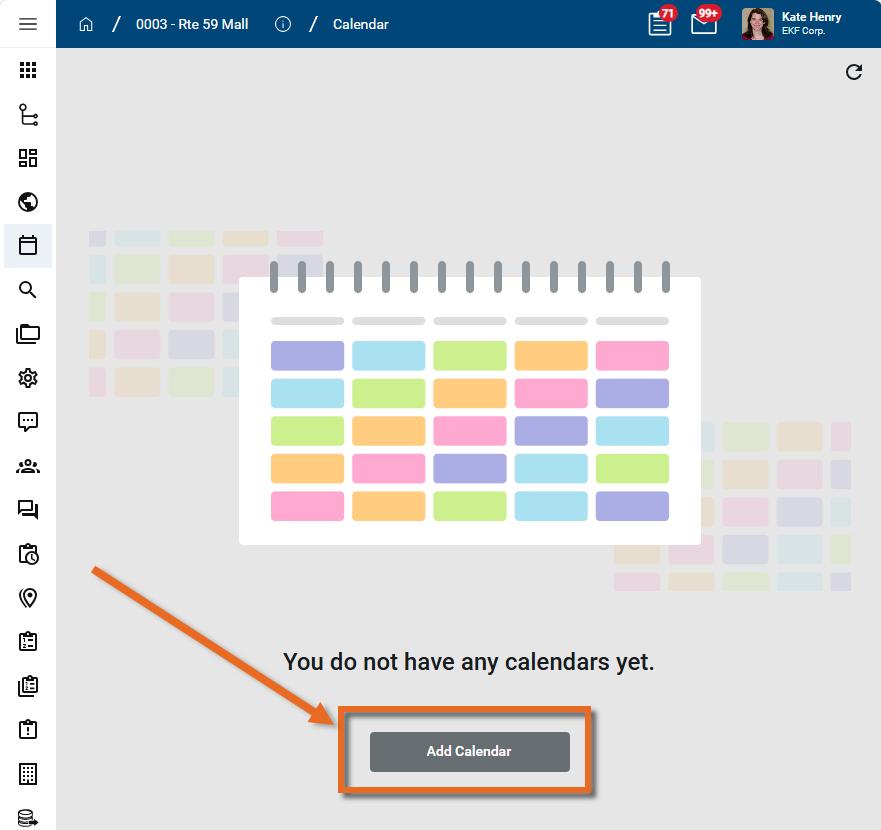
If there is already a calendar available to you and you want to add a new one, click the drop-down menu in the upper left corner to open the list of all available calendars. Click + Add Calendar at the bottom of the list to add a new one.
To edit an existing calendar, click the drop-down menu in the upper left corner to open the list of all available calendars. Select the calendar you want to edit and click the Edit icon
in the upper right corner.
To modify the calendar configuration for an existing calendar, including the name and any sharing, once in edit mode, click the Edit icon
next to the calendar name. -
The Configure Calendar dialog appears. Complete the following fields and selections as appropriate:
Field Description General tab Name Enter a name for the calendar. Availability Select the appropriate availability:
-
All projects - The calendar resides at the root domain level and is available for all the projects in the domain.
-
This project and any project underneath it - The calendar resides in the current partition or project and is available at this point in the hierarchy and below.
Note When calendar items are added, you can control if the items include data from child projects and partitions or not.
Share Share Toggle this option on to share the calendar. If not shared, the calendar will only be visible to you. List of groups Select the appropriate groups names from the Groups app to share this calendar with. For more information on groups, refer to Setting up groups. -
-
Click Save when you are done.
To add project non-working days, refer to Set up non-working days.
To add or edit calendar items, refer to Add and edit calendar items.
-
Click Save to save any changes. Click the Close icon
 to close out of edit mode for the calendar.
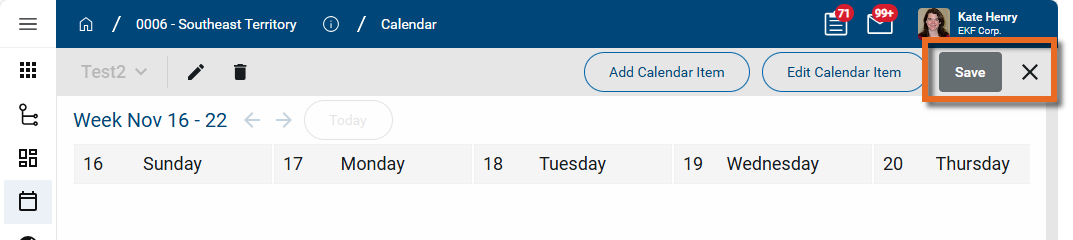
You can have non-working days appear as inactive days on the calendar by linking to the non-working days set up in the Work Days tab of the Configuration app. The non-working days will appear shaded grey on the calendar.
For information on setting up Work Days in your project, refer to Work Days.
To add non-working days to the calendar, complete the following steps:
-
Navigate to the Calendar application (select the Calendar app icon
from the launch bar or selectApps > All Apps > Calendar). -
Click the drop-down menu in the upper left corner to open the list of all available calendars. Select the calendar you want to edit. Click the Edit icon
in the upper right corner.
-
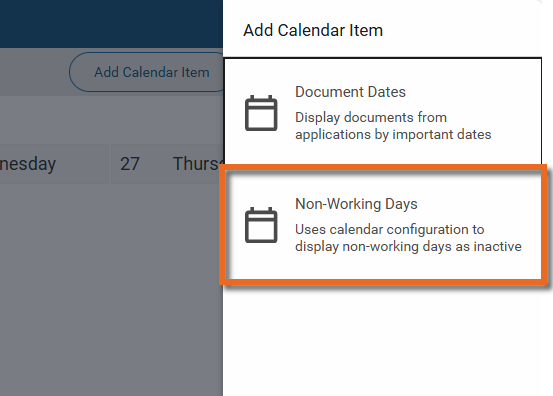
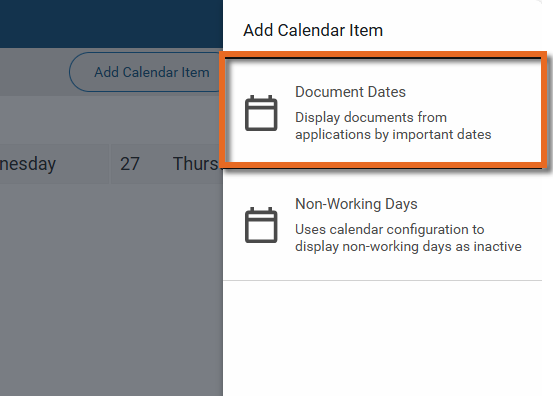
Select Add Calendar Item.
-
Select Non-Working Days.
-
On the Add Calendar Item display, enable one or both of the following options:
-
Include Office
-
Include Job Site
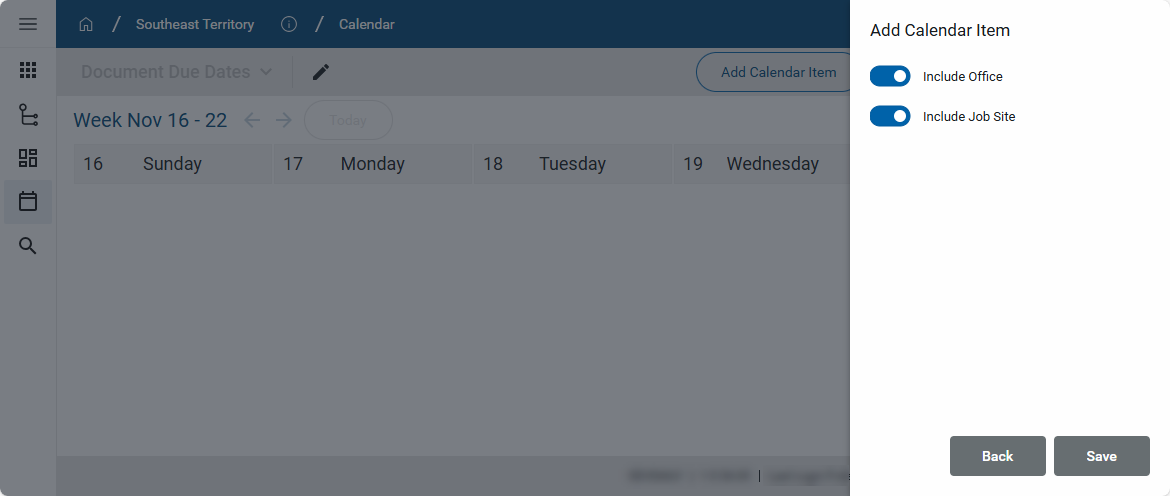
The days and dates included in these selections are configured for each project on the Configuration app > Work Days tab. Refer to Work Days.
-
-
Click Save.
Note Once added to the calendar, select Edit Calendar Item to edit the non-working days.
To add and configure the calendar items on the calendar, complete the following steps:
-
Review the header to ensure that you are in the correct project or partition.
-
Navigate to the Calendar application (Apps > All Apps > Calendar).
-
If the correct calendar is not currently selected, click the dropdown menu in the upper left corner and select the one you want to modify.
-
Click the Edit icon
to open the calendar up for editing.
-
To add a new item, click Add Calendar Item and select Document Dates to add dated records from an app.
To edit an existing item, select Edit Calendar Item. Click on the Edit icon
 for the item you want to modify.
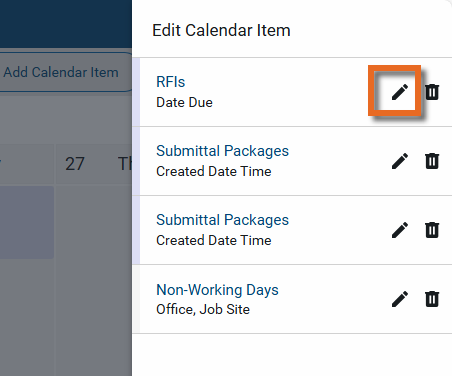
-
Complete the selections as appropriate.
Field Description App Select the app that contains the records you want to include on the calendar. List This field appears for apps with multiple lists. Select the appropriate list to use, or "All" to include all lists. Data Source This field appears for some apps. If it appears, a selection is required to select a date value. Typically, the "Default" option is the most appropriate. Name Enter a name for the calendar item. By default, the app name appears here. Include Data from Child Partitions Select this option to include records from projects lower in the hierarchy.
Note Only records from projects that the viewer of the calendar has access to will appear.
Date Select which date field will be used to determine where records appear on the calendar. Display Color Select the color to be used for these items on the calendar. Title Select the field to appear on the first line of the calendar item. Typically, "Short Label" is a good choice as it is typically the record type and number, e.g. "RFI 1001. Subtitle Select the field to appear on the second line of the calendar item. Typically, a field such as "Title" or "Status" is appropriate. Description Select the field to appear on the third line of the calendar item. Typically, a field such as "Description" or "Subject" is appropriate. -
Click Save to save your changes and add the item to the calendar.
Click Back to return to the Add Calendar Item selection page.
Note You will lose your work if you click Back without saving.
-
To add more items, click Add Calendar Item again and repeat the steps. To modify the item, click Edit Calendar Item and select it.
-
Click Save on the upper right corner of the calendar when you are done.
Your domain administrator or another user with the appropriate permissions can configure the app in the Configuration application.
Important When working in the Configuration app, it is important to review the header and ensure that you are working at the correct level in the hierarchy, either the root domain or at a partition or project level.
Settings that you establish at the root domain or lower levels will inherit down the hierarchy until they are overridden. For more information on the hierarchical structure of Kahua, refer to Understanding the hierarchical structure of Kahua.
The Configuration app can be accessed directly through the apps list (Apps > Administration > Configuration).
For general information on configuring this app in Configuration, refer to Application configuration.