Pinning functionality in Punch Lists
The pinning feature for the Punch Lists app in Kahua allows you to drop a virtual "pin" on a drawing, and then link that "pin" to an existing or newly created punch list record. The drawings must be added to a special "Pinnable Folder" folder type in the File Manager app to be available for pinning in the Punch Lists app.
Note Pinning can also be used in the File Manager app, but it requires a different configuration. For more information on pinning in File Manager, refer to Pinning functionality in File Manager.
These are some key components of the pinning feature in the Punch Lists app:
-
Punch list pins are viewed and managed in the Punch Lists app.
-
The pinning feature must be enabled for your domain by your domain administrator. Refer to Domain Defaults.
-
To use pinning with Punch Lists, you must enable the "Pinnable Drawings" folder type in the File Manager configuration. This allows you to create a "Pinnable Drawings" folder. Only drawings in folders of the type "Pinnable Drawings" will appear in the Punch Lists app.
-
You must create a Pinnable Drawings folder in the File Manager app for your project and add the punch list drawings to the folder.
-
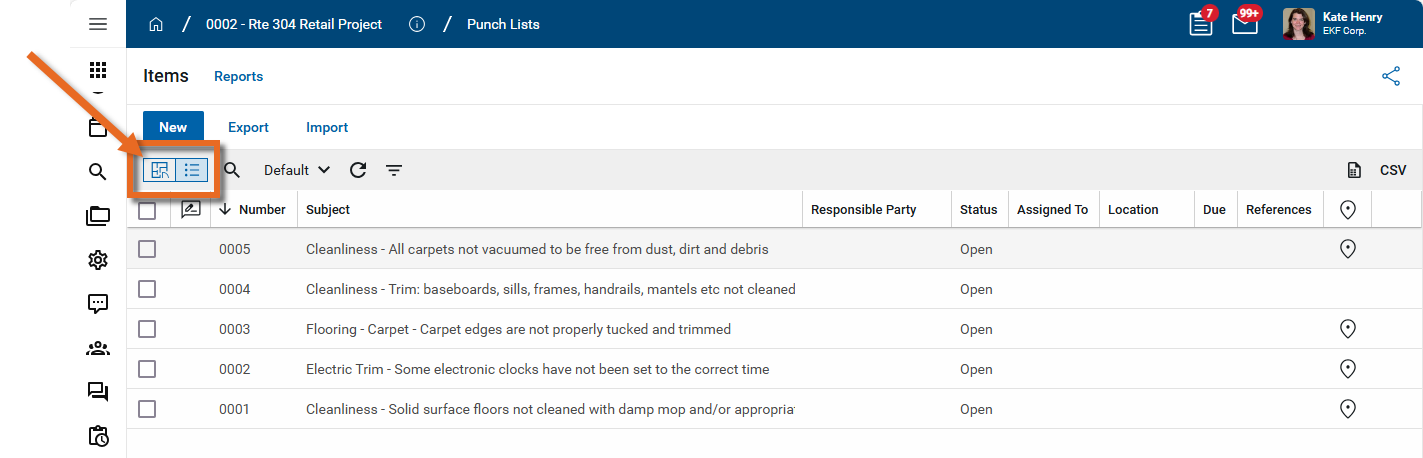
In the Punch List log view, punch list items with an associated pin are indicated with a Pin icon
 in the Pins column.
How to . . .
To enable punch list pinning in your project, you must complete the following steps:
To use the pinning functionality, a domain administrator must enable it on the Domain Settings app > Domain Defaults page. For more information, refer to Domain Defaults.
To use the pinning functionality in the Punch Lists app, a domain administrator or user with the appropriate permissions must enable the "Pinnable Drawings" folder type in File Manager. This allows you to create a "Pinnable Drawings" folder. Only drawings in folders of the type "Pinnable Drawings" will appear in the Punch Lists app.
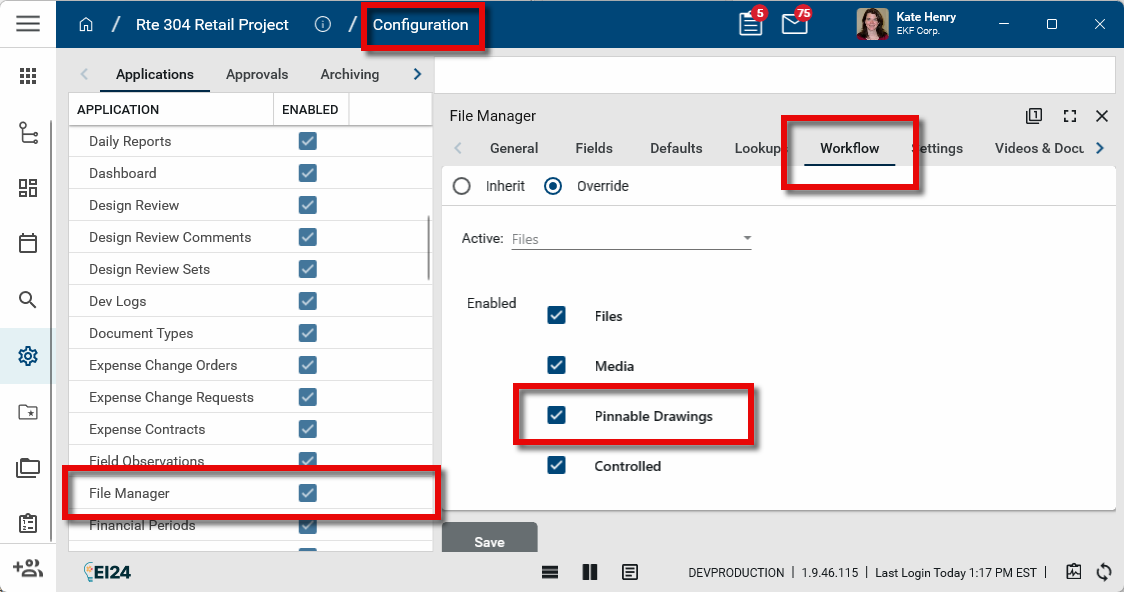
To enable the "Pinnable Drawings" folder type, complete the following steps:
-
Review the header to ensure that you are in the correct project or partition.
Important If you want punch list pinning to be available on all your projects, enable the "Pinnable Drawings" folder type at the root domain.
-
Navigate to the Configuration application (Apps > Administration > Configuration).
-
Open the Applications tab and select File Manager. The detail view appears. Alternatively, right-click on the File Manager app icon in the launch bar and select Configure.
-
Click on the Workflow tab and select Override.
-
Select the Enabled check box for Pinnable Drawings.
-
Click Save when you are done.
To use the pinning functionality in the Punch Lists app, you must create a "Pinnable Drawings" folder in the File Manager app and add to it the drawings which you want to pin punch list items to. Only drawings in folders of the type "Pinnable Drawings" will appear in the Punch Lists app.
To add a "Pinnable Drawings" folder to File Manager, complete the following steps:
-
Review the header to ensure that you are in the correct project or partition. You should be in the project where you want to apply the punch list pins.
-
Navigate to the File Manager application (Apps > Document Management > File Manager).
-
Navigate to the location on the file folder structure where you want to the Pinnable Drawings folder to appear.
-
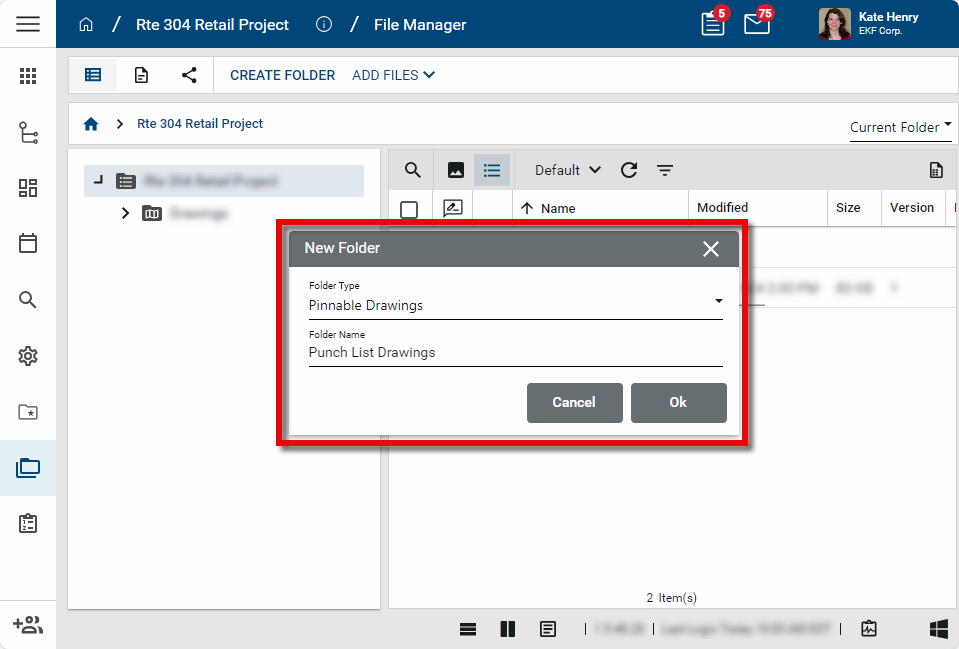
Select Create Folder from the action bar. Alternatively, right-click on the folder that you want to contain the Pinnable Drawings folder and select New Folder. The New Folder dialog appears.
-
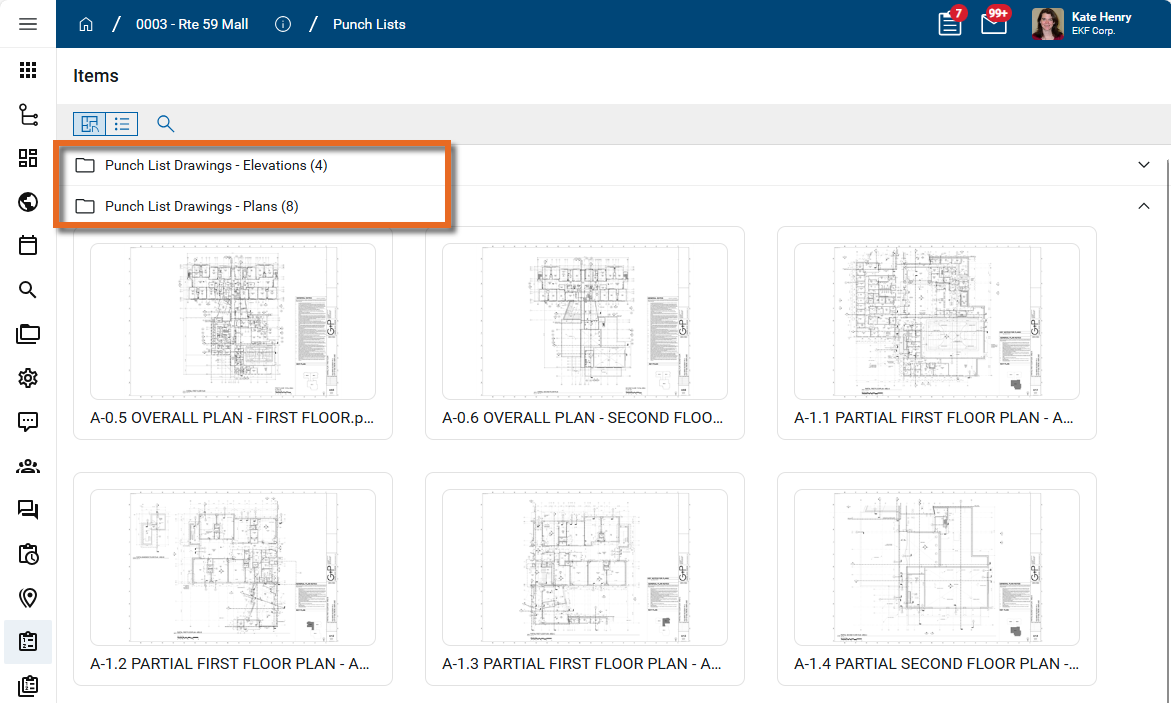
Select "Pinnable Drawings" as the Folder Type. Enter a folder name, such as "Punch List Drawings" and click Ok.
-
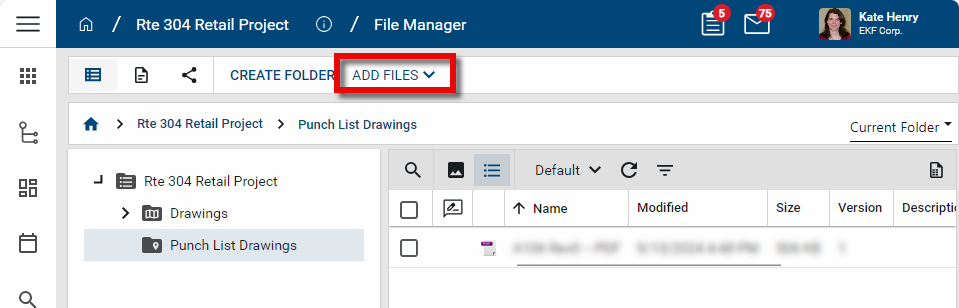
The new folder appears in the selected location. Add the appropriate drawing files to the folder. You can right-click on files in other folders and select Copy to add a copy to the pinnable drawings folder, or open the new folder and select Add Files from the action bar.
-
When you are done adding files, you can open the Punch Lists app to pin punch list items to the drawings in the folder.
Using the Punch Lists app in drawing mode allows you to view and manage pins on drawings that are associated with punch list items.
Drawings must be uploaded to the File Manager app and placed in a folder with a "Pinnable Drawings" folder type to be viewable in drawing mode. For more information, refer to Enable punch list pinning in your project.
To work in Drawing Mode in the Punch Lists app, complete the following steps:
-
Review the header to ensure that you are in the correct project or partition.
-
Navigate to the Punch Lists application (Apps > Document Management > Punch Lists).
-
Select Drawing Mode
 .
. 
-
All the drawing files in folders of the type "Pinnable Drawings" in File Manager appear as thumbnails.
If there are multiple pinnable folders, the drawings are organized by those folders, in alphabetical order.
-
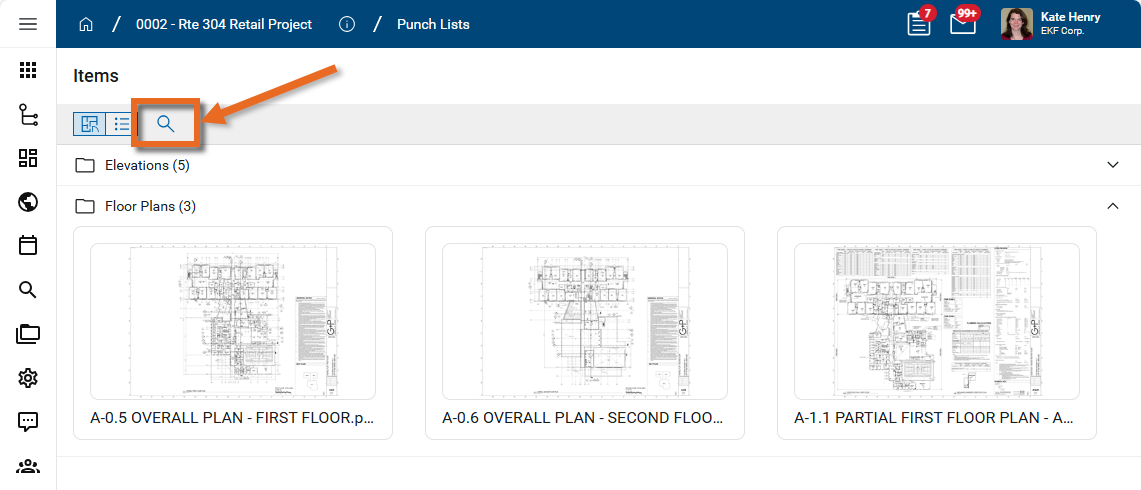
To search for a drawing or folder by name, click the Search icon
 .
. 
-
Click on the thumbnail of the drawing you want to work with.
-
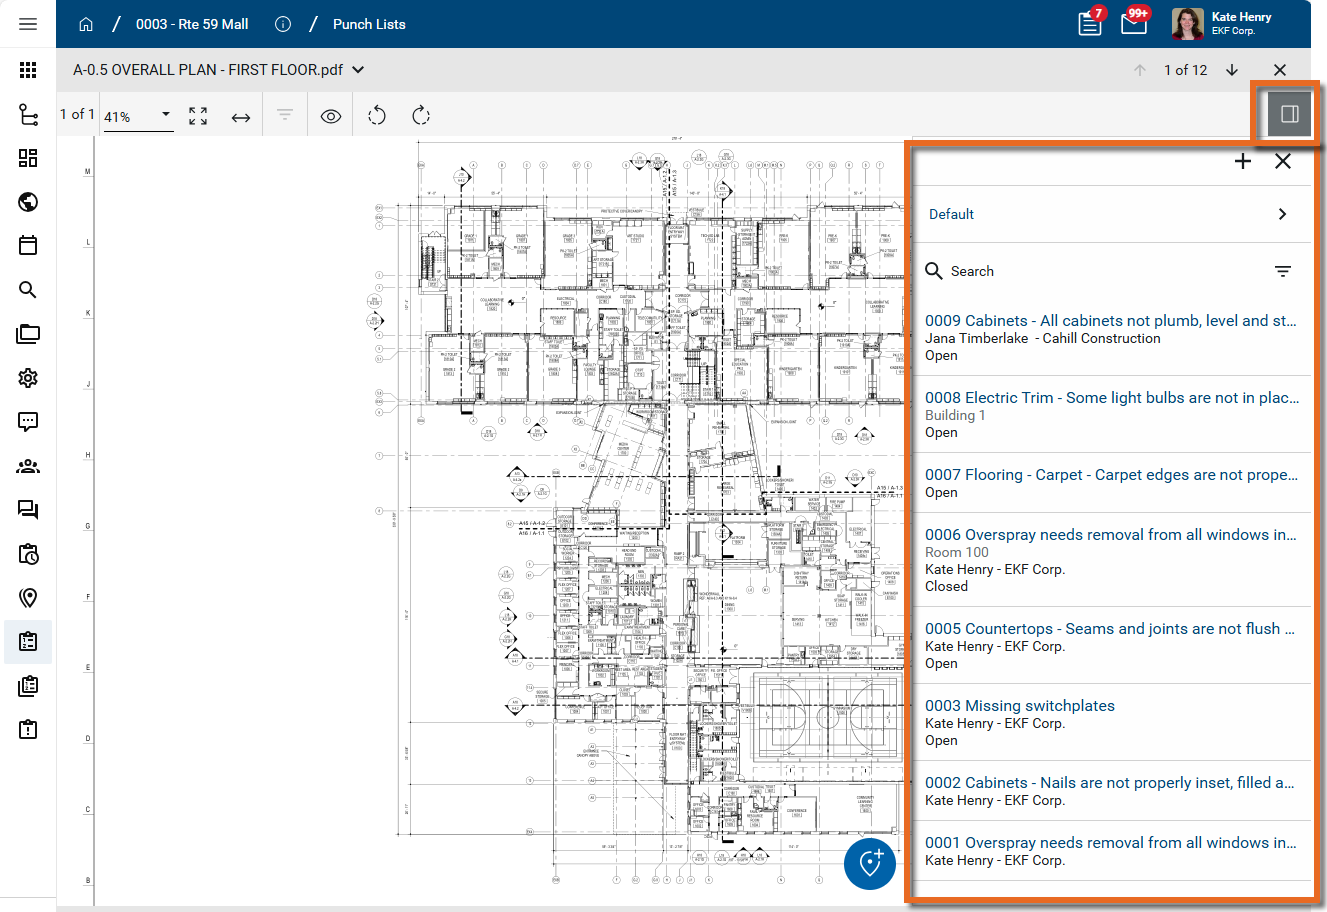
The drawing appears with the Punch List panel open. Click the Open Panelicon
 in the viewer toolbar to open or close the Punch List Panel. Alternatively, you can click the Close icon
  on the panel to close it.
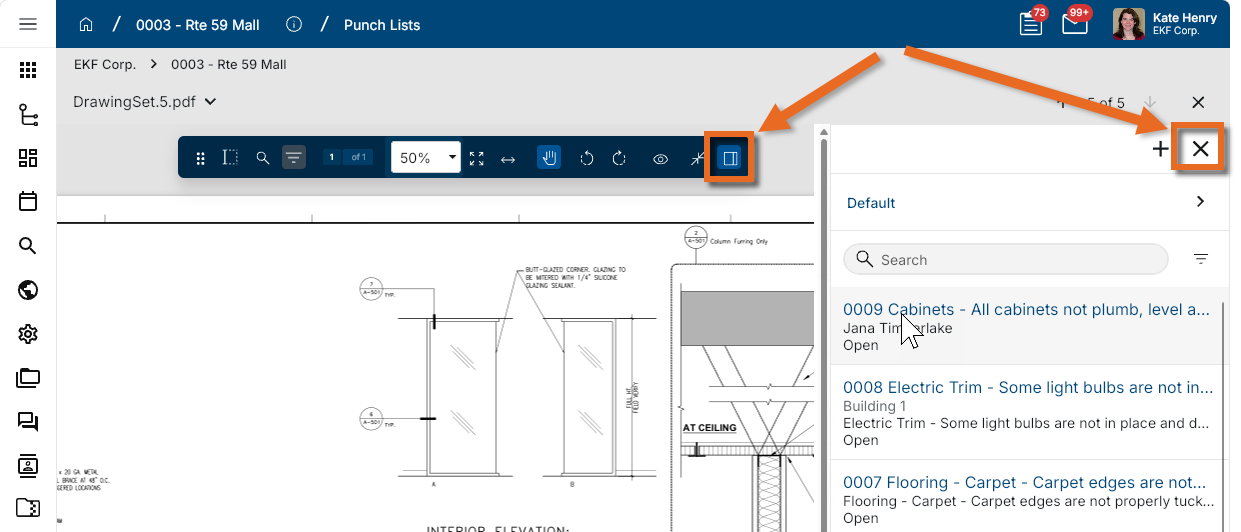
-
You can click and drag in the drawing to pan to a different area for viewing.
You can use the following tools on the Viewer Toolbar to additionally manage your view of the drawing:
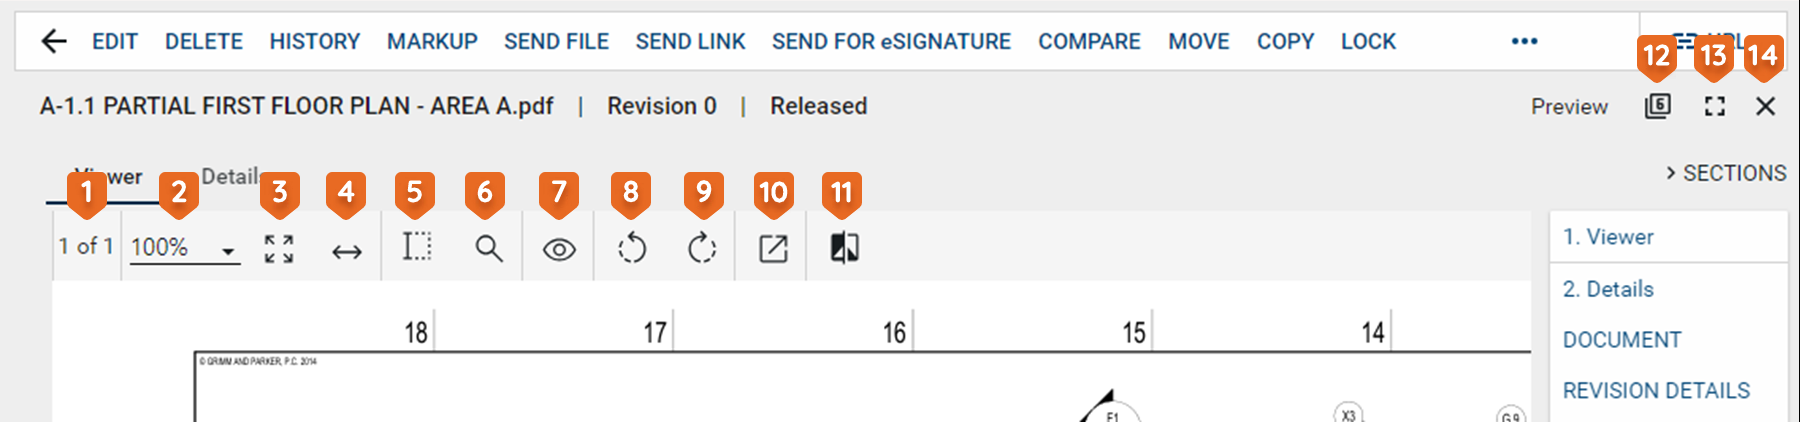
Tool Description Drag toolbar 
This option appears when the toolbar is un-docked. Click on it and drag the toolbar to the desired location. Text Selection 
Select this icon to enter text selection mode.
In this mode, you can click and drag your mouse to select text on the image.
Use Ctrl+C to copy the selected text to your clipboard.
Search 
Opens a text search window.
When you enter the search criteria, the total number of search results will appear with the results highlighted in yellow on the page. You can use the arrows to scroll through the results on the image.
Filter 
Select the Filter icon to open the search function, allowing you to search for a keyword in any markups on the drawing. You can additionally filter the results by type of markup.
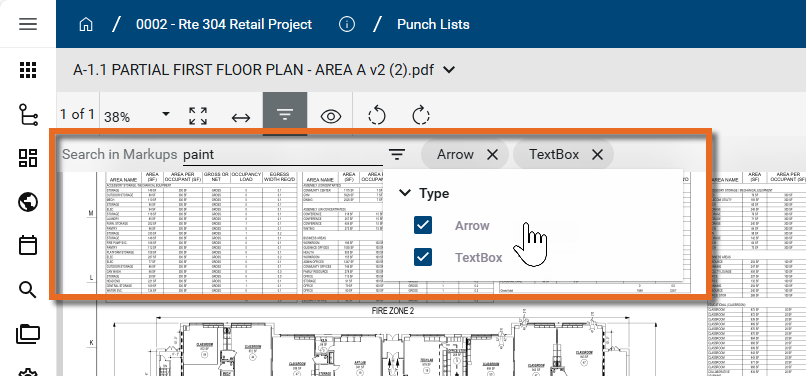
Note If no markups are present, the filter icon is disabled.
Page # of # 
Indicates which number page you are on of the total number of pages in the file or drawing.
If there are multiple pages in the document file, you can use the arrow keys that appear to navigate through the pages.
Additionally, you can click here to open a dialog box that allows you to enter a page number to jump to. Note that you can also use the keyboard shortcut Ctrl+Shift+G to open the dialog box.
Zoom 
Shows your current zoom level on the drawing.
Select a level from the drop-down list, manually enter a level and press Enter on your keyboard, or use Ctrl + your mouse wheel to zoom in and out from the current cursor location.
Fit Page 
Click this icon to fit the file image to the display area.
Fit Width 
Click this icon to fit the file image to width of the display area. Open File 
Opens a PDF file in the default browser or uses the default browser to download the PDF version of the file to the local downloads folder. Pan mode 
Click this icon to switch between pan mode and selection / markup mode.
In pan mode, clicking and dragging on the image will pan across the image.
In selection mode, clicking and dragging on the image will select a section of the image and any markups in that selected area.
Rotate Counter Clockwise  / Rotate Clockwise
Rotates the image counter-clockwise or clockwise.
When done while in markup mode and saved, the rotation is saved with the drawing and will appear rotated to anyone viewing the drawing.
View 
Select any of the following options:
-
Show Markups - Show or hide existing markups.
-
Show Markup Panel - Show or hide existing markups in a table at the bottom of the display area.
-
Show Hyperlinks - Show or hide existing hyperlinks.
-
Show Info - Displays file information, such as the calibration status, internal rotation, page rotation, correction rotation, page zoom, number of annotations, etc.
Bluebeam 
If you have a licensed copy of Bluebeam on your computer, you can use this to open Bluebeam and access their markup tool. Compare 
Opens the Compare Files dialog. Select a second file to compare with this one. To learn more about the Compare feature, refer to Using the Compare feature. Dock toolbar 
Select this option to dock the toolbar outside the viewing pane. This can make it easier to view the whole document. Click the icon again to un-dock the toolbar. -
-
The Punch List Panel lists all the punch list items. The items appear by Number and Subject. You can select a different log view
 , perform a keyword search
  , or apply a quick filter
  to narrow down the items list.
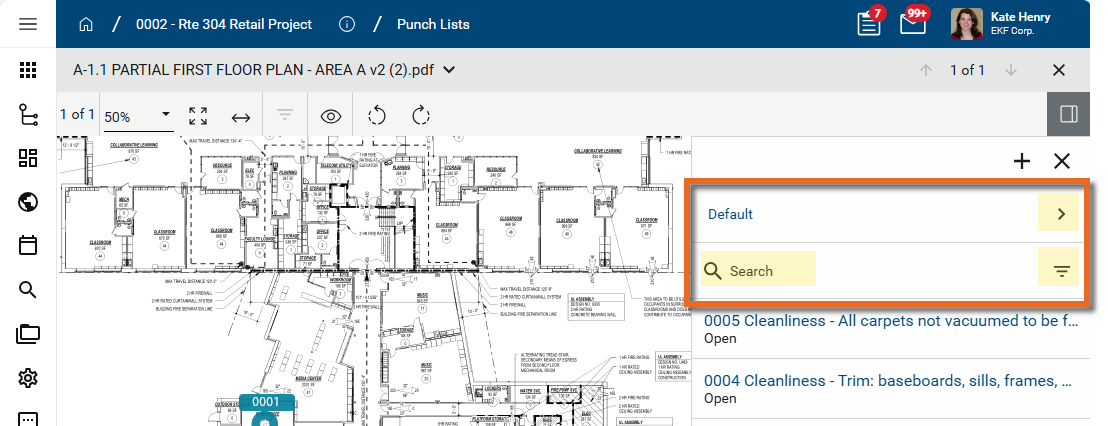
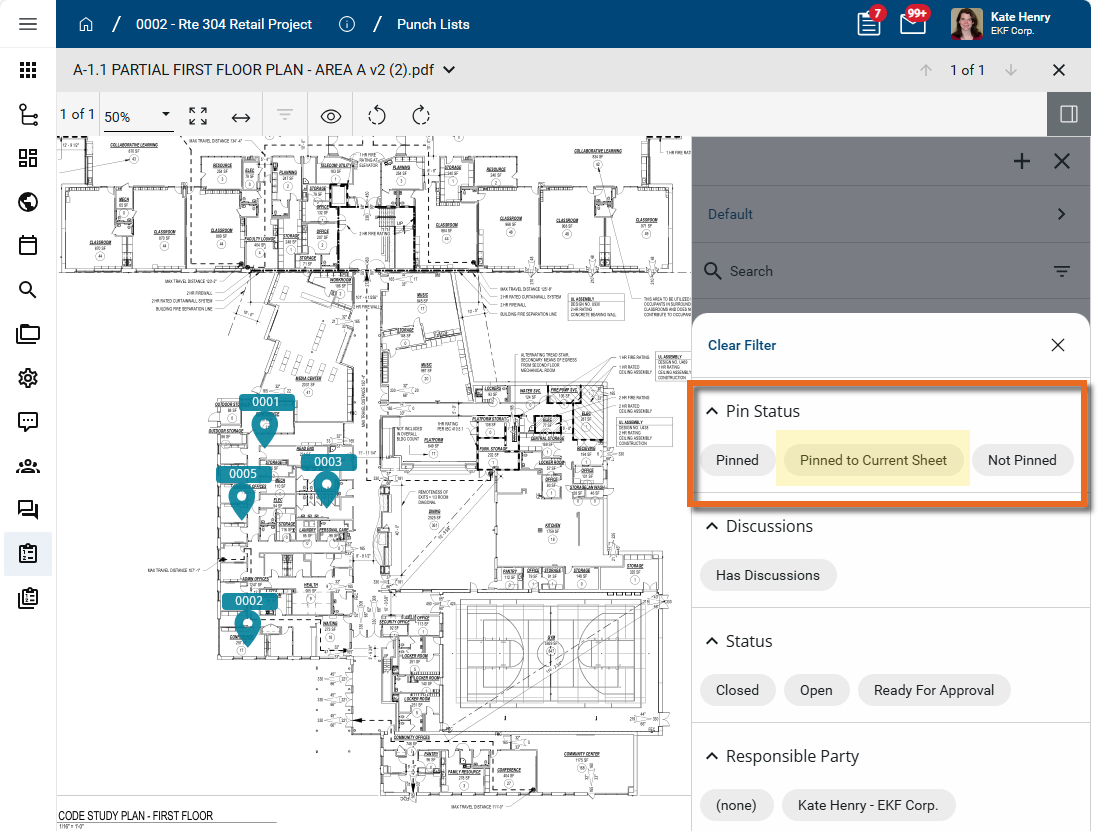
Note Drawing Mode includes a quick filter of "Pinned to Current Sheet" under Pin Status that is not available from the standard log view. This filter reduces the list of punch list items to only those pinned on the currently selected drawing.
-
Select Hide Closed in the lower right corner to hide any closed markups.
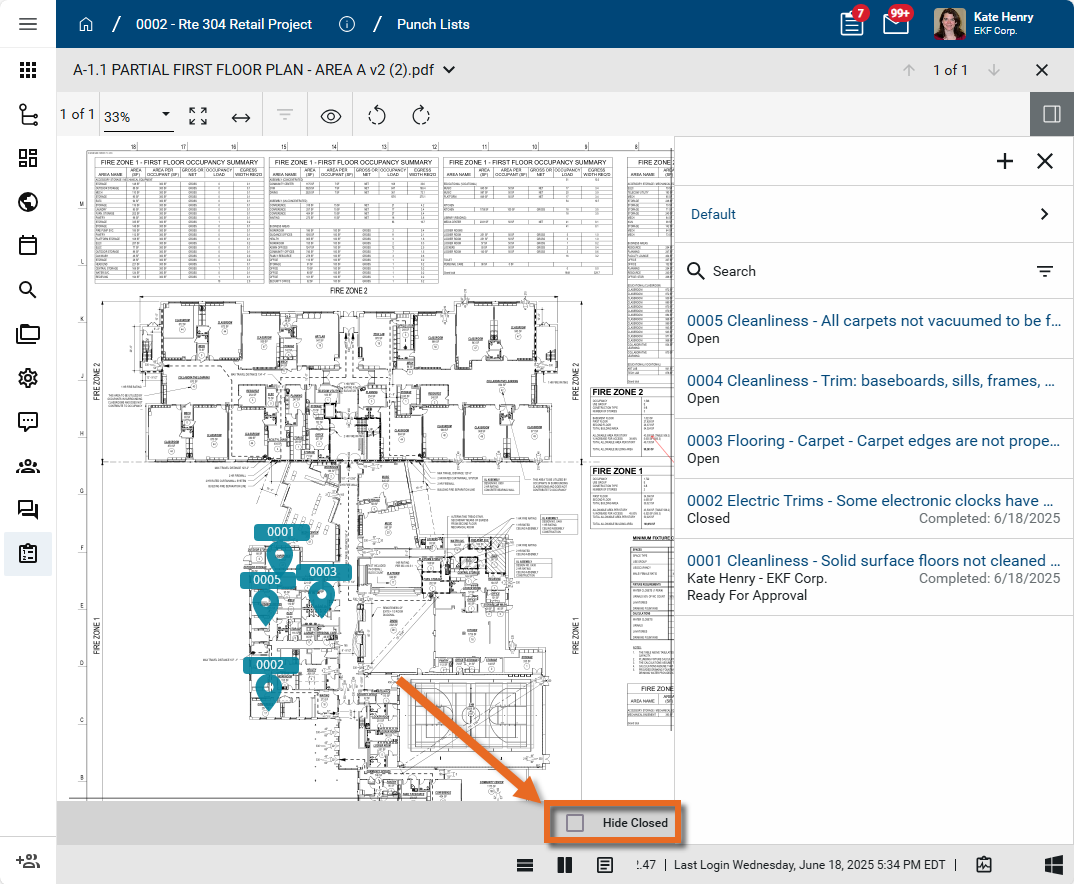
Important Hide Closed refers to drawing markups, not punch list items.
-
To switch to a different drawing, click on the selector icon next to the drawing name, or click on the arrow icons next the # of # option in the header.
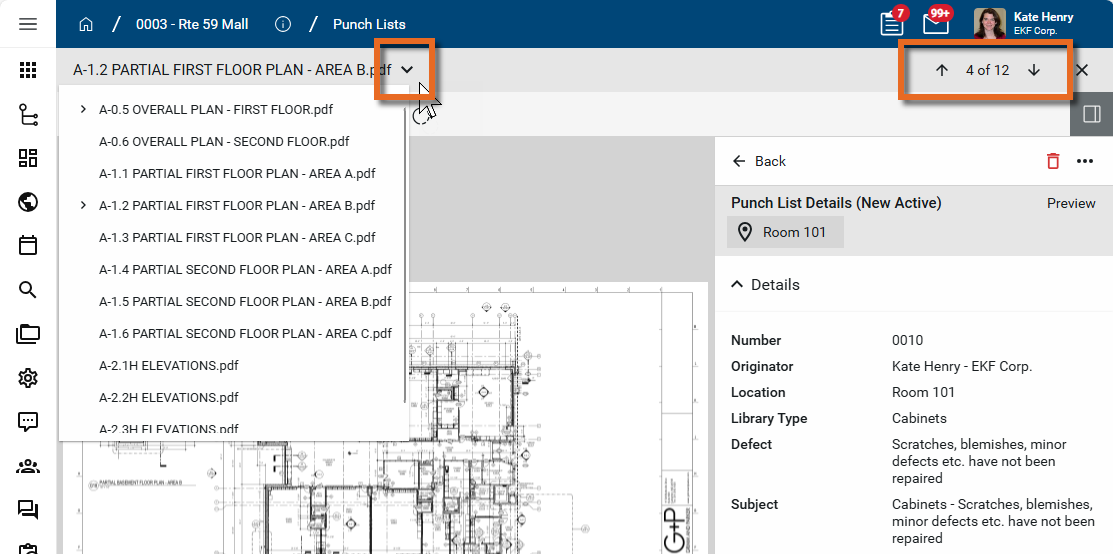
Note You can switch to a different drawing while the Punch List Panel is open and while a punch list item is in edit mode.
-
To exit out of drawing mode, click the Close icon
to return to the image selector.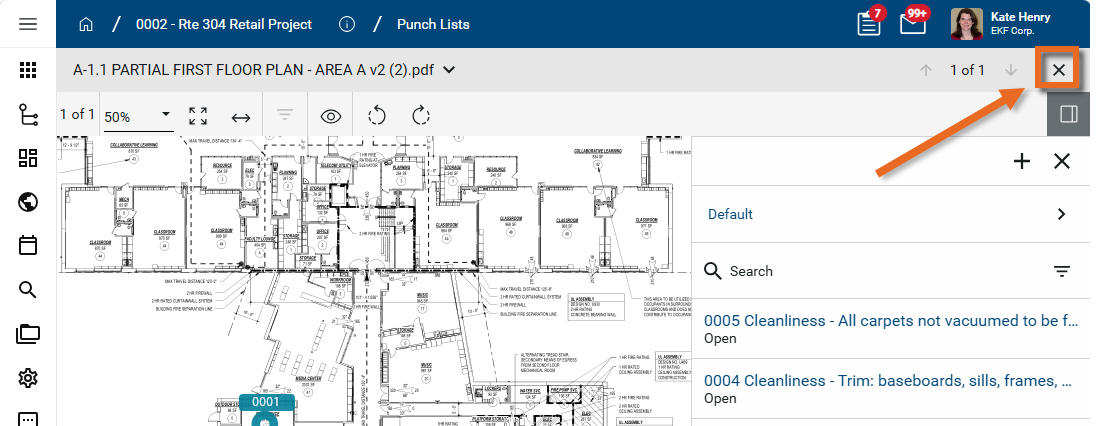
You can add a new punch list item and a pin at the same time. To do so, you must have added the appropriate drawings to a "Pinnable Drawings" folder in the File Manager app. In the Punch Lists app, you must enter Drawing Mode and select the drawing you want to use with your punch list item pins.
To add a new punch list item and pin in the Punch Lists app, complete the following steps:
-
Review the header to ensure that you are in the correct project or partition. You should be in the project where you want to apply the punch list pins.
-
Navigate to the Punch Lists application (Apps > Document Management > Punch Lists).
-
Select Drawing Mode
. For more information on working in Drawing Mode, refer to Work in Drawing Mode.
-
Click on the thumbnail of the drawing you want to work with. The drawing appears with the Punch List panel open.
-
To add a new punch list item and its pin, click the Pinning Mode icon
 .
.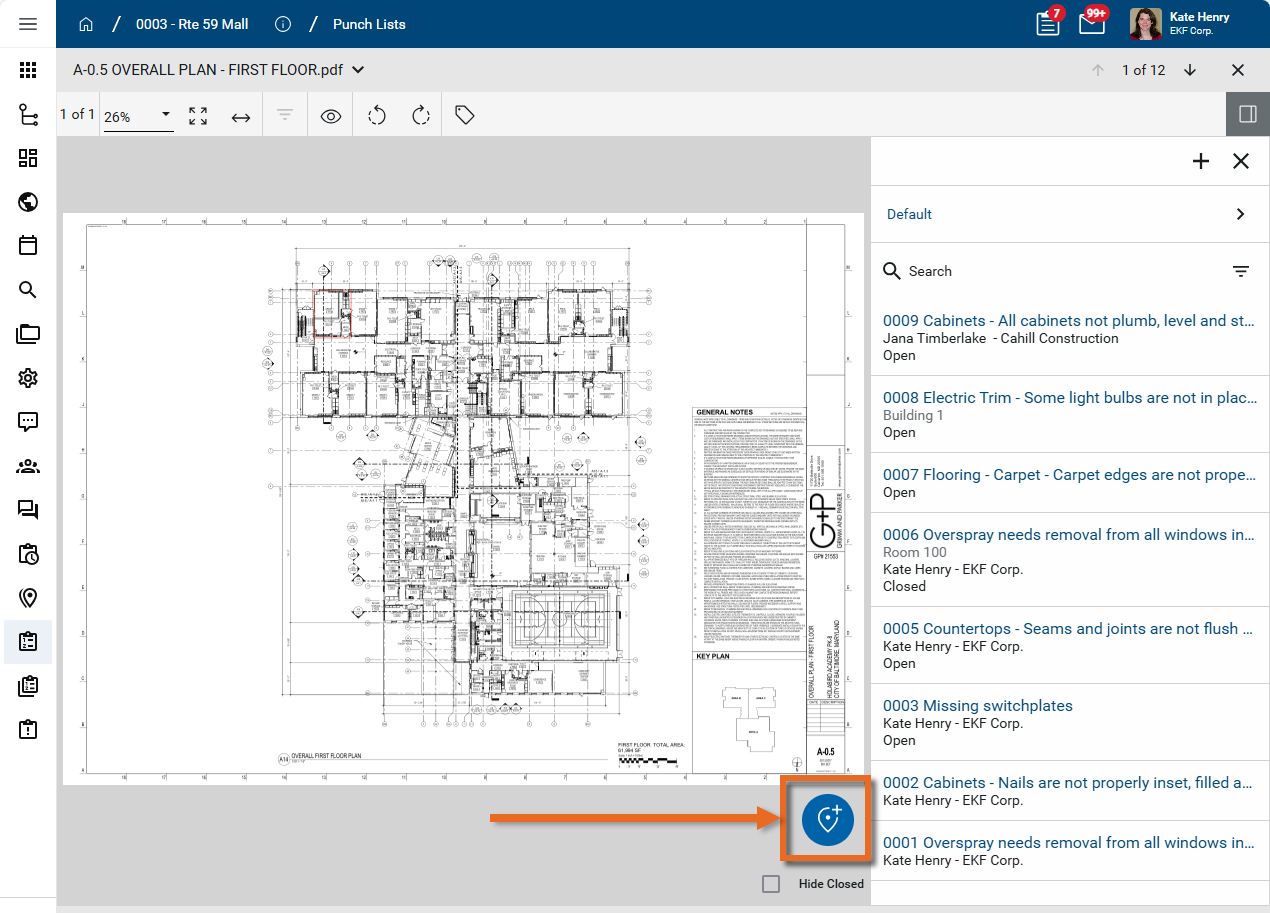
-
Click on the drawing at the appropriate location to drop the pin. Click and drag the pin to move it on the drawing.
-
On the punch list panel, enter information for the punch list item associated with this new pin. For more information on punch list item fields, refer to Details.
-
Click the Save icon
 on the punch list item when you are done. Select More
  for additional Save options.
You can add a new pin to an existing punch list item that is in an "Open" state, i.e., not currently with the Responsible Party or an Approver.
To add a pin to an existing punch list item, complete the following steps:
-
Review the header to ensure that you are in the correct project or partition. Navigate to the Punch Lists application (Apps > Document Management > Punch Lists).
-
Select Drawing Mode.
-
All the drawing files in folders of the type "Pinnable Drawings" in File Manager appear. Click on the drawing you want to work with.
-
The drawing appears with the Punch List panel open. Click the Open icon
 in the upper right corner to open or close the Punch List Panel.
-
All available lists and log views are present above the records list. Use the search field
 or quickfilter
  to search for the correct record.
 -
Click on the punch list item to open it.
-
Click the Edit icon
 in the lower right corner of the panel to enter edit mode.
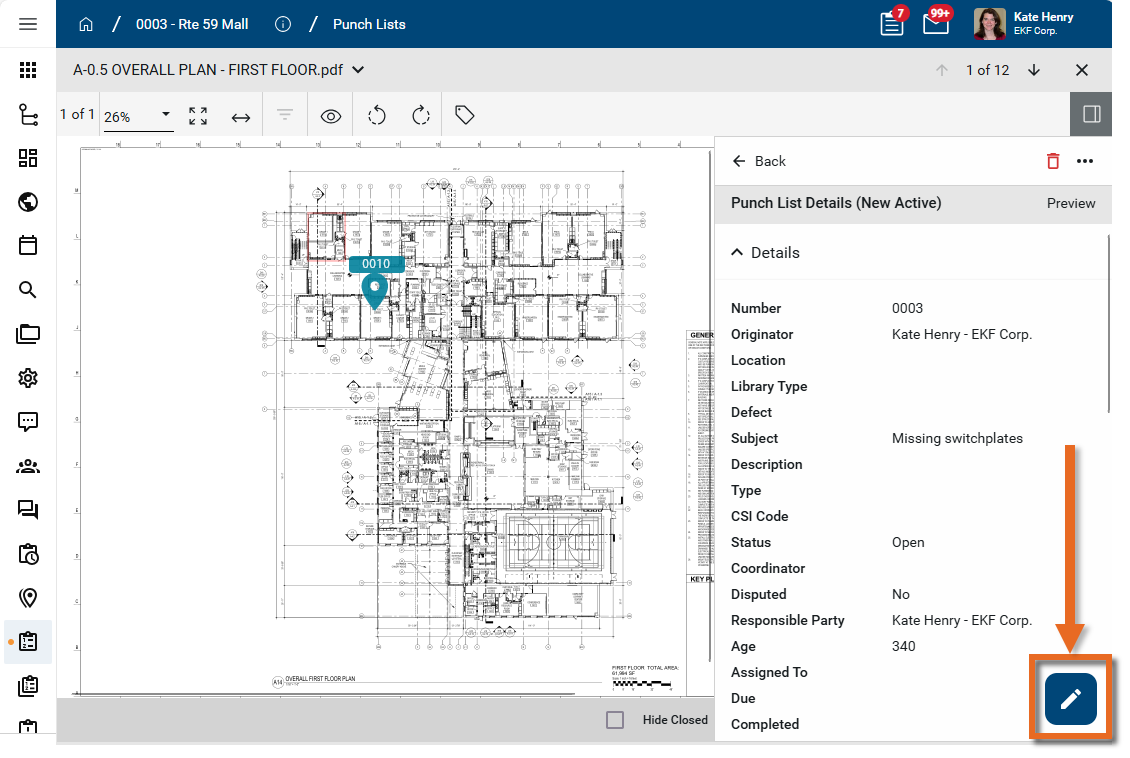
-
Click on the Pin icon
 to enter pinning mode.
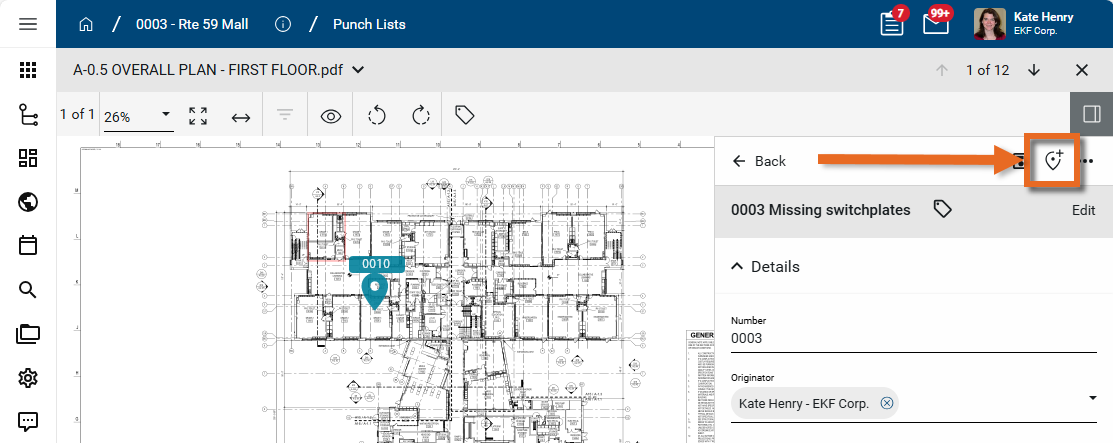
-
Click the appropriate location on the drawing to drop the associated pin. Click and drag the pin to move it on the drawing.
-
Click the Save icon
on the punch list item when you are done. Select More for additional Save options.
Pins can be relocated or removed. To move or remove a pin in the Punch Lists app, the associated punch list item must be in edit mode.
To move or remove (delete) a pin, complete the following steps:
-
Review the header to ensure that you are in the correct project or partition. Navigate to the Punch Lists application (Apps > Document Management > Punch Lists).
-
Select Drawing Mode.
-
Open the drawing with the pin.
-
Select the pin you want to move. The associated punch list item opens in the side panel.
Alternatively, click on the punch list item on the side panel to open it.
-
Click the Edit icon
 in the lower right corner of the panel to enter edit mode.
-
The pin associated with the punch list item appears in red.
-
To move the pin, click and drag it to the correct location.
-
To remove the pin, click on the Unpin icon
 .
. Important Do not confuse the Unpin icon
with the Delete icon  ! The Delete icon appears when the punch list item is not in edit mode. Selecting it will delete the punch list item. If the punch list item is incorrectly deleted, a domain administrator can restore it from the Recycle Bin. Refer to Using the Recycle Bin.
 -
Click the Save icon
 on the punch list panel when you are done. Select More
  for additional options.
Note Pins can also be removed by selecting Unpin from the Pins grid on the Punch List item detail pane while in Edit mode. Once removed, click Save.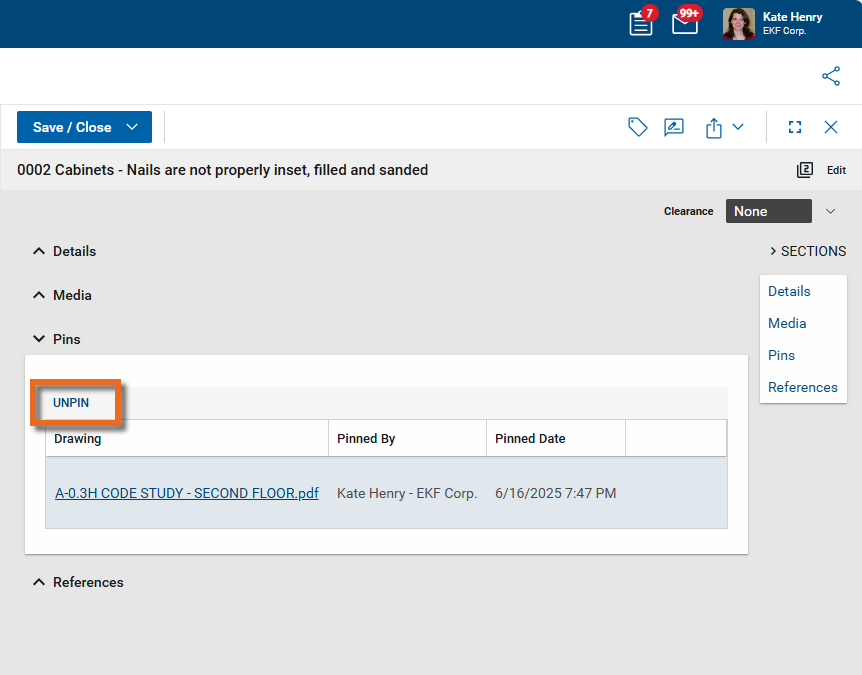
You can open the linked item directly from the pin on a drawing. To do so, complete the following steps:
-
Review the header to ensure that you are in the correct project or partition. Navigate to the Punch Lists application (Apps > Document Management > Punch Lists).
-
Select Drawing Mode from the action bar.
-
Select the drawing that contains the pin. The drawing image appears in the Viewer tab.
-
Click on the pin. The panel opens with the linked punch list record. The selected pin is red to indicate it is the pin associated with the open record.
-
To modify the record, click the Edit icon
in the lower right corner of the panel to enter edit mode. Click the Save icon when you are done. -
Select More
for additional options.
Records in applications that can be linked to a drawing with a pin will have a Pins section on the detail view. Any pins will appear in this section. From this section, you can open the drawing and review the pin. For more information, refer to View a pin from a punch list record.