Punch Lists
Notice Kahua is a very flexible and customizable platform. In your domain, this application may have been modified to meet your company's needs. The online help uses default field labels for field names and describes standard workflows. Please check with your domain administrator for specific information about working in your organization's domain.
A punch list is a list of items that need to be completed before a construction project is considered complete. The Punch Lists app lets you log punch list items, assign responsibility, link those items to locations on drawings, track them through completion, and, if necessary, process them as issues to the Issues app.
Key elements of the Punch Lists app are as follows:
-
You can use the Punch Lists app to simply manage the punch list as a log of items, or you can enable Kahua workflow in the Configuration app to optionally notify those responsible for completing the work and route each item through an approval process.
-
Punch list items can be added directly in the log view, or in combination with pins in Drawing Mode. Refer to Pinning functionality in Punch Lists.
-
To be used with the Punch Lists app, drawings must be added to a special "Pinnable Folder" folder type in the File Manager app.
-
QR Codes can be used in the field to identify locations and filter for related punch list items or create new ones. Refer to Using QR Codes in the Punch Lists application.
-
Lists of possible defects are maintained in the Punch List Libraries app. For more information, refer to Punch List Libraries.
-
If Kahua workflow is enabled, you can notify the designated responsible party or parties about a punch list item. Once they mark the work as complete, the item is routed for approval. You can select up to three approvers. The approval process moves sequentially through each of them.
-
If Kahua workflow is enabled, your domain administrator can additionally enable the Assign to Coordinator function for your project. When enabled, the punch list Coordinator field is available and punch list items can be assigned to the Coordinator for review prior to submission to the Responsible Party or for approval.
-
Notifying responsible parties is optional. Punch list items can be sent directly through the approval process instead.
-
You can set up different lists in a project and utilize the Punch Lists app for additional purposes during the project, such as tracking deficiencies during construction. Refer to Manage multiple item lists in a project.
-
Sometimes a punch list item has the potential to become a cost item. To track this potential cost item, the punch list item can be processed into an issue in the Issues application. Refer to Process the punch list item into an Issue.
-
If enabled for your domain, punch lists and punch list libraries can be made available for access when you are offline. Refer to Kahua Offline.
How to . . .
You can add a punch list item one of several ways. To add a punch list item, you can:
To add a punch list item in the log view, complete the following steps:
-
Review the header to ensure that you are in the correct project or partition.
-
Navigate to the Punch Lists application (Apps > Document Management > Punch Lists).
-
Click New in the action bar to add a new item.
-
Complete the following fields as appropriate:
Note Depending on how this app is configured for your domain, there may be fields or sections listed here that do not appear for you, fields and sections that appear for you which are not listed here, or fields and sections which appear in a different order. If you have any questions, check with your domain administrator.
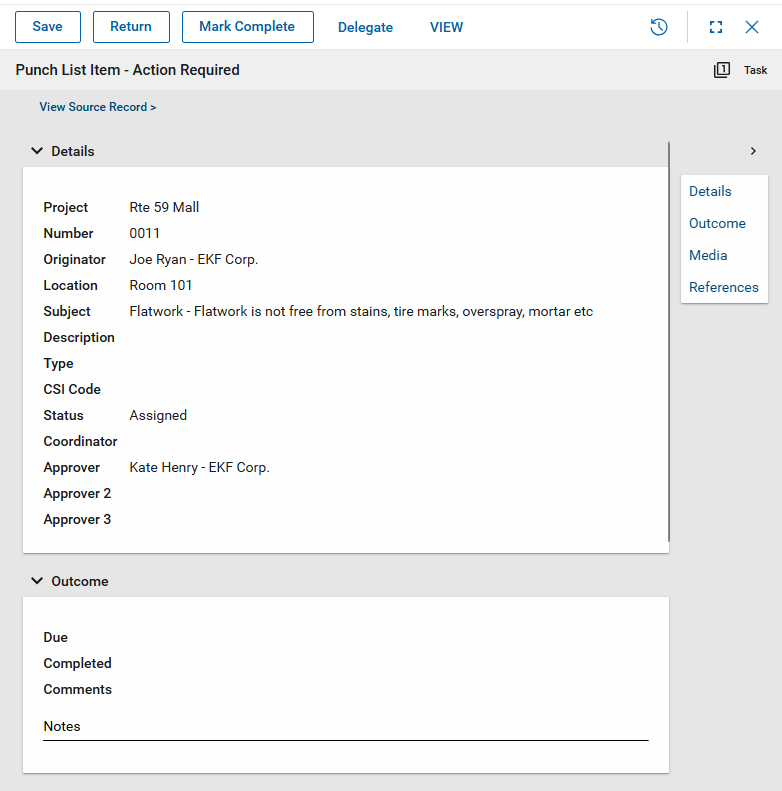
Field Description Details Number Allow Kahua to auto-number the record, or enter a different value.
Note The number format can be configured by your domain administrator. Refer to Number.
Originator Typically, this will default to your name. Modify as needed. Location Select one or more locations from the list, as appropriate.
For more information on setting up location values, refer to Setting up locations.
Library Type If you are using Punch List Libraries, select the appropriate Library Type. Selecting the Library Type will enable the Defect field.
Note If you do not have a project-specific library set up in Punch List Libraries > Project Library, all the library types from the Master Library sub-app will appear here. To reduce this list to a smaller set of library items and also automatically assign responsibility to the appropriate contractors, create a Project Library. For more information, refer to Punch List Libraries.
Defect Select from a list of defects associated with the selected Library Type. Subject If you have selected a Library Type and Defect value, the Subject will automatically be set to the "Library Type - Defect". You can modify this value. If empty, enter your own subject.
Description Enter an additional description as needed. Type Select a type. By default, the available values are "Preliminary" and "Final".
Note This lookup list is managed in the Configuration app. Refer to Lookups.
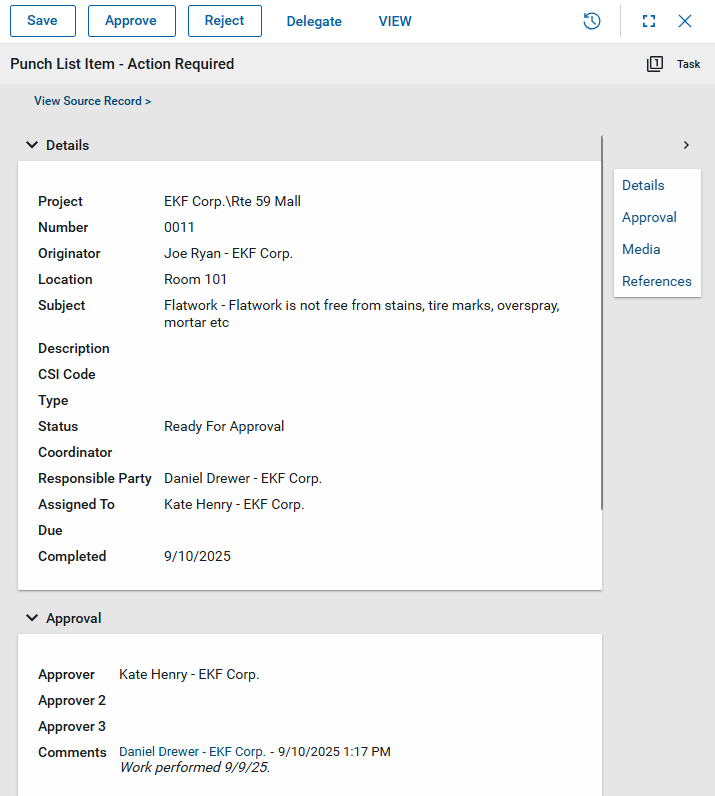
CSI Code Select the associated CSI Code. Status The status field represents where this item is in the workflow. One of the following values will appear in this field:
-
Open – Workflow has not yet been initiated.
-
Assigned – Workflow was initiated and the item has been routed to the responsible party, i.e., the contact at the organization responsible for rectifying the punch list item.
-
Ready for Approval - Workflow step routed to the Approver after the responsible party has completed. The workflow will continue routing to the remaining approvers if they are assigned to the punch list item.
-
Closed – Workflow is completed once the last approver has approved the punch list item or the punch list item has been locked outside of the workflow.
Coordinator If applicable, select the user responsible for coordinating punch list items prior to assigning them to the responsible party or sending them out for approval.
Note This field only appears if the option Hide Assign to Coordinator on the Configuration > Punch Lists > Settings tab is cleared.
Disputed Select this check box if this item is disputed. This allows you to filter and report on disputed items.
Age This is a calculated field that indicates how long the punch list item has been open. It represents the number of days between the creation of the item and today's date.
When the punch list item is marked as complete, this field is calculated as the difference between the creation of the item and the completed date.
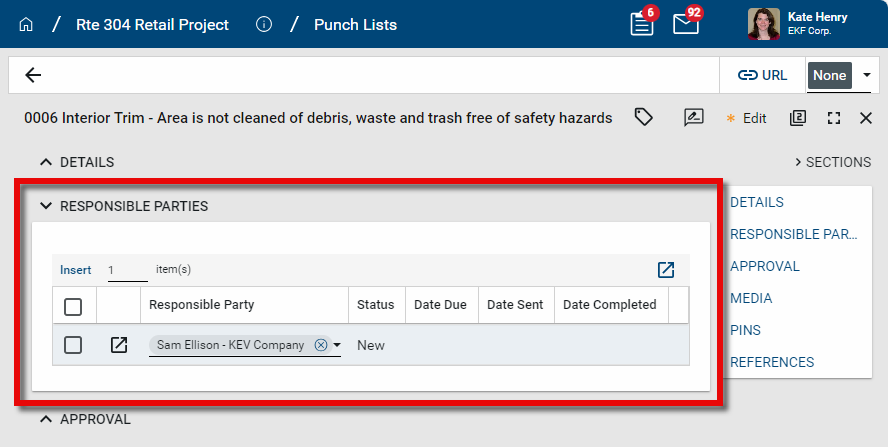
Responsible Party From your contact list, select the appropriate person from the organization responsible for rectifying this punch list item. This contact is typically from the contractor, subcontractor, or vendor.
Note If the Allow any member of responsible company to mark completed setting is enabled in Configuration, any member of the responsible company can edit the punch list item from a shared list, mark it complete, and automatically close the originally assigned task.
The responsible party can be associated with punch list item types in Project Library sub-app in Punch List Libraries. If so, the contact will automatically appear here, but the value can be modified. Refer to Create a Project Library.
The punch list item can be sent to the responsible party as a task by selecting Send to Responsible.
Note If the Kahua Punch List Multiple Responsible Workflow option is selected in Configuration, the Responsible Parties appear in a separate section with a grid. For information on using grids, refer to Item Grids.
Due / Completed Enter these dates as appropriate. Root Cause If you are tracking the root cause for punch list items, enter that information here.
Note This field is not included when the document is routed through workflow.
Portable View Template Select the portable view template to apply to this punch list item.
For more information on portable views, refer to Portable Views.
Approval Approver / Approver 2 / Approver 3 If you are using the workflow, select the contact or contacts who will be approving the work for the punch list item. The approval process will route the punch list item to each approver in order as entered here. When the final approver listed here approves the item, the Status updates to "Closed".
For more information on configuring workflow for this app in your project, refer to Workflow.
Media Upload relevant photos or other image files to this section as necessary, or select Add Kahua Photo to select an image file from the Media Manager app. For more information on working with media files, refer to Media section.
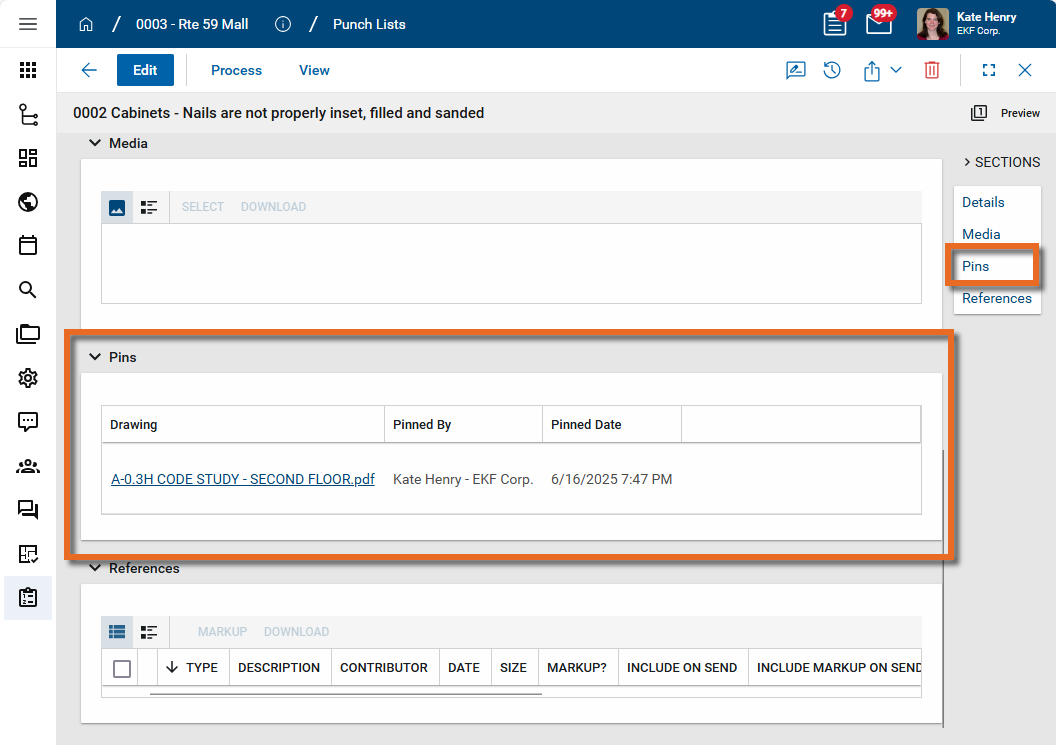
Pins Any existing pins will appear in this section. For information on viewing existing pins, refer to View a pin from a punch list record. For information on adding pins to a punch list record, refer to Pinning functionality in Punch Lists.
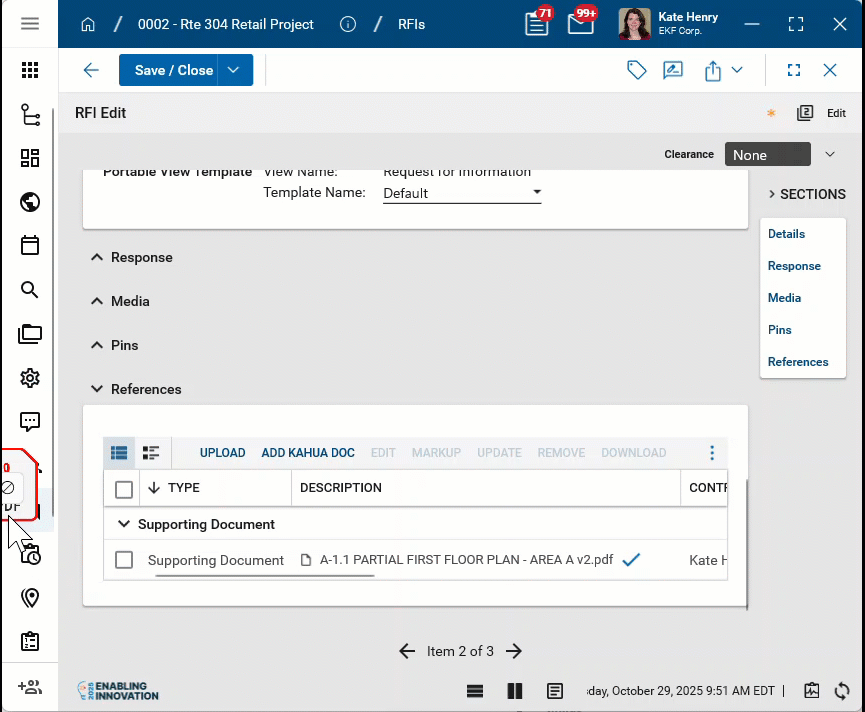
References Upload or select any relevant files or documents. You can use drag and drop to add a file to this section. For more information on using this section, refer to References section.
Note If desired, this section can be removed through the Fields tab in Configuration for this app. Refer to Configure the punch lists app.
-
-
Click Save to save the record.
Adding punch list items while in drawing mode is usually done in conjunction with adding a pin for that punch list item on a drawing. For more information on this process, including general information on pinning punch list items, refer to Pinning functionality in Punch Lists.
Punch List items are imported in the same manner as other imports are completed in Kahua. For more information on the import process, refer to Importing records.
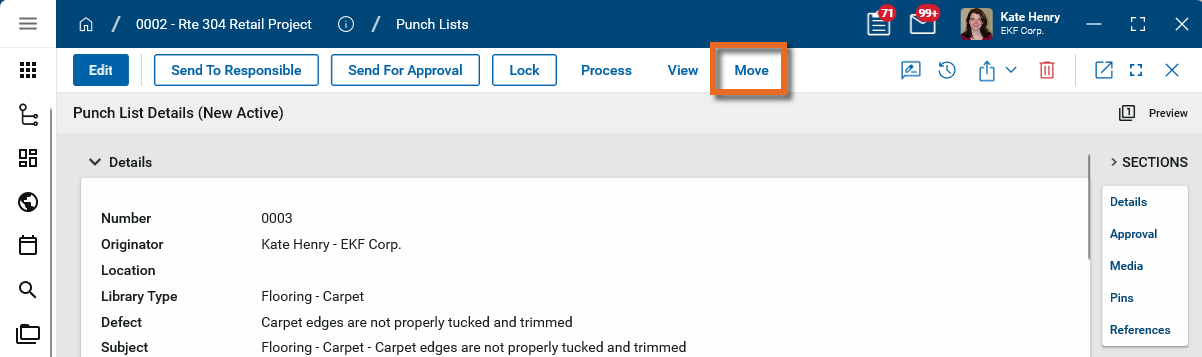
You can set up different lists in a project and utilize the Punch Lists app for additional purposes during the project.
Example You can set up a separate list within the Punch Lists app called "Deficiencies", and record items that require correction during the construction phase of a project. You can then apply the Punch List app notification and approval process to those items.
Items not addressed during the construction phase can then be moved to a second list named "Punch List" as part of the traditional punch list at the end of the project.
For more information on setting up multiple lists within the Punch Lists app, refer to Lists.
For more information on navigating between multiple lists in an app, refer to Application title bar.
To move an item from one list to another within a project, select Move from the action bar in the detail view, or from the right-click menu on the log view.
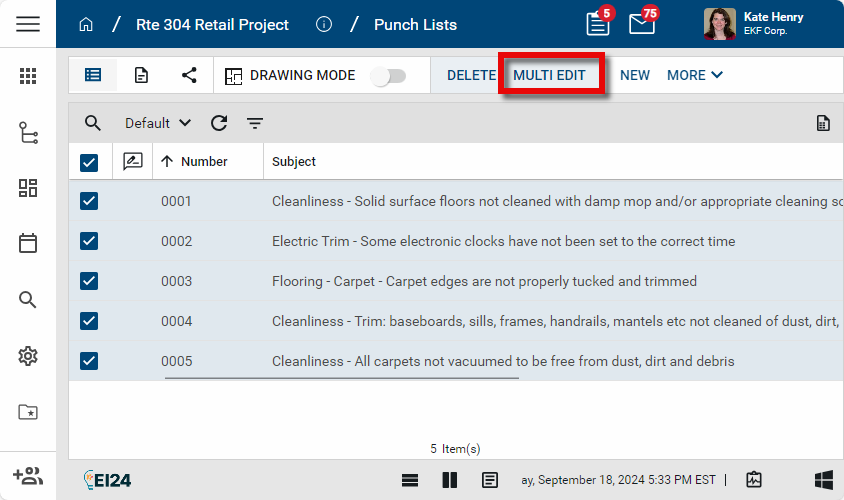
You can update multiple punch list items at one time by using the Multi Edit function.
To do so, complete the following steps:
-
Select the check boxes next to the records you want to edit.
-
Select Multi Edit from the action bar. The Multi Edit page opens.
-
You can edit individual fields. To copy a field value to other records, select the value on the record. Select Copy to All to copy the value to all other records, or select Copy to Selected to copy the value to selected records.
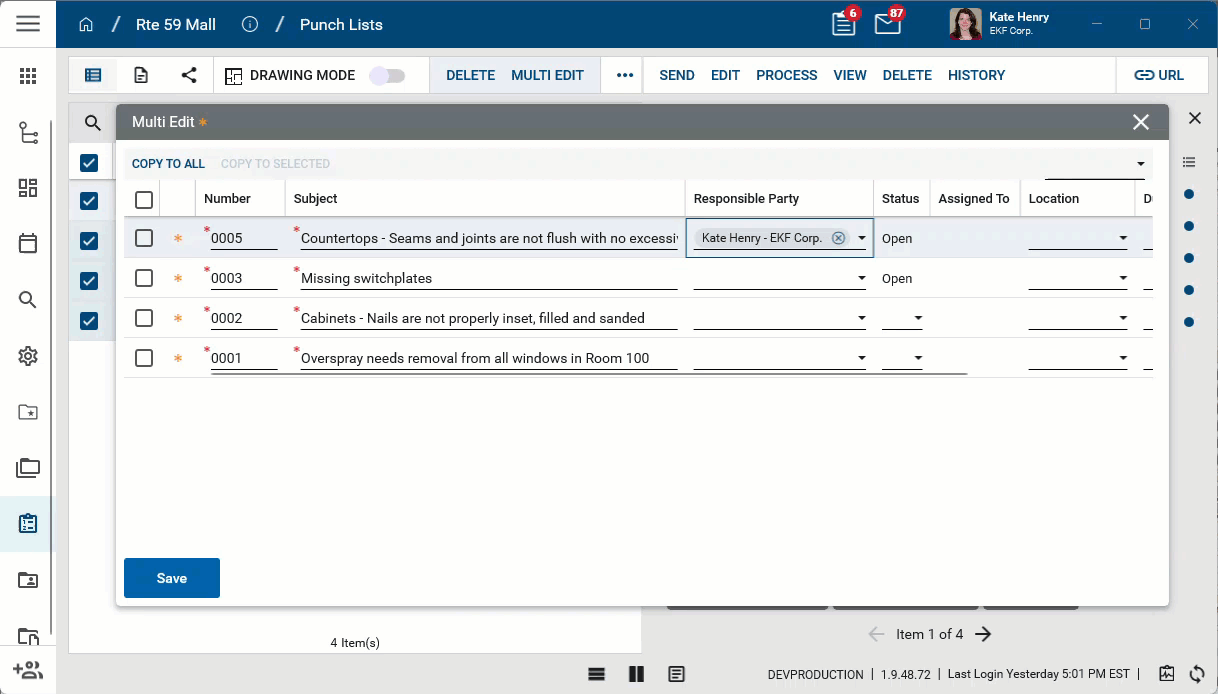
Note The Multi Edit page lists fields from the log view applied when Multi Edit is selected. To update fields which are not present on the default log view, create a new log view that includes all the fields you want to edit and then apply that log view before selecting Multi Edit.
-
Click Save when you are done.
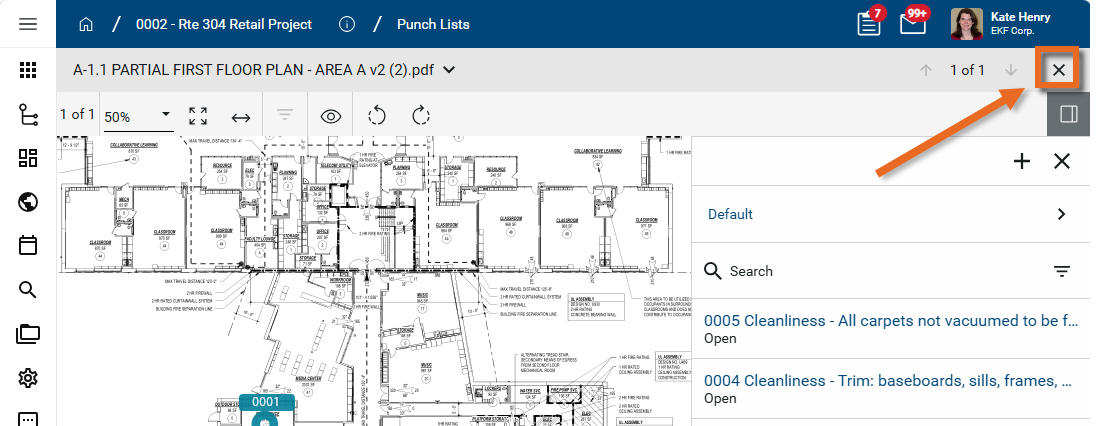
Using the Punch Lists app in drawing mode allows you to view and manage pins on drawings that are associated with punch list items.
Drawings must be uploaded to the File Manager app and placed in a folder with a "Pinnable Drawings" folder type to be viewable in drawing mode. For more information, refer to Enable punch list pinning in your project.
For more information on working with punch list pins, refer to Pinning functionality in Punch Lists.
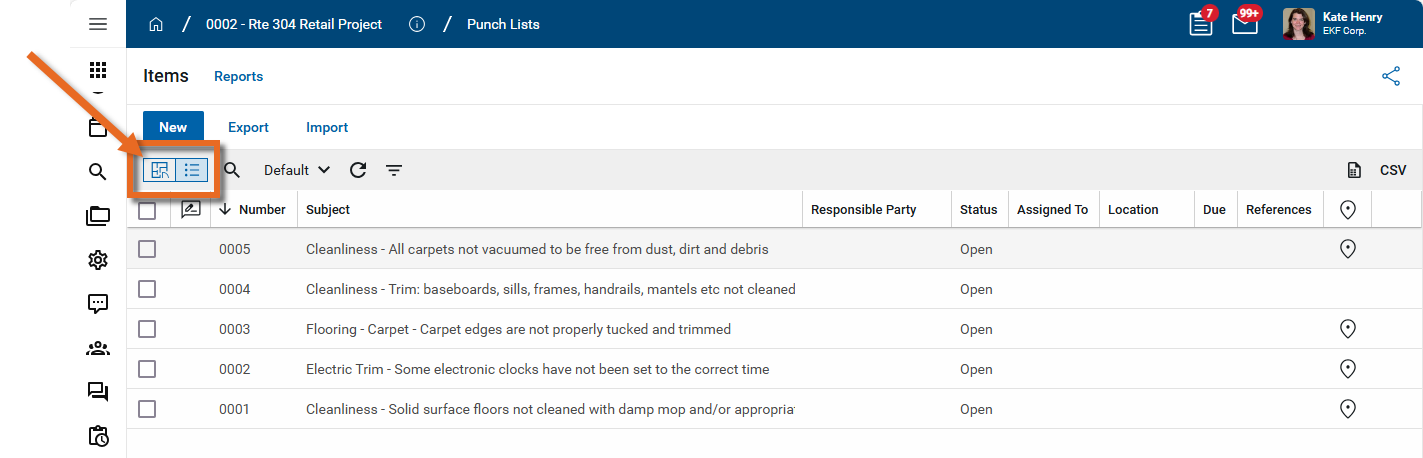
To work in Drawing Mode in the Punch Lists app, complete the following steps:
-
Review the header to ensure that you are in the correct project or partition.
-
Navigate to the Punch Lists application (Apps > Document Management > Punch Lists).
-
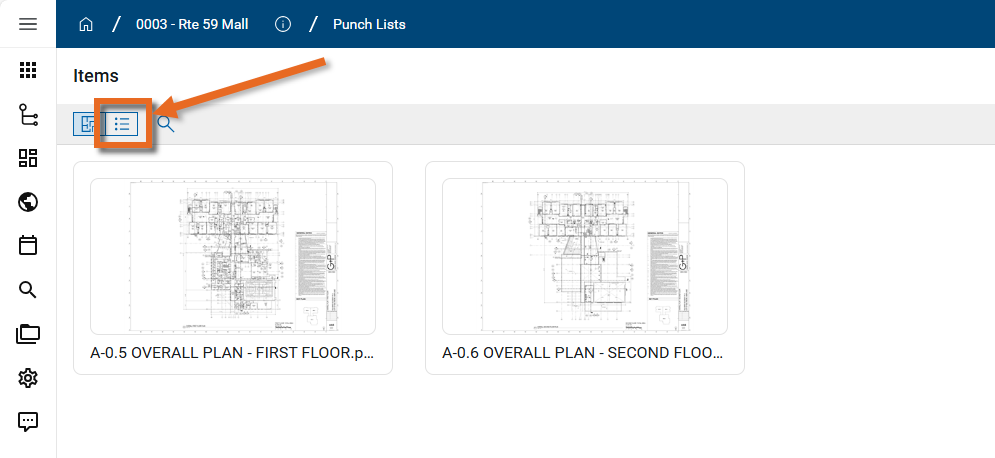
Select Drawing Mode
 .
. 
-
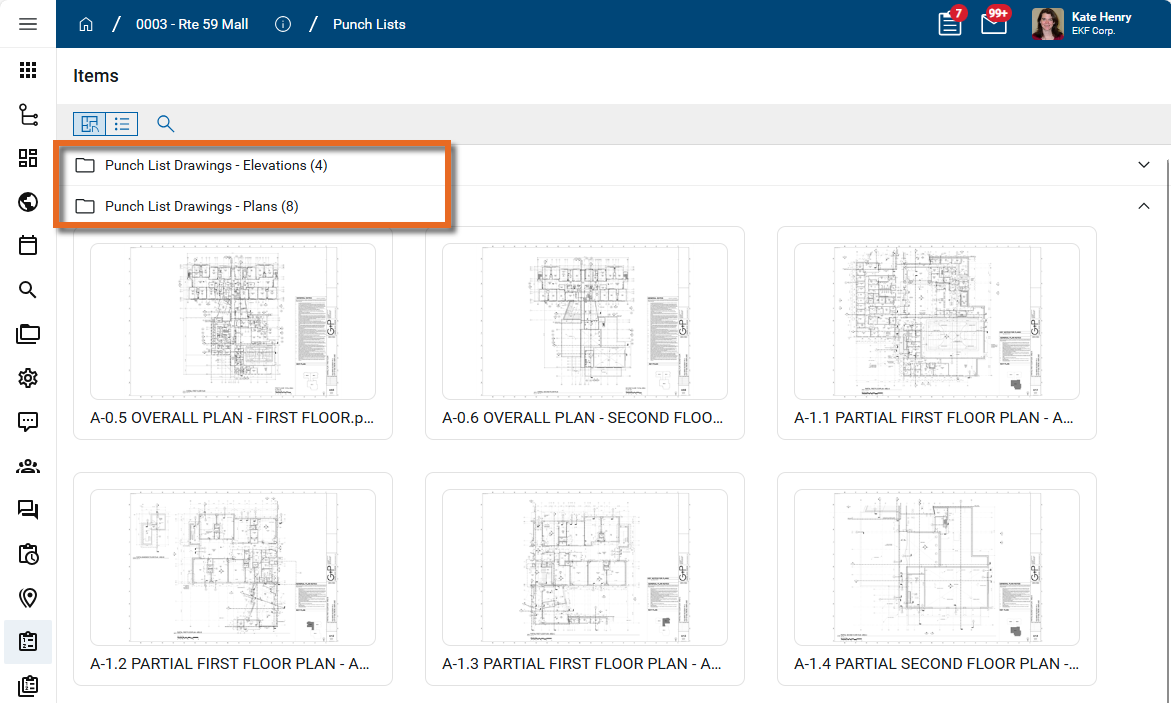
All the drawing files in folders of the type "Pinnable Drawings" in File Manager appear as thumbnails.
If there are multiple pinnable folders, the drawings are organized by those folders, in alphabetical order.
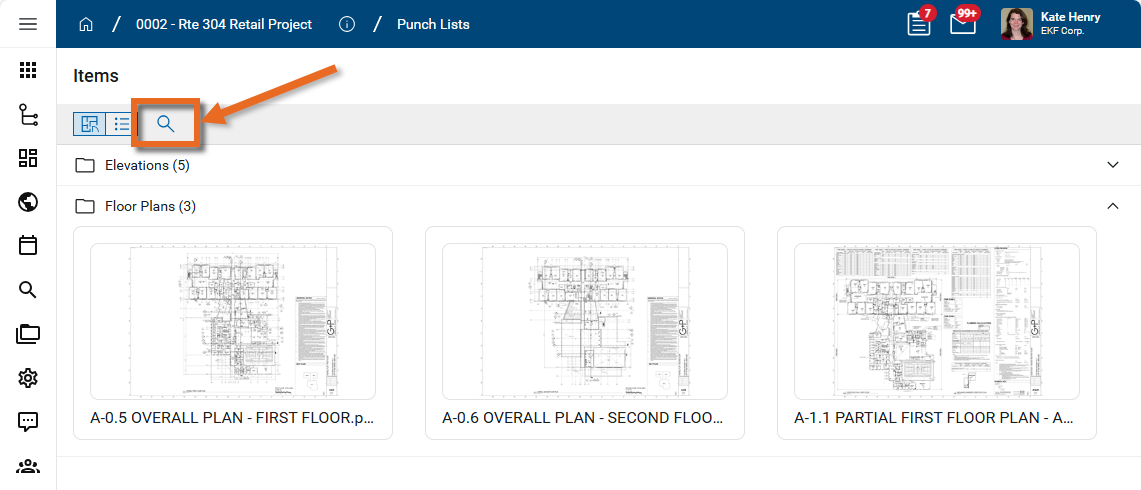
-
To search for a drawing or folder by name, click the Search icon
 .
. 
-
Click on the thumbnail of the drawing you want to work with.
-
The drawing appears with the Punch List panel open. Click the Open icon
 in the upper right corner to open or close the Punch List Panel.
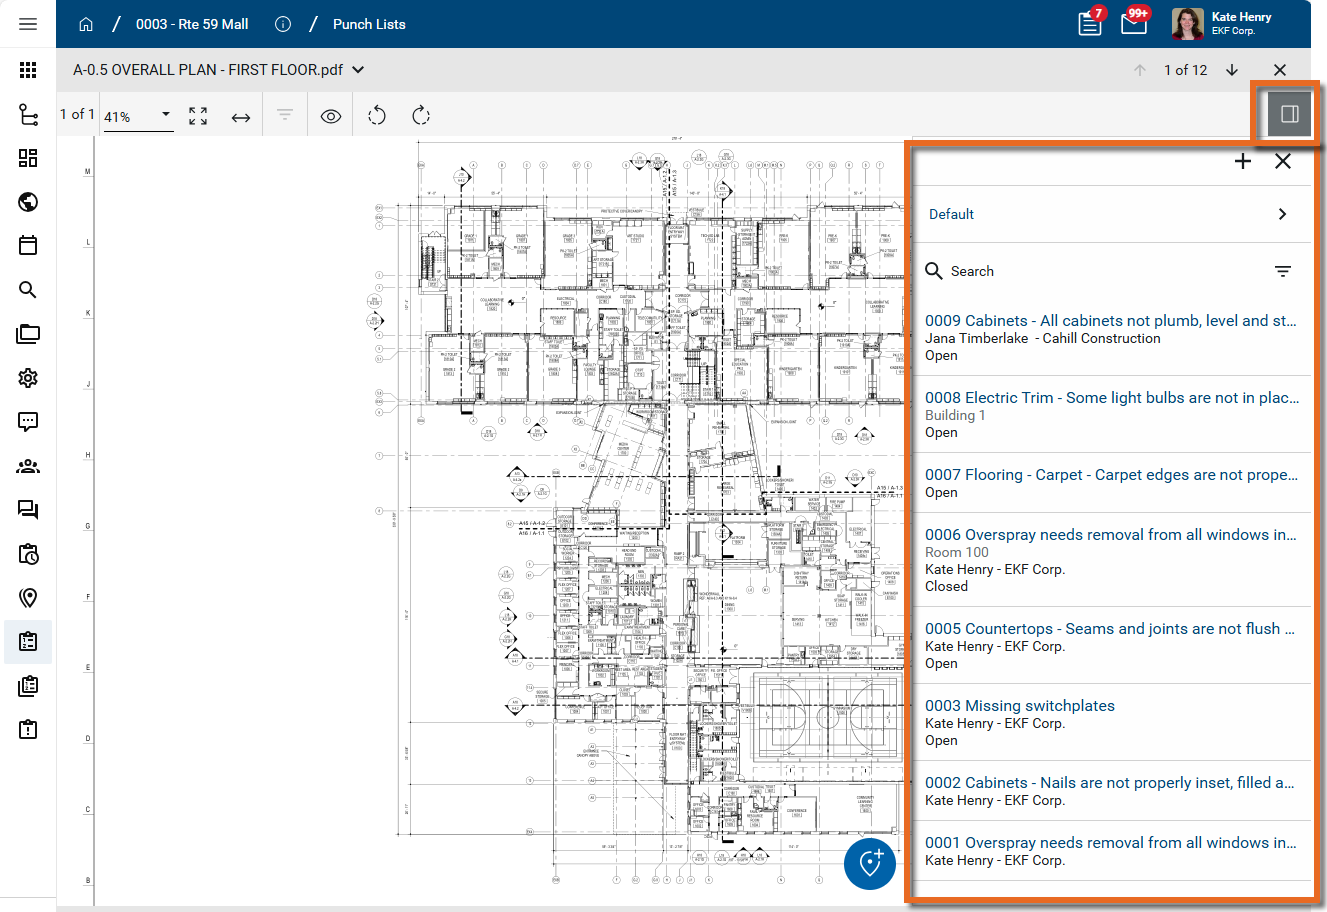
-
You can click and drag in the drawing to pan to a different area for viewing.
You can use the following tools on the Viewer Toolbar to additionally manage your view of the drawing:
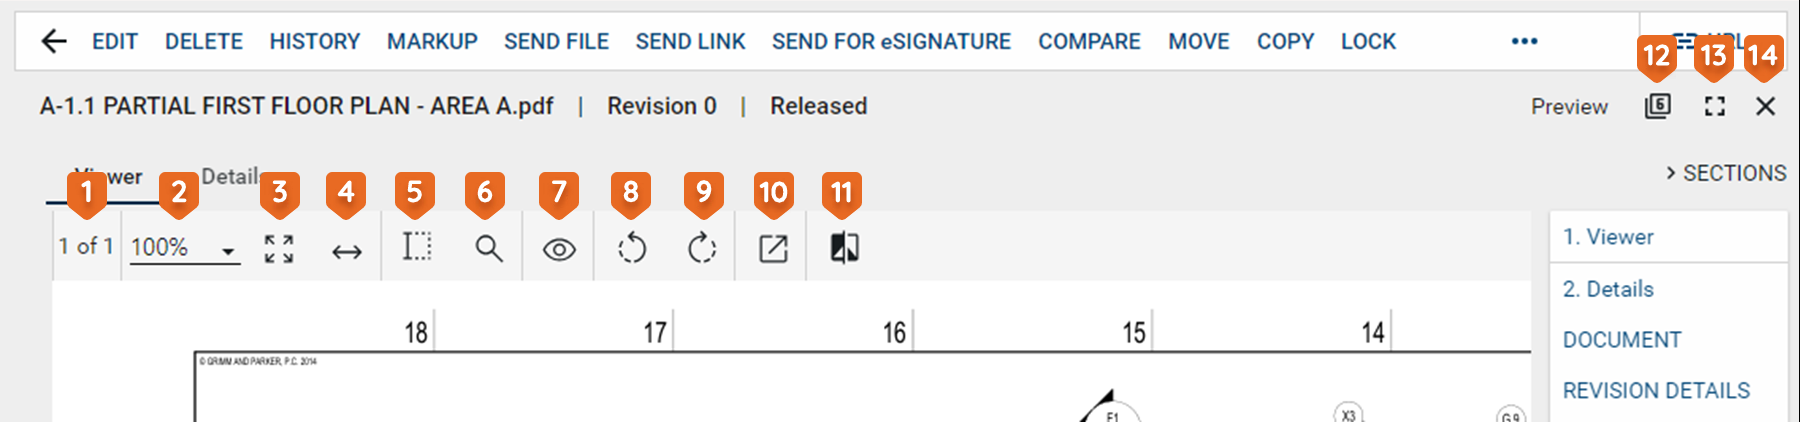
Tool Description Drag toolbar 
This option appears when the toolbar is un-docked. Click on it and drag the toolbar to the desired location. Text Selection 
Select this icon to enter text selection mode.
In this mode, you can click and drag your mouse to select text on the image.
Use Ctrl+C to copy the selected text to your clipboard.
Search 
Opens a text search window.
When you enter the search criteria, the total number of search results will appear with the results highlighted in yellow on the page. You can use the arrows to scroll through the results on the image.
Filter 
Select the Filter icon to open the search function, allowing you to search for a keyword in any markups on the drawing. You can additionally filter the results by type of markup.
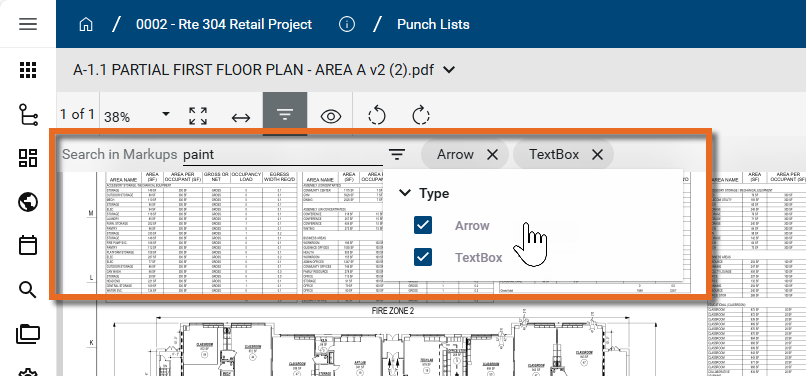
Note If no markups are present, the filter icon is disabled.
Page # of # 
Indicates which number page you are on of the total number of pages in the file or drawing.
If there are multiple pages in the document file, you can use the arrow keys that appear to navigate through the pages.
Additionally, you can click here to open a dialog box that allows you to enter a page number to jump to. Note that you can also use the keyboard shortcut Ctrl+Shift+G to open the dialog box.
Zoom 
Shows your current zoom level on the drawing.
Select a level from the drop-down list, manually enter a level and press Enter on your keyboard, or use Ctrl + your mouse wheel to zoom in and out from the current cursor location.
Fit Page 
Click this icon to fit the file image to the display area.
Fit Width 
Click this icon to fit the file image to width of the display area. Open File 
Opens a PDF file in the default browser or uses the default browser to download the PDF version of the file to the local downloads folder. Pan mode 
Click this icon to switch between pan mode and selection / markup mode.
In pan mode, clicking and dragging on the image will pan across the image.
In selection mode, clicking and dragging on the image will select a section of the image and any markups in that selected area.
Rotate Counter Clockwise  / Rotate Clockwise
Rotates the image counter-clockwise or clockwise.
When done while in markup mode and saved, the rotation is saved with the drawing and will appear rotated to anyone viewing the drawing.
View 
Select any of the following options:
-
Show Markups - Show or hide existing markups.
-
Show Markup Panel - Show or hide existing markups in a table at the bottom of the display area.
-
Show Hyperlinks - Show or hide existing hyperlinks.
-
Show Info - Displays file information, such as the calibration status, internal rotation, page rotation, correction rotation, page zoom, number of annotations, etc.
Bluebeam 
If you have a licensed copy of Bluebeam on your computer, you can use this to open Bluebeam and access their markup tool. Compare 
Opens the Compare Files dialog. Select a second file to compare with this one. To learn more about the Compare feature, refer to Using the Compare feature. Dock toolbar 
Select this option to dock the toolbar outside the viewing pane. This can make it easier to view the whole document. Click the icon again to un-dock the toolbar. -
-
The Punch List Panel lists all the punch list items. The items appear by Number and Subject. You can select a different log view
 , perform a keyword search
  , or apply a quick filter
  to narrow down the items list.
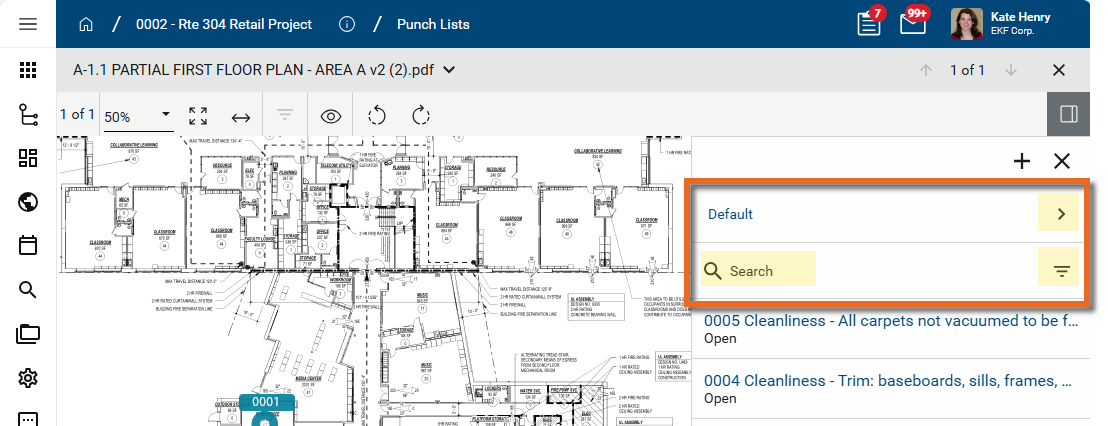
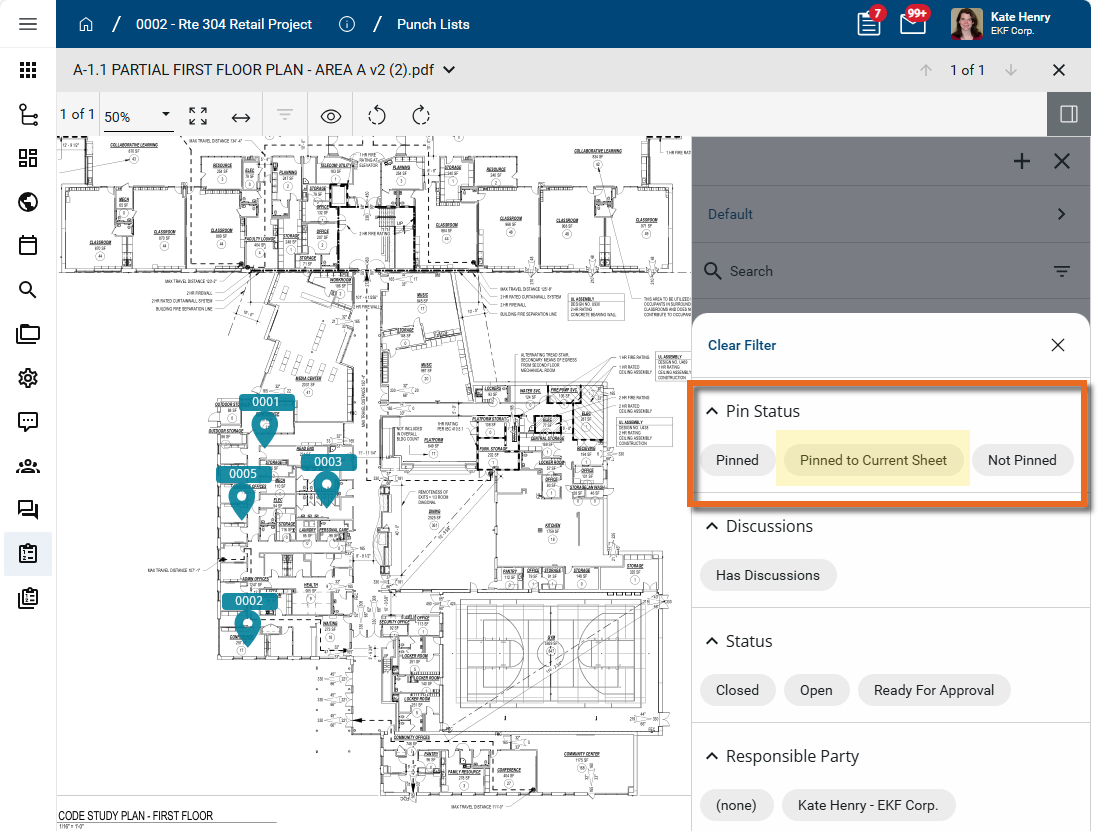
Note Drawing Mode includes a quick filter of "Pinned to Current Sheet" under Pin Status that is not available from the standard log view. This filter reduces the list of punch list items to only those pinned on the currently selected drawing.
-
Select Hide Closed in the lower right corner to hide any closed markups.
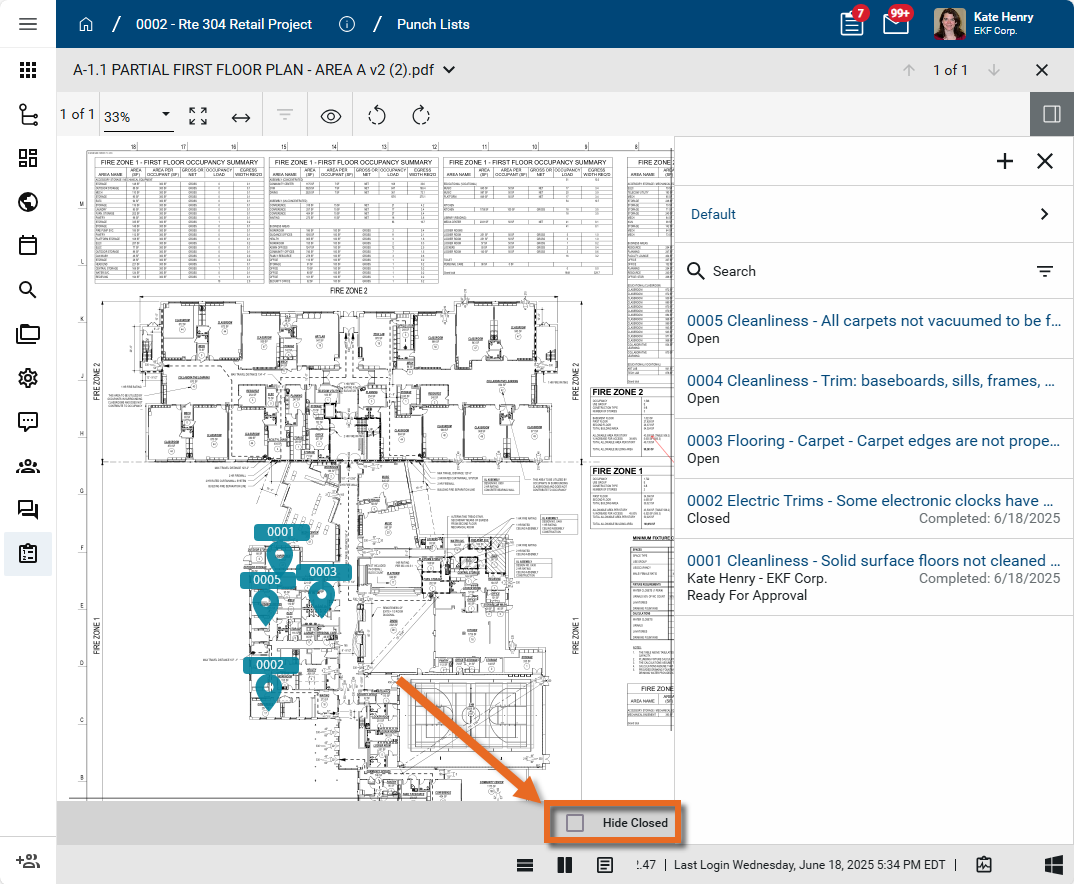
Important Hide Closed refers to drawing markups, not punch list items.
-
To switch to a different drawing, click on the selector icon next to the drawing name, or click on the arrow icons next the # of # option in the header.
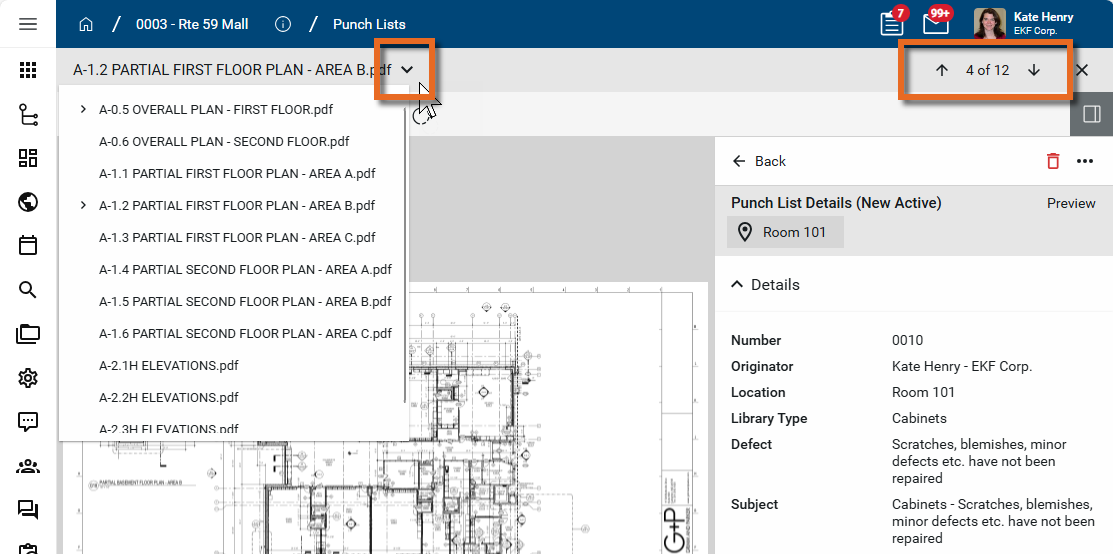
Note You can switch to a different drawing while the Punch List Panel is open and while a punch list item is in edit mode.
-
To return to the image selector, click the Close icon
 .
.
-
To return to the log view, click the Log View icon
 .
.
Punch list records have a Pins section on the detail view. Any pins will appear in this section. From this section, you can open the drawing and review the pin. For information on adding pins, refer to Pinning functionality in Punch Lists.
To open a drawing with an associated pin from the punch list detail view, complete the following steps:
- Review the header to ensure that you are in the correct project or partition.
-
Navigate to the Punch Lists application (Apps > Document Management > Punch Lists).
-
Locate the appropriate punch list item and open the record to the detail view.
-
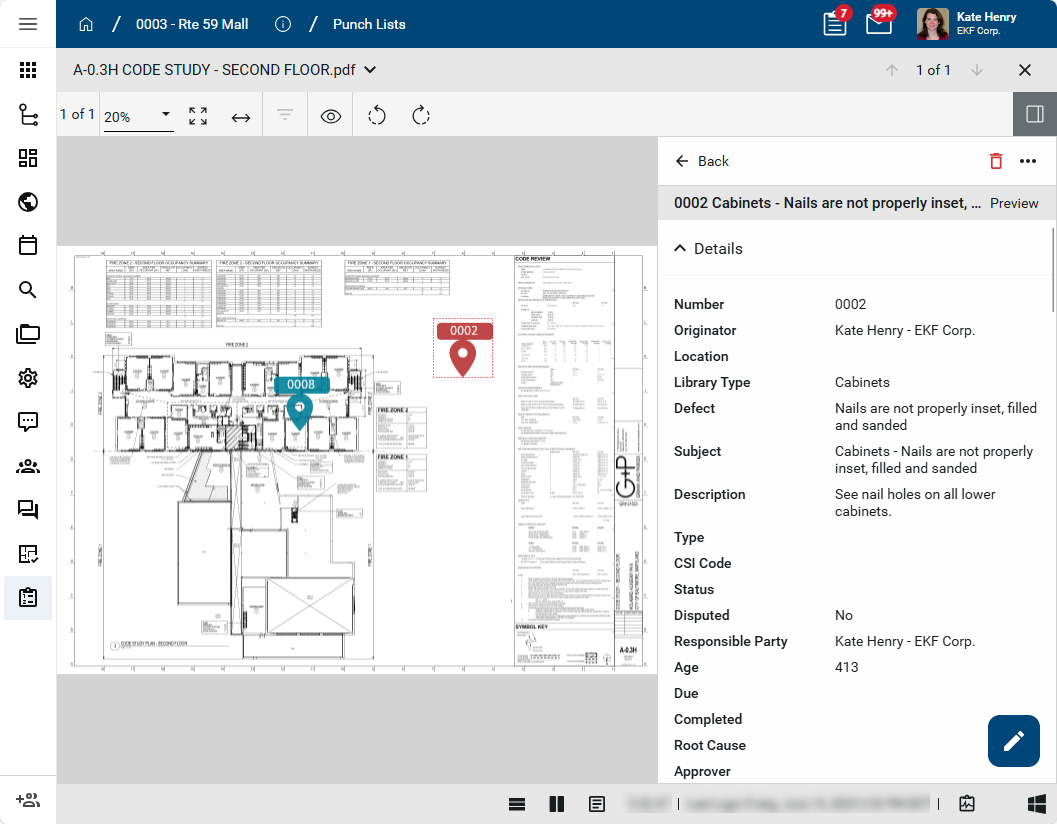
Navigate to the Pins section. Click on the name of the file containing the pin.

-
The punch list item opens with the pin in drawing mode. The punch list number appears on the associated pin and the pin's color is red.
If workflow is enabled for your Punch Lists app (refer to Configure the punch lists app), you can notify the designated responsible party or parties about a punch list item. Once the responsible parties mark the work as complete, the item is routed for approval.
If desired, the item can be sent directly for approval once the work is complete.
To notify the responsible party or begin the approval process, complete the following steps:
-
Review the header to ensure that you are in the correct project or partition.
-
Navigate to the Punch Lists application (Apps > Document Management > Punch Lists).
-
Select the appropriate punch list item from the log view.
-
Select Send to Responsible to send to the contact in the Responsible Party field.
To skip that step and send it directly to the designated approvers, select Send For Approval.
Note You may need to click the More icon
 to access options hidden for space reasons.
-
The punch list item is sent as a Kahua task to the contact in the Responsible Party field.
-
The responsible party can add Notes on the task and mark the task as complete.
-
Once the responsible party marks the task as complete, the Status changes to "Ready for Approval" and a Kahua task is created for the first approver. The approver can add Notes and Approve or Reject the work.
-
The item will be routed to any additional approvers. Once all the approvers have reviewed and approved the item, the status changes to Closed.
If you are designated as the Responsible Party on a punch list item, the originator or coordinator will send it to you as a Kahua task. For general information on the Tasks app, refer to Tasks App.
To respond to a Punch List item, complete the following steps:
-
Navigate to the Tasks app and select the appropriate task.
-
Review the information in the Details section, such as the Location, Subject, or Description.
-
Review any attached files in the Media or References sections. For more information on using these sections, refer to Media section or References section.
-
As part of your response, you can complete any or all of the following actions:
-
You can enter text in the Notes field. Added text will be saved as a Comment with your name and the date and time the comment was saved.
-
You can upload a new photo or select an existing photo previously uploaded to Kahua in the Media section. For more information on using this section, refer to Media section.
-
You can upload additional documentation in the References section. For more information on using this section, refer to References section.
-
-
Click Save at any time to save your work and return to the item later.
-
If you are ready to mark the item as complete and submit it for approval, select Mark Complete from the action bar.
The status of the item changes to "Ready for Approval" and it is forwarded to the first designated approver with any comments, media, or references you have added.
-
If you do not want to mark the item complete but instead want to return it to the originator, select Return from the action bar.
The punch list item is returned to the originator with any comments, media, or references you have added.
If you are designated as an Approver on a punch list item, it will be forwarded to you as a Kahua task when the Responsible Party has marked it as complete. For general information on the Tasks app, refer to Tasks App.
To respond to a Punch List item, complete the following steps:
-
Navigate to the Tasks app and select the appropriate task.
-
Review the information in the Details section, such as the Location, Subject, or Description.
-
Review any attached files in the Media or References sections. For more information on using these sections, refer to Media section or References section.
-
As part of your response, you can complete any or all of the following actions:
-
You can enter text in the Notes field. Added text will be saved as a Comment with your name and the date and time the comment was saved.
-
You can upload a new photo or select an existing photo previously uploaded to Kahua in the Media section. For more information on using this section, refer to Media section.
-
You can upload additional documentation in the References section. For more information on using this section, refer to References section.
-
-
Click Save at any time to save your work and return to the item later.
-
If you are ready to mark the item as complete and submit it for approval, select Approve from the action bar.
The punch list items moves to the next approver with any comments, media, or references you have added, or, if you are the final approver, the status of the item changes to "Closed" and it is considered complete.
-
If the work is incomplete or unsatisfactory, enter a comment in the Notes section and select Reject from the action bar. You can also add media or references as desired.
The punch list item is returned to the Responsible Party with any comments, media, or references you have added.
Sometimes a punch list item has the potential to become a cost item. To track this potential cost item, the punch list item can be processed into an issue in the Issues application.
To create an issue related to this punch list item, complete the following steps:
-
Review the header to ensure that you are in the correct project or partition.
-
Navigate to the Punch Lists application (Apps > Document Management > Punch Lists).
-
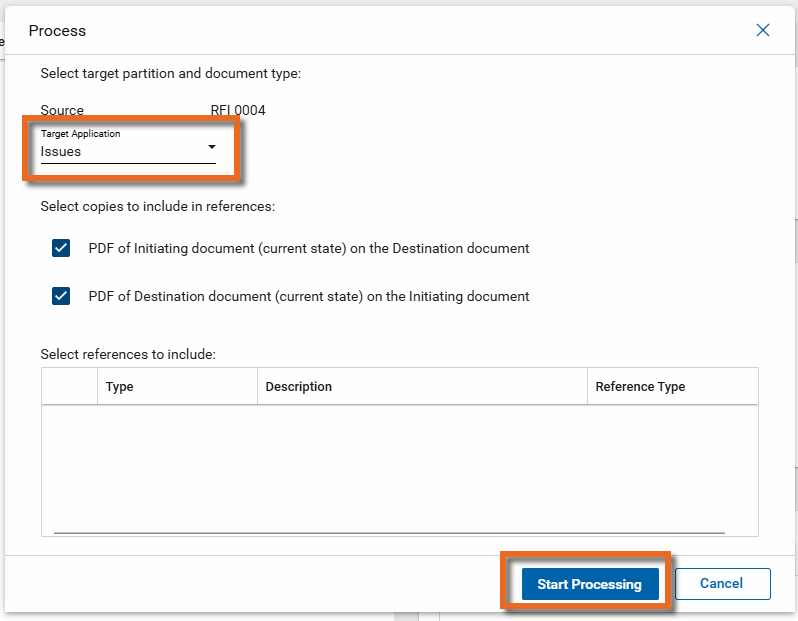
Right-click on the punch list item and select Process, or open the detail view and select Process from the action bar.
-
In the Target Application field, select "Issues". By default, reference files are included. Clear the check boxes for any files you do not want to include.
-
Click Start Processing.
-
The Issues app opens to a new issue item with information from the punch list item. Complete any additional fields and click Save.
You can generate a report from a selected log view, or use one of the built-in reports available by default in each application. For more information on creating your own reports, including how to set up scheduled reports, refer to Creating ad hoc reports.
Note For information on modifying the logo that appears on reports in your project, refer to Managing report logos.
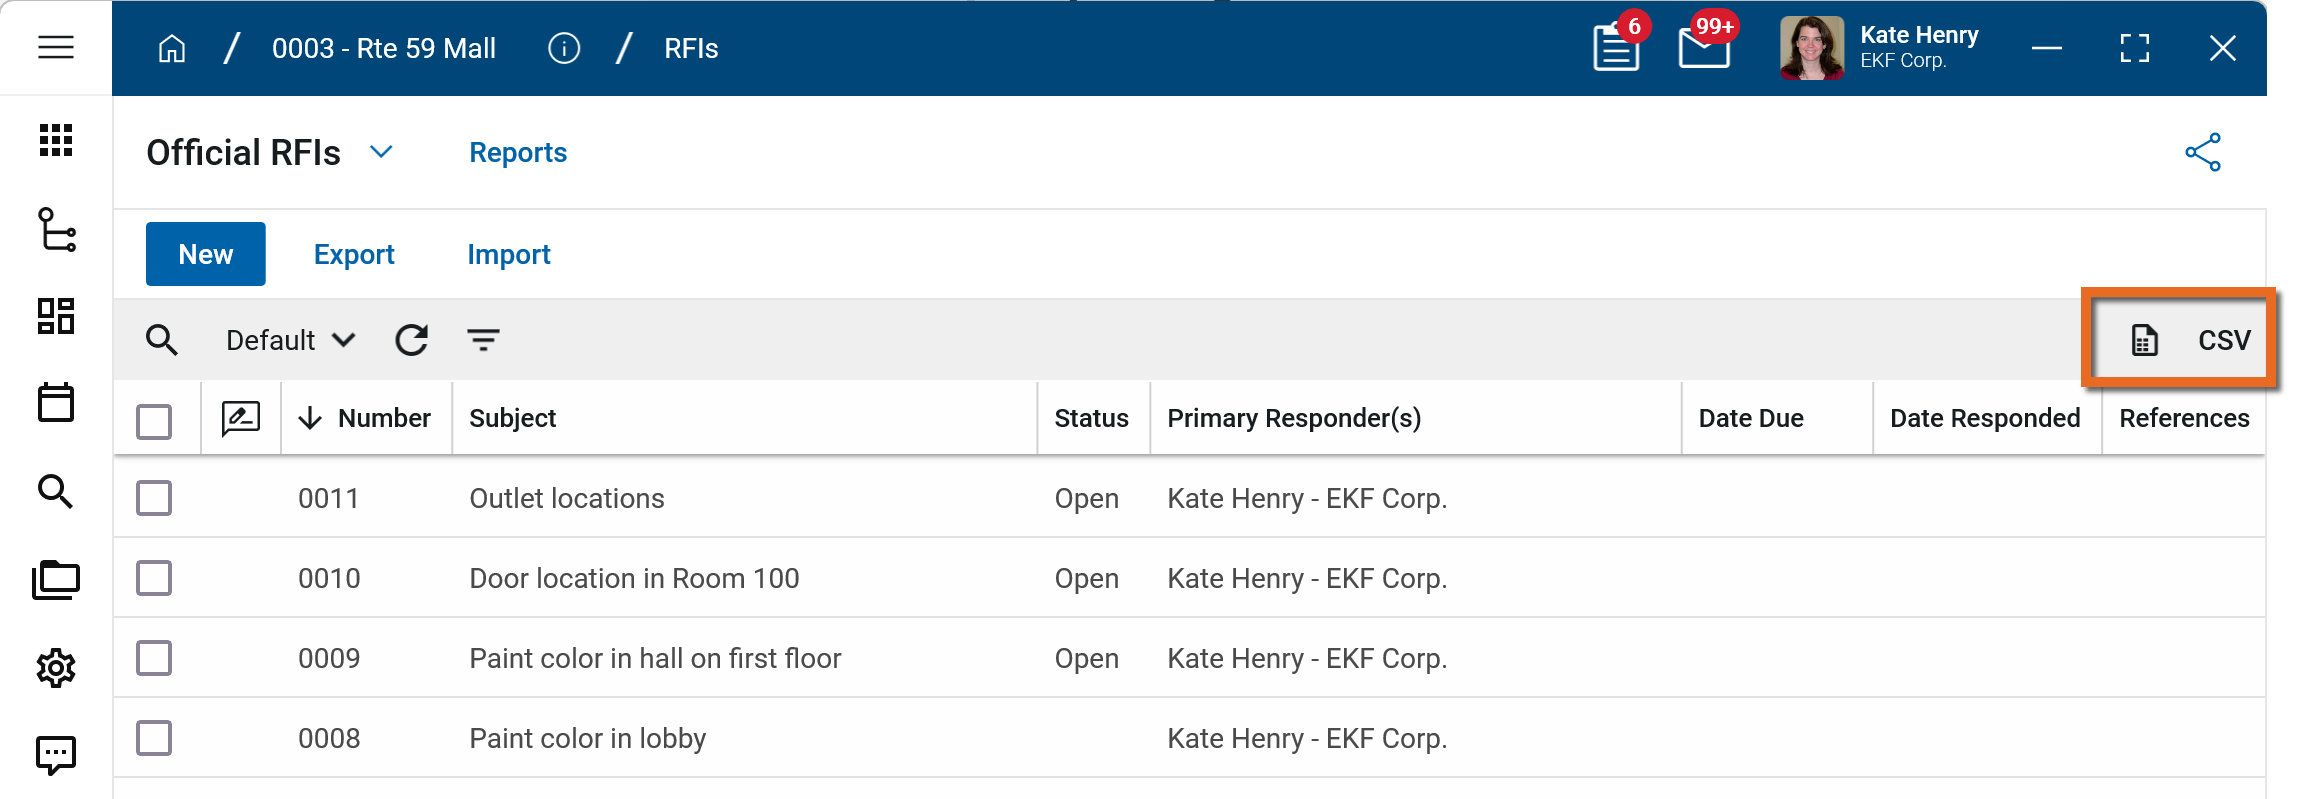
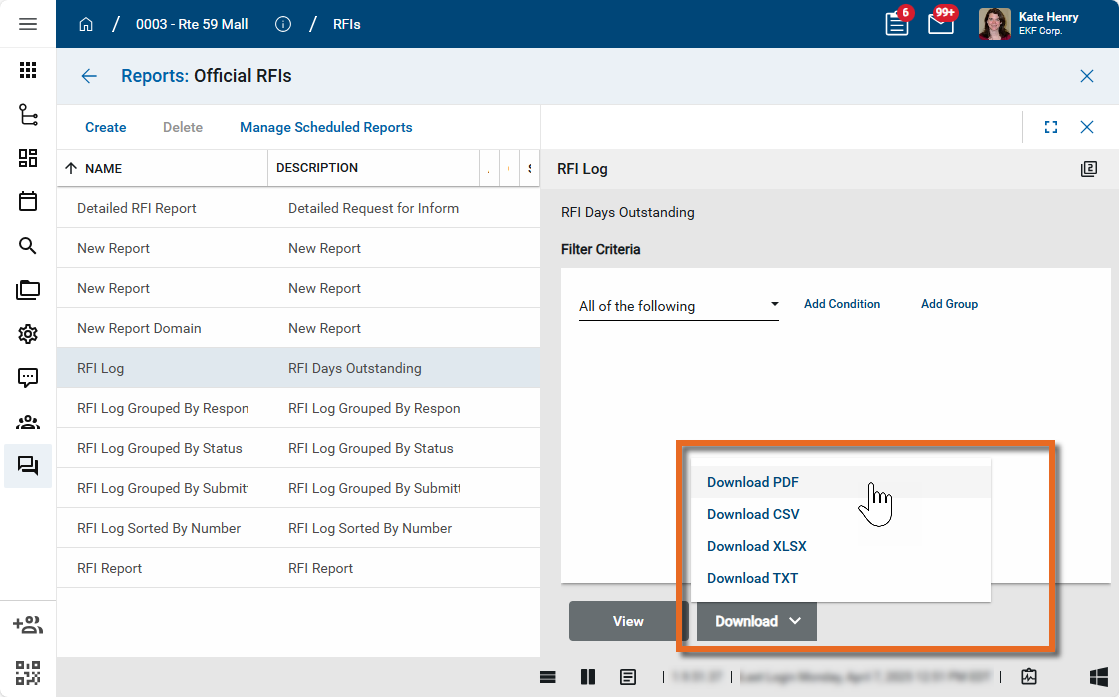
To generate a report from a log view with up to 10,000 records, select the report icon ![]() . If your log view contains more than 10,000 records, the report icon will be disabled and you can select to download the records to a CSV file instead. For more information, refer to Generate a report from a log view.
. If your log view contains more than 10,000 records, the report icon will be disabled and you can select to download the records to a CSV file instead. For more information, refer to Generate a report from a log view.
To generate an application report, complete the following steps:
-
Navigate to the application.
-
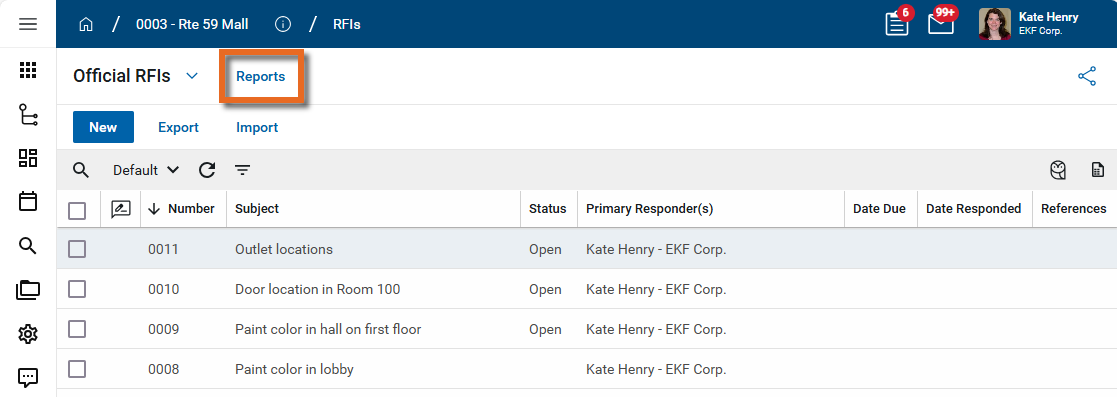
Select Reports in the application title bar.
-
Select the report you want to run.
-
Apply any desired filters.
-
Select View or Download as appropriate. For more information, refer to Viewing Reports.
-
Click the Close icon
 when you are done.
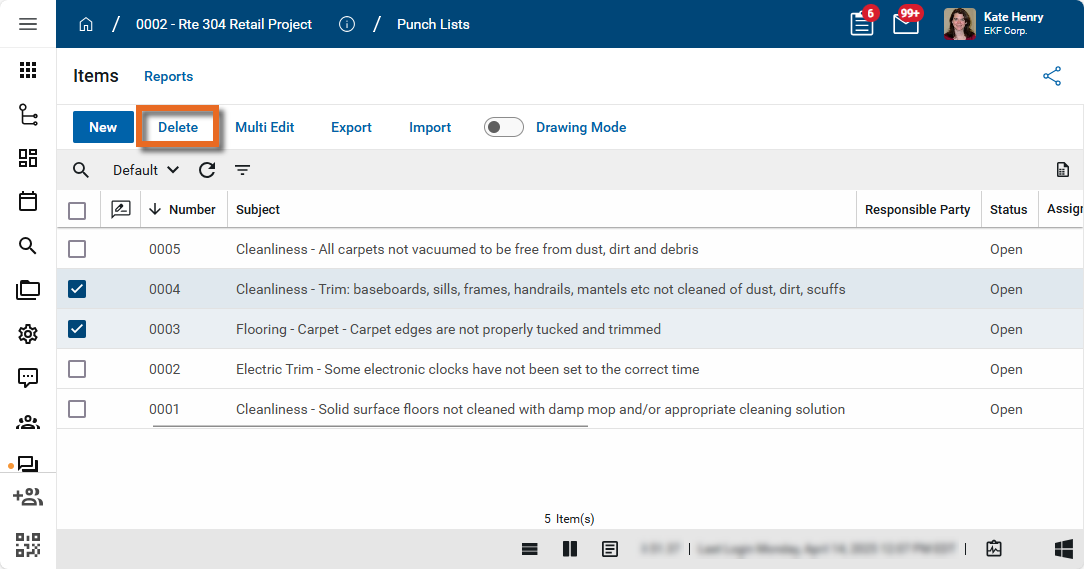
A punch list item created in error can be deleted by a user with the appropriate permissions as long as it has not yet been sent to the responsible party or sent for approval. If it has been sent out already, select Recall on the detail view of the record to remove it as a task for that person and make it available for deletion.
To delete a punch list item, complete the following steps:
-
Review the header to ensure that you are in the correct project or partition.
-
Navigate to the Punch Lists application (Apps > Document Management > Punch Lists).
-
In the log view, select the check box next to the record or multiple records that you want to delete. Select Delete from the action bar.
-
Alternatively, right-click on the record in the log view and select Delete. To delete a punch list item in Drawing mode, open it and click on the Delete icon
 .
. -
Click OK on the confirmation message. The record or records will be deleted.
Note If a record was deleted in error, it can be recovered from the Recycle Bin application by an administrator. Deleted records are available for restoration for a set number of days as configured in domain settings. For more information, refer to Using the Recycle Bin.
Your domain administrator or another user with the appropriate permissions can configure the Punch Lists app in the Configuration application.
Important When working in the Configuration app, it is important to review the header and ensure that you are working at the correct level in the hierarchy, either the root domain or at a partition or project level.
Settings that you establish at the root domain or lower levels will inherit down the hierarchy until they are overridden. For more information on the hierarchical structure of Kahua, refer to Understanding the hierarchical structure of Kahua.
The Configuration app can be accessed directly through the apps list (Apps > Administration > Configuration), or by right-clicking on an application in the launch bar and selecting Configure. When you select Configure for an app from the launch bar, the detail view of the configuration page for that application opens automatically.
For information on configuring this app in Configuration, refer to Application configuration.
The following items are specific to the Punch Lists application: