Share Manager app
The Share Manager app allows a domain administrator to review and manage all inbound and outbound shares in your domain. For more general information on sharing, refer to Understanding how Kahua sharing works.
How to . . .
It is possible for the user accepting a share to inadvertently accept it into the wrong project. You can move an accepted share from one project to another in the Share Manager app.
To move an accepted share from one project to another, complete the following steps:
-
Navigate to the Share Manager app (Apps > Administration > Share Manager).
-
Select the Inbound tab.
-
Select the share you want to move and click Edit in the action bar.
-
The Edit Inbound Share page opens.
-
Click on the Edit icon
 next to the current project name in the Destination field.
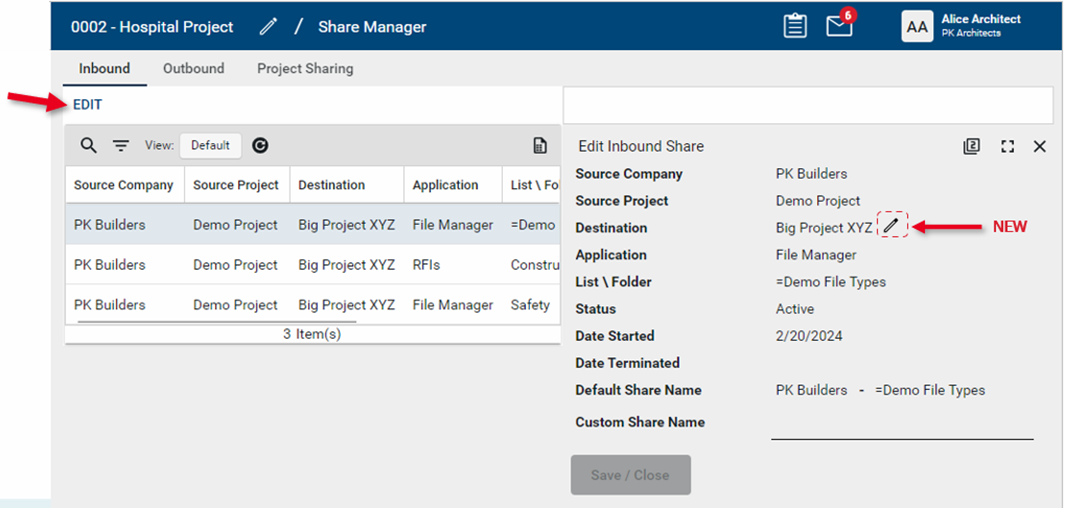
-
Select the correct project to associate the share with and click Ok.
-
Click Save when you are done.
In addition to moving shares from one project to another, you can use the Inbound tab to review existing inbound shares in your domain. All inbound shares appear here, regardless of the currently selected project or partition.
To review inbound shares, complete the following steps:
-
Navigate to the Share Manager app (Apps > Administration > Share Manager).
-
Select the Inbound tab.
-
Select the share you want to review.
-
The detail page opens and information about the share appears, including the source company and project, app and list or folder name, status, start date and any end date.
-
Close the detail page when you are done.
From the Share Manager app, you can add new shares or edit existing ones. All outbound shares appear here, regardless of the currently selected project or partition or how the shares were originally created.
To add or edit an existing outbound share, complete the following steps:
-
Navigate to the Share Manager app (Apps > Administration > Share Manager).
-
Select the Outbound tab.
-
To add a new share, click on Add. To edit an existing share, select it and click Edit.
Important If you are adding a new share, review the header to ensure that you are in the correct project.
-
Enter or modify the following fields as appropriate:
-
User's Company is Named on Record
-
Created By Current User's Company
-
Created by Current User
-
If you are adding a new share, select Send Invitation. If you are editing an existing share, click Save when you are done.
| Field | Description |
|---|---|
| Project | The name of the current project appears here. |
| Application | The name of the current app appears here. |
| List\Folder | If the app includes lists or folders, select the appropriate option here. |
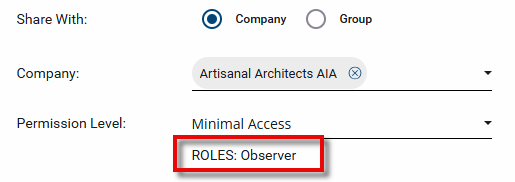
| Share With: | Select Company or Group. Typically it is advisable to select the Company option. |
| Company |
This option appears if you selected Company above. Select the company name. Important To be available for selection, the company must appear in the Companies app in your domain and be a Kahua user. To accept the share, they will have to have the appropriate licenses. For information on the Companies app, refer to Using the Companies app. |
| Permission Level |
Select the name of the group with the appropriate permissions for this application. Once you select the group name, the roles assigned to the group appear below the selection.
For more information on assigning permissions in the Groups app, refer to Manage permissions for a group. Example If you are a general contractor and want to allow your subcontractors to view RFIs for a project in your domain, you can set up a group with Observer permissions for RFIs and select that group here. Note This selection can be edited after the share is accepted. |
| Send Invite To: |
If you selected to share with a company, select which Kahua user from the named company to send the invitation to. If you selected to share with a group, the members of the group appear for selection. Choose members of the group to receive an invitation. The invitation will appear as a task in the recipient's Kahua domain. The invitation recipient can determine if they want to add the share to an existing project or create a new one. In your domain, the invitation will appear as ‘Pending’ until the invitation is accepted. Important The selected invitation recipients must appear in your Contacts app. For information on the Contacts app, refer to Understanding the Contacts app. |
| Allow copy |
Select this option to allow the company you are sharing with to keep a copy of the shared records when the share ends. This creates a static list that can only be viewed and not edited. This is a recommended practice to allow the company receiving the share to be able to view the records once the share ends. Note This selection can be edited after the share is accepted. |
| Filters |
Filters allow you to restrict what records are available from the shared application. You can select one of the standard filters, or create your own. The available standard filters will vary depending on the application being shared. Some typical filters include the following: To create a custom filter instead, select a field to filter by in the Custom Filter section. You can filter by multiple fields and use either AND or OR conditions. Note This selection can be edited after the share is accepted. |
From the Project Sharing tab, you can create new sharing invitations for individual companies and include multiple apps in the invitation.
New sharing invitations cannot be created from the root domain. You must be in a project to initiate a share from the Share Manager app.
To share multiple apps on a project to a company, complete the following steps:
-
Review the header to ensure that you are in the correct project or partition.
-
Navigate to the Share Manager app (Apps > Administration > Share Manager).
-
Select the Project Sharing tab.
-
Click New to open the new Share tab
Important If you are adding a new share, review the header to ensure that you are in the correct project.
-
Enter or modify the following fields as appropriate:
-
Field Description Details Project The name of the current project appears here.
Name Enter a name for this share.
Company Select the company name.
Important To be available for selection, the company must appear in the Companies app in your domain and be a Kahua user. To accept the share, they will have to have the appropriate licenses. For information on the Companies app, refer to Using the Companies app.
Contact Select which Kahua user from the named company to send the invitation to.
The invitation will appear as a task in the recipient's Kahua domain. The invitation recipient can determine if they want to add the share to an existing project or create a new one.
In your domain, the invitation will appear as ‘Pending’ until the invitation is accepted.
Important The selected invitation recipients must appear in your Contacts app. For information on the Contacts app, refer to Understanding the Contacts app.
Permission Group Select the name of the group with the appropriate permissions. The permissions for each app will be applied from this selected group.
For more information on assigning permissions in the Groups app, refer to Manage permissions for a group.
Note This selection can be edited after the share is accepted.
Apps Enter a number and select Insert to add that number of lines to the grid.
Note For more information on working with grids, refer to Item Grids.
Application Select an app to share List\Folder If the app includes lists or folders, select the appropriate option here. Copy on End Select this option to allow the company you are sharing with to keep a copy of the shared records when the share ends. This creates a static list that can only be viewed and not edited.
This is a recommended practice to allow the company receiving the share to be able to view the records once the share ends.
Note This selection can be edited after the share is accepted.
Share Filter Filters allow you to restrict what records are available from the shared application. You can select one of the standard filters, or create your own.
Click Modify to apply a filter.
The available standard filters will vary depending on the application being shared. Some typical filters include the following:
-
User's Company is Named on Record
-
Created By Current User's Company
-
Created by Current User
To create a custom filter instead, select a field to filter by in the Custom Filter section. You can filter by multiple fields and use either AND or OR conditions.
Note This selection can be edited after the share is accepted.
-
-
Select Send when you are done to send the invitation.