Approval configuration
The Approvals tab of the Configuration app is where administrators set up the approvals process for eligible applications.
The Approvals tab follows the hierarchical model. That is, the approval settings are inherited down the partition / project hierarchy until they are overridden. Approval responsibilities can be assigned by roles or groups, so the assignments are valid down through the hierarchy.
Note Approval tasks can only be delegated if the Domain Settings > Domain Defaults > Enable Approval Task Delegation setting is enabled. Refer to Enable approval task delegation.
How to . . .
When setting up approvals, you do not select individual contacts as approvers or notification recipients. Instead, you select a Role, Actor, or Group in those fields. Roles, Actors, and Groups are defined as folllows:
-
Role - Roles are set up on the Approvers tab. The role itself inherits down the hierarchy, but the contact assigned to a role can be modified at the partition or project level. Refer to Add or modify approvers.
-
Actor - Actors are contacts assigned to fields in the Roster section of the Project Information page, or they come from the document involved in the approval, such as the "From Contact"/"To Contact" or an app-specific item such as "To Contract Signer". For more information on the Project Information page, refer to Project Information.
-
Group - Groups are set up in the Groups app. For more information, refer to Setting up groups.
The selection of the role or actor inherits down the hierarchy, so you can set up approvals that match your organization's approval processes at the domain or partition level, and then modify which contacts from the project participate in the specific role, actor, or group.
Example Your organization may require that division Vice-Presidents approve any contract worth over $10,000,000. At the root domain level you can set up an approval workflow to match this scenario, with "Vice-President" as a role on the Approvers tab. The workflow then inherits down the hierarchy. Divisions can be set up as partitions in the hierarchy, and you can assign the appropriate contact as the Vice-President in the division for each partition. Then when the approval workflow is initiated, the appropriate vice-president will be notified and required to complete the approval.
For more information on the hierarchy, refer to Understanding the hierarchical structure of Kahua.
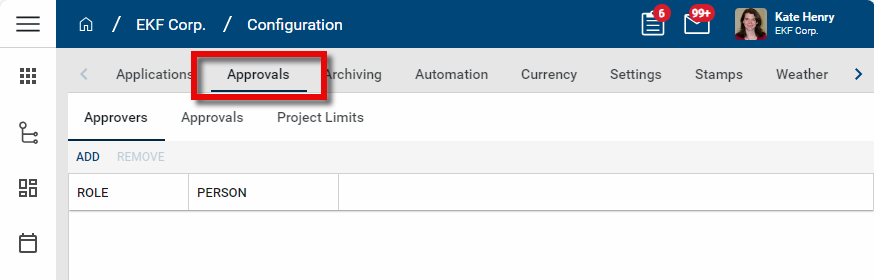
The Approvers tab is where you to define the roles to be included in the approval workflow for applications where these workflows are available.
The Approvers tab is where Approver roles may be defined that are NOT captured in roles defined in the Project’s Roster (which is a list of contact fields in the Project / Portfolio Management app) or in the record itself. These roles typically are roles that will not differ project to project, or should not be editable by end users.
For instance, if the CEO may be involved in workflow, it may be beneficial to defined the CEO in the Approvers tab, so that users cannot edit nor do they need to define the contact for CEO in the project roster. Note that you can define as many Approvers as you wish at the root, or at a partition level – Approvers will follow the Kahua inheritance model and be available to include in workflow from that partition downward in the hierarchy.
To add or modify an approver, complete the following steps:
-
Review the header to ensure that you are in the correct project or partition. To add an approver at the domain level, ensure that you are in the root domain.
-
Navigate to the Configuration application (Apps > Administration > Configuration).
-
Select the Approvals tab. There are three sub-tabs, Approvers, Approvals, and Project Limits. Select the Approvers tab.
-
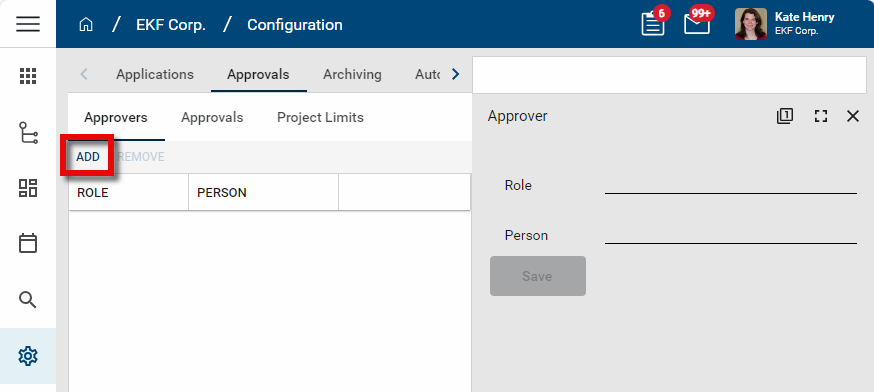
To add a new role, click Add. The detail panel opens.
To edit an existing role, click on it in the list view to open the detail panel.
To remove an existing role, select it from the list and click Remove.
-
In the Role field, enter the name of the role you are defining (e.g., "Program Manager").
-
In the Person field, select the appropriate contact for this role. If the person's name is not available, verify that they have been added as a Contact in your Contacts application. Refer to Add a contact.
Important At a lower partition or project level in the hierarchy, this value can be overridden and another contact selected for this role.
-
Click Save. This contact is now available to be selected when defining your approvals workflow in the Approvals sub-tab.
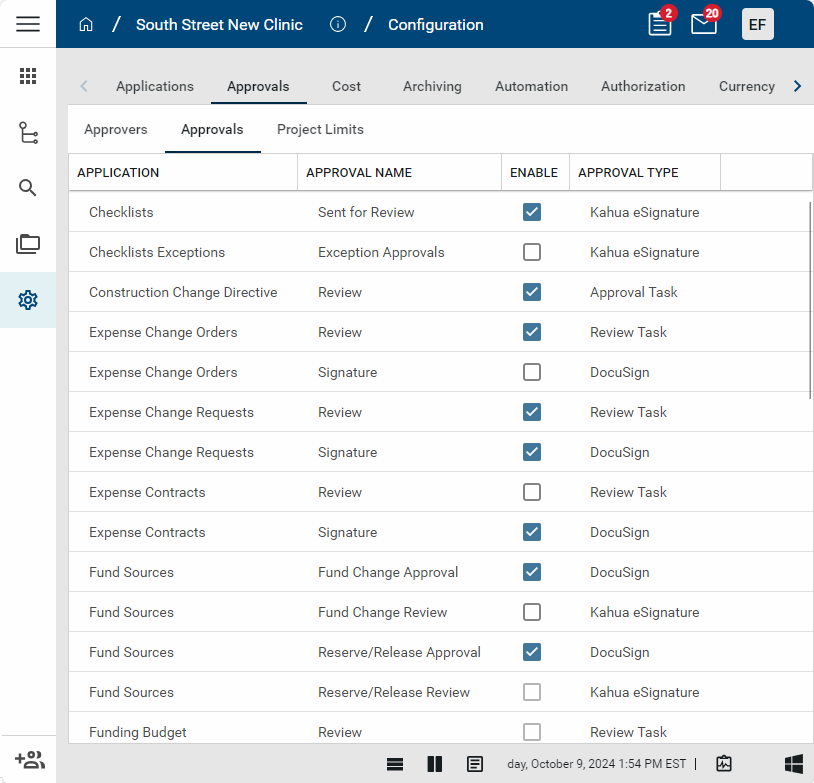
The Approvals sub-tab will contain a list of applications and the type of approvals available for configuration. There are potentially multiple approval types available to be configured for each application, such as Review or Signature.
Note For more information on Review and Signature workflows in cost applications, refer to Understanding Review workflows vs Signature workflows.
To enable and configure an approval, complete the following steps:
-
Review the header to ensure that you are in the correct project or partition. To enable and configure an approval process at the domain level, ensure that you are in the root domain.
-
Navigate to the Configuration application (Apps > Administration > Configuration).
-
There are three sub-tabs, Approvers, Approvals, and Project Limits. Select the Approvals tab.
-
Select the appropriate Application and Approval Name. The detail panel opens.
-
Select Override.
-
Complete the following fields as appropriate:
Note Depending on selections made, some fields listed below may not be relevant and will not appear.
Field Description Enable Approval Select this option to enable the approval workflow for this combination of Application and Approval Name.
Note You must also enable the workflow for the application in the application Configuration. Review the documentation for the application for more information.
Add Conditional Approvals?
Select this option to replace the standard approvals with Conditional Approvals.
Conditional approvals allow approver lists to be determined by conditions beyond simply document value. Creating these conditions requires the use of standard kBuilder Conditionals syntax. For more information, refer to Conditional Approvals.
Example Conditional approvals can be used to have the system can evaluate a different approver list for a change order related to a construction-type contract vs a change order to a leasing-type contract, plus refine the final approval list based on the change order value.
Approval Configuration tab
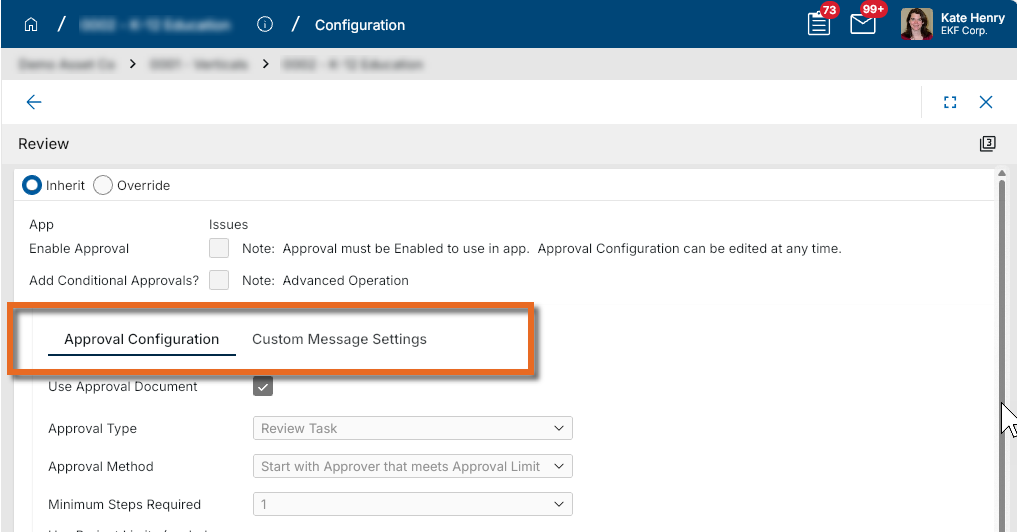
Use Approval Document Select this option to require users to create an approval document.
Approval documents are added to the References section of records routed for review. This allows users to define the document routed for approval. The document can include the standard PDF view and additional selected supporting documentation. Refer to Add Approval Doc.
Note If this option is not selected, the document routed for approval will be the standard PDF view of the record.
Approval Type Review tasks - By default, Review tasks will be sent as a Kahua task. This means that the task will appear in a user's Kahua Tasks app, and the user will be required to indicate that they have reviewed the document. To use a different method, make that selection here.
Signature tasks - By default, Signature tasks will be sent via a Docusign task (send record into Docusign). This means that the task will come to the users in their email inbox from Docusign, and they will be required to use the free Docusign features to digitally sign the document. If you want to use another type of task – such as the Kahua signature pin, etc., you can select that here. This determines the method through which the task is sent to users.
Note Docusign does NOT require that all approvers are Kahua users. If you use Kahua eSignature tasks, all users must have a Kahua account to access their Task menu.
eSignature Document Output Option Select from one of the following available options:
-
Use Signature Tokens - Select this option to apply signatures to signature tokens in the portable view for the record.
-
Append Signatures to Document Pages - Select this option to append the signature information to the bottom of the portable view for the record. If you do not have signature tokens set up on the record portable view, use this option.
Add to References? Select this option to add the approval document to the References section of the record. Approval Method Select the appropriate option:
-
Start with Approver that meets Approval Limit
-
Start with First Approver up to Approval Limit
Minimum Steps Required Select the number of steps required in the workflow. Use Project Limits (excludes negative amounts)
Select this option to use Project Limits. Refer to Establish Project Limits. Use Absolute Value for Negative Amounts
Select this option to have the absolute value of the approval amount be used for thresholds and limits, including the Automatic Approval Amount.
For example, if this option is selected, an approval amount of -$5,000 is treated as $5,000 during the approval process.
Use Comments / Require Comments
Select Use Comments to have the Comments field available when the approver is completing the workflow task.
When you select Use Comments, the Require Comments option becomes available. Select this option to require comments when the approver is completing the workflow task.
Use References / Require References
Select Use References to allow approvers to upload reference documents as part of their review. These documents will be attached to the original record.
When you select Use References, the Require References option becomes available. Select this option to require references when the approver is completing the workflow task.
Send Reminders Select this option to configure reminders for approvals. When selected, additional setting selections appear.
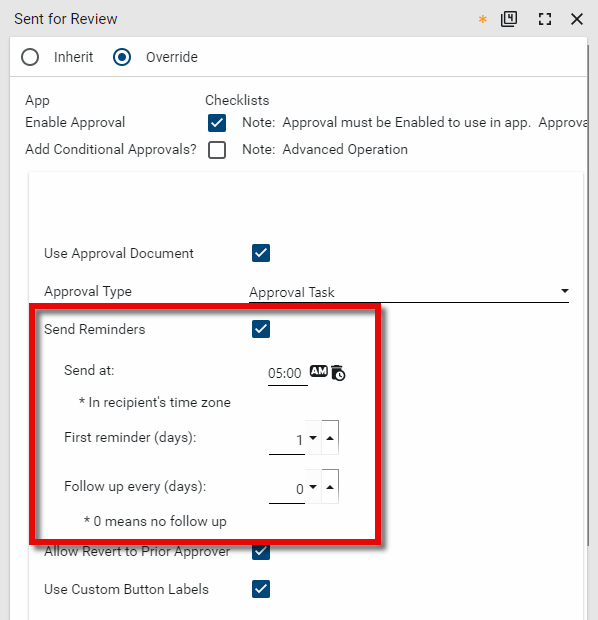
Select the time of day the reminder should be sent, the number of days until the first reminder, and the number of days between additional follow-ups. Select 0 for no additional follow-up reminders.
Note This selection can be overridden for individual approvers when you configure the Approval Steps.
Note This option is not available for Docusign approvals.
Allow Revert to Prior Approver Select this option to allow approval tasks in a multi-step approval process to be returned to a prior approver.
When enabled, a Revert button (or the selected custom label for the button) will appear for all approvers other than the first one. If selected, the user is required to enter a comment to explain the purpose for reverting back to the prior approver (e.g., ask a clarifying question, request additional information, ask for additional review and re-approval). The comment will appear in the new task sent to the prior approver.
Note When the prior approver approves the task again, both the original approval and subsequent approval are recorded and appear in the History and Visual Workflow.
Use Custom Button Labels Select this option to customize the labels that appear on approval buttons in the user interface. Once this option is selected, the available button types appear with the default values which can now be modified.
For review tasks, the Review Complete button label appears and can be modified.
For approval tasks that do not use Docusign, the following button labels appear and can be modified:
-
In-Progress Approve Button - This label is for intermediary approvals, prior to the final one.
-
Final Approve Button - This label is for the final approval. If there is only approval step, this button label will be used. If there are multiple steps, it will be used on the last one.
-
Decline Button - This label is for a rejection of the approval.
-
Revert Button - If Allow Revert to Prior Approver is selected, the Revert button appears on approvals and can be customized here.
Custom button labels will appear in the History and Visual Workflow to accurately reflect the selections made by reviewers and approvers.
Note This option is not available for Docusign approvals.
Enable this option to enter a value at which the configured approval steps are bypassed and the approval is completed automatically.
Once a document is automatically approved, the originator of the approval request receives a notification confirming the record has been approved. The record's history is updated to reflect that approval occurred automatically, and the automatic approval status is visible on the record preview wherever approval steps are displayed.
This option is available for all approval types that include an amount field. It is useful for small value amounts that don't require a formal approval process.
Note Only basic amount-based auto-approval is supported. Conditional logic or other customizations are not available for this threshold option. If a custom completion message is configured on the approval, that message is sent instead of the auto-approval notification. Only one message will be sent.
Initiate New Approval Workflow After Completion
Select this option to have the completion of this approval workflow automatically initiate another approval workflow.
For example, you can use this option to have the completion of a Review workflow automatically trigger a Signature workflow.
Important Only enabled workflows for the same application appear for selection in the dropdown list.
Custom Message Settings
Note This tab only appears if custom messages are available for the selected approval type.
Step Notification Recipients This option allows you to manage who receives a notification when an approval workflow process is initiated and when the intermediate approval steps occur.
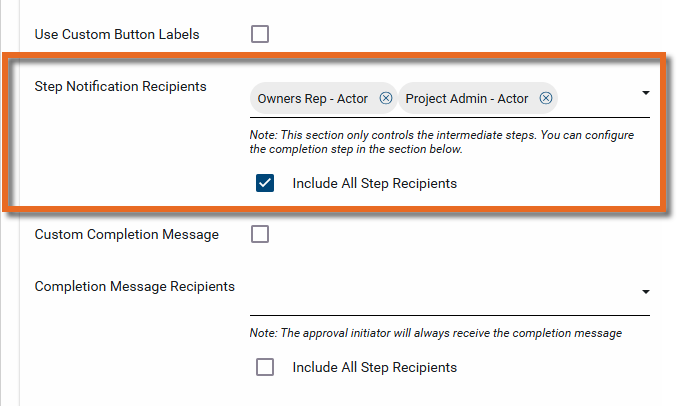
From the drop-down menu, select the groups, roles, and actors that you want to receive a notification when an approval workflow process is initiated and for the subsequent intermediate steps.
Select Include All Step Recipients to send the step notifications to all the step recipients in the approval workflow.
The initial message will list all the approvers in the process. The subsequent notifications will include the name of the current approver and the name of the next approver in the approval workflow.
Note This option is not available for Docusign approvals.
Custom Completion Message
Select this option to replace the body of the message sent upon completion to the initiator of the review or approval process with a custom message.
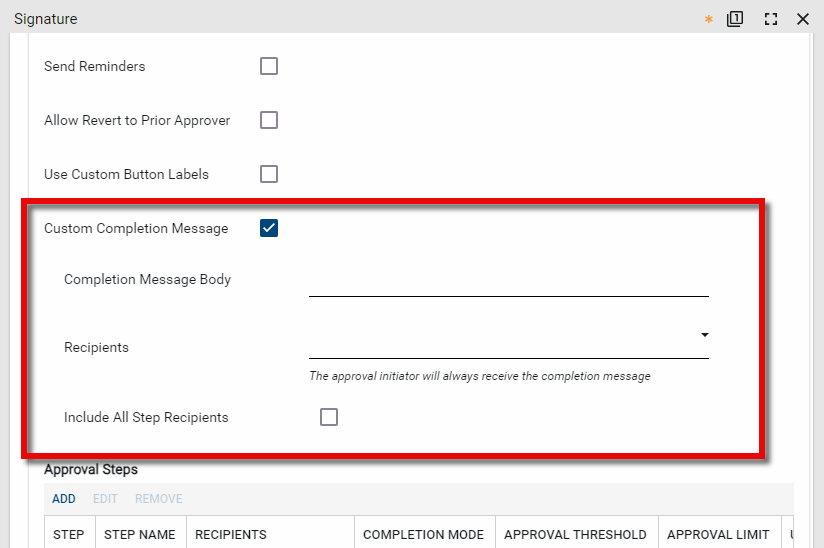
The following fields appear when this option is selected:
-
Completion Message Body - Enter the message text.
-
Recipients - Select any additional message recipients. All recipients must be Kahua contacts.
-
Include All Step Recipients - Select this option to also send the message to all approver recipients.
Note This option is not available for Docusign approvals.
-
-
In the Approval Steps section, select Add and complete the following fields:
Field Description Step Enter the number this step is in the process. The first step should be assigned the number 1. The number should be incremented for additional steps.
Step Name Enter a name for the step, making it clear what function the step covers (e.g., "PM Review", "Owner Review", etc).
Task Completion Mode
Select the appropriate option:
-
All - When selected, all recipients must approve the item before it advances to the next step. If a group has been selected as a recipient, all members of the group must approve the item.
-
First Completed - When selected, the item is considered approved when one recipient approves it.
-
Minimum Responses - When selected, the item is considered approved when the specified number of recipients approve it. The Approvers Required field appears when this option is selected. You can require up to ten responses.
Recipients Select the appropriate recipients. You can select Roles as defined on the Approvers tab, Actors as defined on the Project Information page or the record itself, or non-system groups from the Groups app.
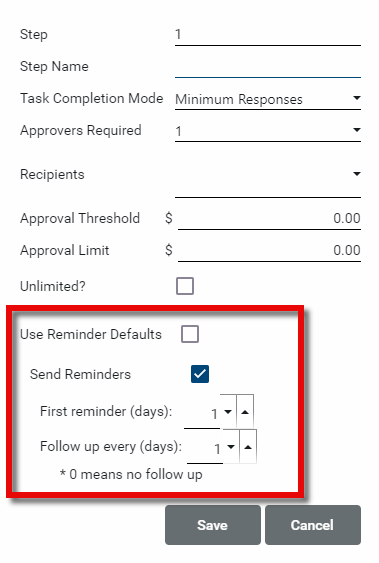
Approval Threshold Enter the minimum amount this approver is authorized to approve. Approval Limit Enter the maximum amount that this approver is authorized to approve. Unlimited Select this option if there are no limits on the amounts this approver is authorized to approve. Use Reminder Defaults Select this option to use the reminder defaults established in the previous step. Clear this option to not use the reminder defaults.
Send Reminders If Use Reminder Defaults is not selected, this option becomes available and you can select it to send reminders for this step on a custom schedule.
Select the number of days until the first reminder, and the number of days between additional follow-ups. Select 0 for no additional follow-up reminders.
-
-
Click Save when you are done.
The Project Limits tab is where you establish the maximum amounts a person can approve for selected approvals in a single project. Once individual project limits are set up, you can enable checking these limits per approval. When a person receives a document where the amount of that document will put them over their project limit, it then requires the next person in the route to approve the document.
After the limits are set up, return to the approvals where you want to enforce these limits and select Use Project Limits.
To review what documents have been processed that apply to these limits, select the Activity tab.
To add or modify approval limits, complete the following steps:
-
Review the header to ensure that you are in the correct project or partition. To establish approval limits at the domain level, ensure that you are in the root domain.
-
Navigate to the Configuration application (Apps > Administration > Configuration).
-
Select the Approvals tab. There are three sub-tabs, Approvers, Approvals, and Project Limits. Select the Project Limits tab.
-
Select an existing limit to open it in the detail pane and select Override. Select Add to add a new one.
-
Complete the following fields as appropriate:
Field Description Enabled Select this option to enable this project limit. Contact Select the contact to whom this limit will be applied in this project. Limit Enter the limit amount. Applications / Approval Names Add Select Add to add a line for an approval. Click in the line to select an approval that this limit should be applied to. Remove To remove an item, select it by clicking on the line and click Remove. -
Click Save to save your changes.