Inviting Users to Kahua
Important The Invites application is only available in domains created after the 2026.1 release, and can only be used by accounts with a "@kahua.com" domain email address. In a future release, it will be made available to other users in the Domain Administrators group.
The Invites application provides a single location where your domain administrator can easily invite multiple users to work or receive tasks in your domain.
The Invites app is part of User Management, which also includes the Users and Groups applications. Together, these applications manage collaborators, licenses, projects, and permissions across the Kahua platform.
Key things to know about the Invites app include the following:
-
Only Domain Administrators can access the Invites app.
-
When creating an invitation for someone to work in your domain, you can create named Access profiles which allow you to select what licenses to assign to an invited user, which projects they receive access to, and the groups they become members of. The named Access profile can be re-used later for additional users. If a user's access is unique, you can set up their access without saving the access profile.
-
You can also create a saved email configuration for the welcome email sent to the invited user by modifying the subject line, adding information to be included with the standard message, and uploading or adding any attachments as desired.
-
There are two invitation types:
-
User Invitations - These are used when the invited user is granted a license by the inviting administrator. This user may or may not share the same originating domain as the inviting administrator, but the invited user will be working in the same domain as the inviting administrator.
-
Task Invitations - These are for users who only need to take action on tasks and do not share your domain.
-
-
Invitations can be saved without being sent, allowing you to review or update them before notifying users.
-
Once an invitation is sent, the assigned Access cannot be edited.
-
Users can change their associated company during registration, even if one is selected during the invitation process.
How to . . .
Watch the videos! Add an Internal User , Add an External User, and Saving Invites for Future Send
User Invitations are for users who work in your domain and are typically assigned a license. They can be internal users, which are typically employees of your company, or external users, which are typically not your employees but have a need to access your domain.
Important If the user will only need to take action on tasks and not share your domain, you should send them a Task Invitation. Refer to Create a Task Invitation.
To invite a user to your domain, complete the following steps:
-
Navigate to the Invites application (Apps > All Apps > User Management > Invites).
-
Select Add > User Invitation.
-
To add a single user, enter their Email, First Name, and Last Name.
Note To add multiple users at once, select Download Template. This will download an Excel file that you can use to add multiple users with their First Name, Last Name, and Email Address.
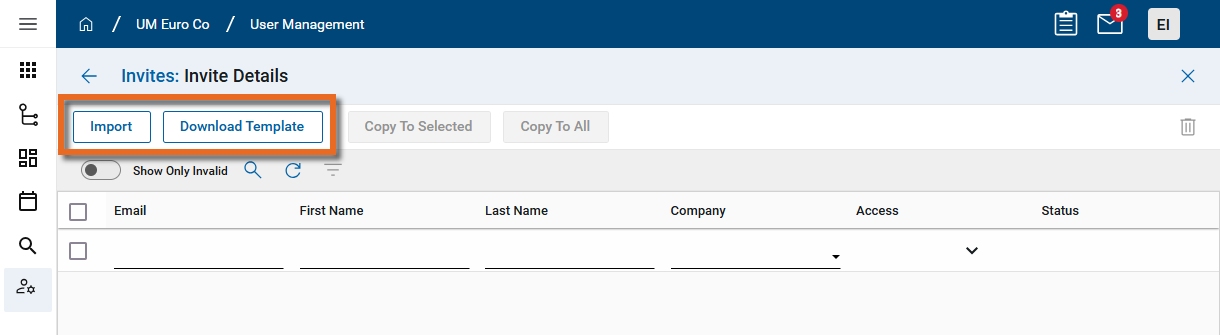
Once the template file is updated, select Import to import the user information. You can then complete the remaining selections. Consider using Copy or Copy to All to copy the Company, Access, and Email Configuration settings to newly uploaded users as appropriate. Refer to Use Copy and Copy to All. -
In the Company field, complete one of the following actions:
-
Select your company or associated company from the Company Profiles app- Your company and companies listed in the Company Profiles app in your domain appear at the top of the selection list with "Company Profile" next to the company name. Refer to Updating your company information in the Company Profiles app.
Select one of these companies to add the user as an internal user in your domain.
Note When adding an internal user, the Email Configuration is not available as it is not needed for internal users.
-
Select a Company from the Contacts > Companies app in your domain - These companies are external to your domain.
Users added with these companies must complete the registration process and accept a join task to work in your domain.
-
Select "Create a Company" - This selection allows you to search the Kahua Community for an existing company record. If found, the company is selected and added to your Contacts > Companies app.
If the company name cannot be found in the Kahua Community, you can select Cancel and Create New Company to create a new company record by entering their name and address information.
Users added with this way must complete the registration process and accept a join task to work in your domain.
-
Leave the company field blank - If a company is not selected, the user will select a company during registration.
Note Users can change the associated company during their registration process.
-
-
The Access selection determine the licenses, projects, and groups assigned to the user.
In the Access field, complete one of the following actions:
-
Select an existing Access profile - To review the settings of an existing Access profile prior to selecting it, click the View icon
 .
. -
Click "New" to create a new Access profile - Click New to create a new Access profile for re-use, or for use with only this invitation. For more detailed information, refer to Configure Access profile.
-
-
The Email Configuration allows you to modify the standard Welcome email that goes out to the invited user, allowing them to register their Kahua account. In the Email Configuration field, complete one of the following actions:
-
Select an existing Email Configuration - To review the settings of an existing Email Configuration prior to selecting it, click the View icon
. -
Click "New" to create a new Email Configuration - For more detailed information, refer to Modify the Email Configuration.
Note This option is not available for selection when adding an internal user.
-
-
When your selections are complete, a green check
 appears in the Status column, indicating that the invitation is ready to be sent. You can continue to add and update invited users.
 -
If you are not ready to send the invitations out yet, select Save to save your work. When you are ready, select Save & Send to send the invitation to all invited users.
-
After the invitation is sent, the Status and Info fields provide current information on the invitation status.
Watch the video! Add a Task Invitation
A Task Invitation is used when the invited user is only being added so they can take action on tasks in Kahua and does not share a domain with the inviting administrator.
To create a Task Invitation, complete the following steps:
-
Navigate to the Invites application (Apps > All Apps > User Management > Invites).
-
Select Add > Task Invitation.
-
To add a single user, enter their Email, First Name, and Last Name.
Note To add multiple users at once, select Download Template. This will download an Excel file that you can use to add multiple users with their First Name, Last Name, and Email Address.
Once the template file is updated, select Import to import the user information. You can then complete the remaining selections. Consider using Copy or Copy to All to copy the Company, Access, and Email Configuration settings to newly uploaded users as appropriate. Refer to Use Copy and Copy to All. -
In the Company field, complete one of the following actions:
-
Select a Company from the Contacts > Companies app in your domain - These companies are external to your domain.
-
Select "Create a Company" - This selection allows you to search the Kahua Community for an existing company record. If found, the company is selected and added to your Contacts > Companies app.
If the company name cannot be found in the Kahua Community, you can select Cancel and Create New Company to create a new company record by entering their name and address information.
Users added with this way must complete the registration process and accept a join task to work in your domain.
-
Leave the company field blank - If a company is not selected, the user will select a company during registration.
Note Users can change the associated company during their registration process.
-
-
The Access selection determine the projects assigned to the user. They can be assigned to a group, but the group assignment is for messages only, as the user is being invited for tasks only.
In the Access field, complete one of the following actions:
-
Select an existing Access profile - To review the settings of an existing Access profile prior to selecting it, click the View icon
. -
Click "New" to create a new Access profile - Click New to create a new Access profile for re-use, or for use with only this invitation. For more detailed information, refer to Configure Access profile.
-
-
The Email Configuration allows you to modify the standard Welcome email that goes out to the invited user, allowing them to register their Kahua account. In the Email Configuration field, complete one of the following actions:
-
Select an existing Email Configuration - To review the settings of an existing Email Configuration prior to selecting it, click the View icon
. -
Click "New" to create a new Email Configuration - For more detailed information, refer to Modify the Email Configuration.
-
-
When your selections are complete, a green check
appears in the Status column, indicating that the invitation is ready to be sent. You can continue to add and update invited users. -
If you are not ready to send the invitations out yet, select Save to save your work. When you are ready, select Save & Send to send the invitation to all invited users.
-
After the invitation is sent, the Status and Info fields provide current information on the invitation status.
The Access selection determine the licenses, projects, and groups assigned to the user.
You can select an existing Access profile, create a new one, or configure one for use with only the current invitation.
To select an existing Access profile, click in the field and make your selection. Click on the View icon ![]() to view the settings for the selected Access profile.
to view the settings for the selected Access profile.
To create a new one to save or use one time, complete the following steps:
-
Click in the Access field and select New.
-
To create an Access profile for re-use, enter a value in the Name field and, optionally, complete the Description.
To set up access for this invitation only, select the Use Once check box.
-
On the Licenses tab, select any licenses to assign as appropriate.
Note This tab does not appear when setting up a Task invitation.
-
On the Access tab > Projects section, select the appropriate projects that the user should have access to.
To select a project and all the projects below it in the hierarchy, click on the check box next to the project.
To select a project but exclude the projects below it in the hierarchy, click Only next to the project.
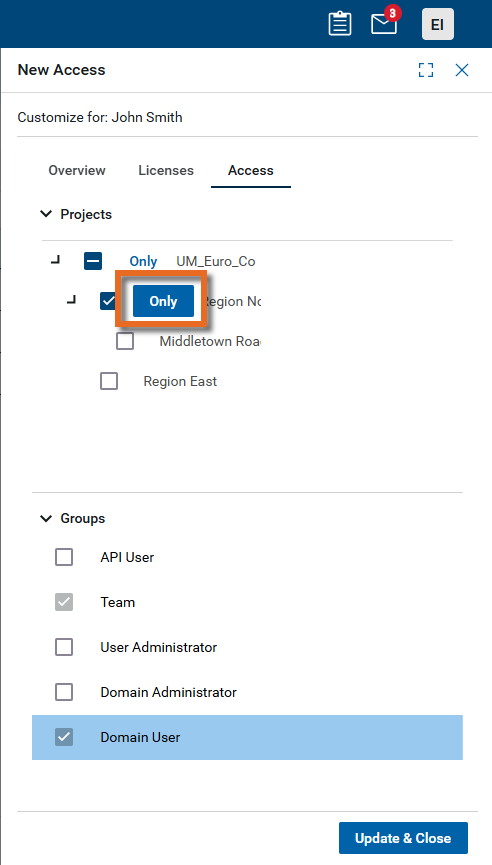
Note If the user is to be added to the Domain Administrator group, no project selection is required as they automatically have access to all projects.
-
On the Access tab > Groups section, select the appropriate domain-level groups the user should be assigned to.
Note By default, all users are assigned to the system Teams group. This group is for message distribution only and has no permissions. Additionally, depending on your domain settings, users may automatically be assigned to the system Domain User group. For more information, refer to Setting up groups.
-
Select Update & Close when you are done to return to the previous page.
The Email Configuration allows you to modify the standard Welcome email that goes out to the invited external user, allowing them to register their Kahua account.
To select an existing Email Configuration, click in the field and make your selection. Click on the View icon ![]() to view the settings for the selected configuration.
to view the settings for the selected configuration.
To create a new one to save or use one time, complete the following steps:
-
Click in the Email Configuration field and select New.
-
Enter a value in the Name field and, optionally, complete the Description.
-
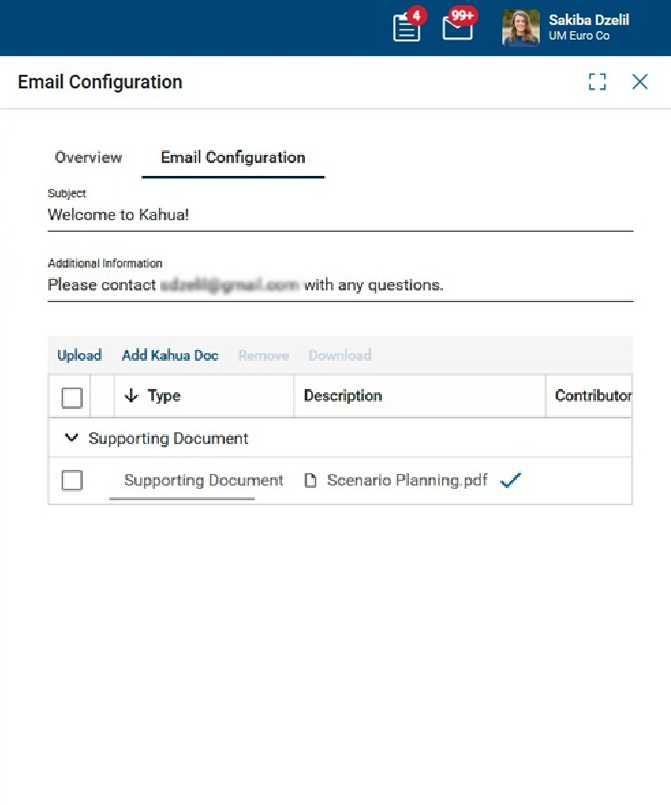
On the Email Configuration tab, complete the following fields as appropriate:
Field Description Subject Enter text to replace the default subject of the standard welcome email.
Additional Information Enter text to be added to the default text in the standard welcome email body.
Attachments Select Upload to add a new file. Select Add Kahua Doc to select a document previously uploaded to File Manager. For more information, refer to References section.
-
Select Update & Close when you are done to return to the previous page.
When creating multiple invitations, the Copy and Copy to All functions allow you to quickly apply Company, Access, and Email Configuration settings to multiple entries.
To copy a setting from one invitation to other invitations:
-
Set the Company, Access, or Email Configuration for one invitation.
-
Select the other invitations you want to apply the same setting to.
-
Select Copy to apply the setting to the selected invitations, or select Copy to All to apply it to all invitations in the list.
The Log View displays invitations that have been saved, are processing, or have been sent but the user has not yet registered. When the invited user registers their account, they are removed from the Invites app and can be viewed in the Users app.
There are built-in quick filters available to make it easier to find invitations by a combination of Access, Company, or Status.
For more information on using the log view, refer to Log Views and Log Reporting.
Invitations that have been saved but not yet sent can be deleted from the edit screen or from Log View.
To delete an invitation, complete the following steps:
-
Select the check box next to the invitation.
-
Select the Delete icon
 .
.