Manage sharing in an app
A powerful feature of the Kahua platform is the ability to share project information across domains. For example, a general contractor can share a project's RFI log or submittal log on a project with the subcontractors on that project, ensuring everyone is on the same page. For more general information on sharing in Kahua, refer to Understanding how Kahua sharing works.
The company sharing their information can control which records are shared from selected apps, and what permissions the receiving company will have for those records. They can initiate, edit, or end the share at any time.
The receiving company can control what project the shared records appear in. The records appear in their own separate list within the appropriate application.
If you have the appropriate permissions, you can share an app from a project directly from the application, as described below. You can also share multiple apps at one time through an invitation template, and you can manage inbound and outbound shares in the Share Manager app. Refer to Managing invitation templates and Share Manager app.
Key elements to know about this feature include the following:
-
When an app is shared with another organization, the contents of that app appear in real-time in the other organization's domain. It is not a copy of the data, it is the actual records.
-
When you share an app, you control what level of access they have to those records. This is managed through the selection of a group with the appropriate permissions.
-
You can apply a filter to the share to limit which records in the app are shared with the other party.
-
You can edit or end the share at any time.
-
If you are the person initiating the share, you must have the appropriate permissions to do so. This typically requires an Administrator or Moderator role.
-
You can allow the other party to keep a viewable copy of the records after the share is ended by selecting Allow copy on the share document.
-
The invitation recipient accepts the share on behalf of their organization. The invitation appears as a task in their Kahua domain. The share can be added to an existing project, or the recipient can create a new project from the invitation itself. For information on accepting a share, refer to Accepting a share invitation.
How to . . .
To share an application with an outside company or contact, complete the following steps:
-
Review the header to ensure that you are in the correct project or partition.
-
Navigate to the application you want to share.
-
Click the Share icon
 in the app title bar. The log view with any existing shares appears.
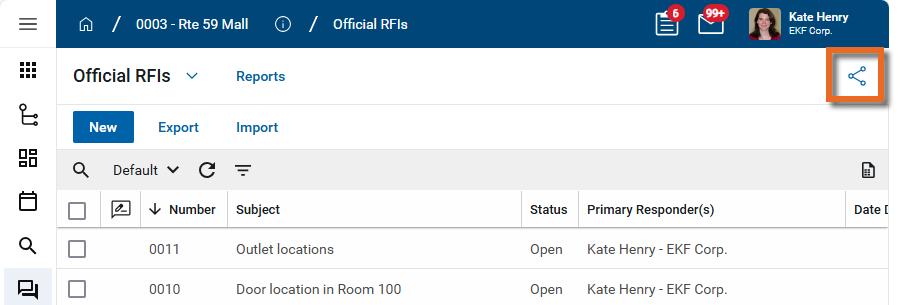
-
Click Add in the action bar to add a new share. The New Share page appears.
-
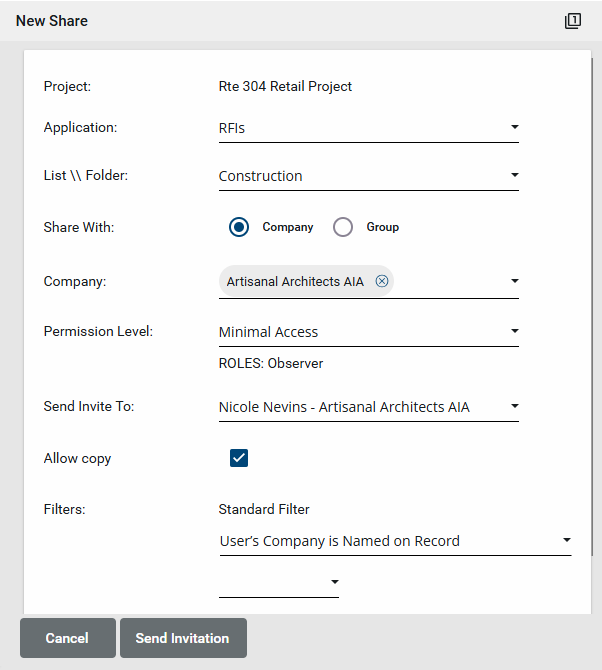
Complete the following fields as appropriate:
-
User's Company is Named on Record
-
Created By Current User's Company
-
Created by Current User
- Click Send Invitation when you are done.
-
Click the back arrow icon
 to return to the app log view.
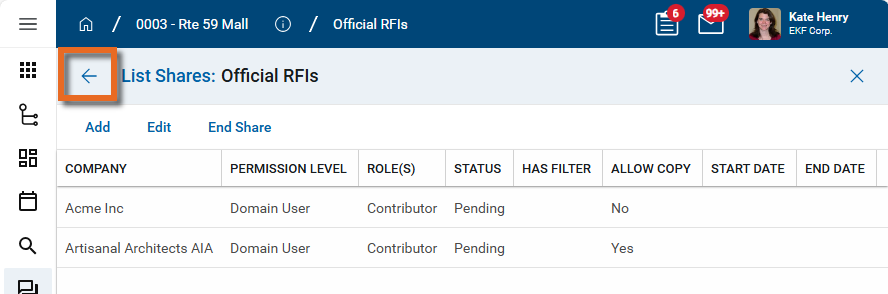
| Field | Description |
|---|---|
| Project | The name of the current project appears here. |
| Application | The name of the current app appears here. |
| List\Folder | If the app includes lists or folders, select the appropriate option here. |
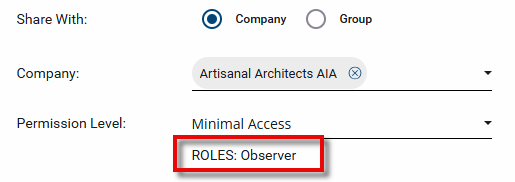
| Share With: | Select Company or Group. Typically it is advisable to select the Company option. |
| Company |
This option appears if you selected Company above. Select the company name. Important To be available for selection, the company must appear in the Companies app in your domain and be a Kahua user. To accept the share, they will have to have the appropriate licenses. For information on the Companies app, refer to Using the Companies app. |
| Permission Level |
Select the name of the group with the appropriate permissions for this application. Once you select the group name, the roles assigned to the group appear below the selection.
For more information on assigning permissions in the Groups app, refer to Manage permissions for a group. Example If you are a general contractor and want to allow your subcontractors to view RFIs for a project in your domain, you can set up a group with Observer permissions for RFIs and select that group here. Note This selection can be edited after the share is accepted. |
| Send Invite To: |
If you selected to share with a company, select which Kahua user from the named company to send the invitation to. If you selected to share with a group, the members of the group appear for selection. Choose members of the group to receive an invitation. The invitation will appear as a task in the recipient's Kahua domain. The invitation recipient can determine if they want to add the share to an existing project or create a new one. In your domain, the invitation will appear as ‘Pending’ until the invitation is accepted. Important The selected invitation recipients must appear in your Contacts app. For information on the Contacts app, refer to Understanding the Contacts app. |
| Allow copy |
Select this option to allow the company you are sharing with to keep a copy of the shared records when the share ends. This creates a static list that can only be viewed and not edited. This is a recommended practice to allow the company receiving the share to be able to view the records once the share ends. Note This selection can be edited after the share is accepted. |
| Filters |
Filters allow you to restrict what records are available from the shared application. You can select one of the standard filters, or create your own. The available standard filters will vary depending on the application being shared. Some typical filters include the following: To create a custom filter instead, select a field to filter by in the Custom Filter section. You can filter by multiple fields and use either AND or OR conditions. Note This selection can be edited after the share is accepted. |
Outbound shares can be edited in the app from which they are shared, or in the Share Manager application.
Note In the Share Manager app, you can manage all the shares in your domain from one log view. Refer to Share Manager app.
To edit an existing share from the app where it was shared, complete the following steps:
-
Review the header to ensure that you are in the correct project or partition.
-
Navigate to the application with shares you want to edit.
-
Click the Share icon
in the app title bar. The log view with any existing shares appears.
-
Click on the share you want to edit and click Edit in the action bar.
-
The Edit Share page appears. You can edit the Permission Level, Allow copy, and Filter fields.
Note These fields can be edited after the share is accepted.
-
Click Save when you are done.
To end an existing share, complete the following steps:
-
Review the header to ensure that you are in the correct project or partition.
-
Navigate to the application with shares you want to end.
-
Click the Share icon
in the app title bar. The log view with any existing shares appears.
-
Click on the share you want to terminate and click End Share in the action bar.
-
A confirmation message appears. Click Ok to end the share. Click Cancel to keep the share.