Working in the Users application
The Users application contains a list of the internal and external users in your Kahua domain. From the Users application you can add new internal and external users, remove existing users, manage user email settings, and set up task delegation for another user. You can also view user licenses, permissions and activity.
How to . . .
From the Users app you can add internal users and external users. For more information, refer to Adding Internal Users and Adding External Users.
When an invited user does not respond to an invitation or the invitation has expired, it can be sent again.
Note Your domain administrator can define the invitation expiration period. Refer to Account Security Requirements.
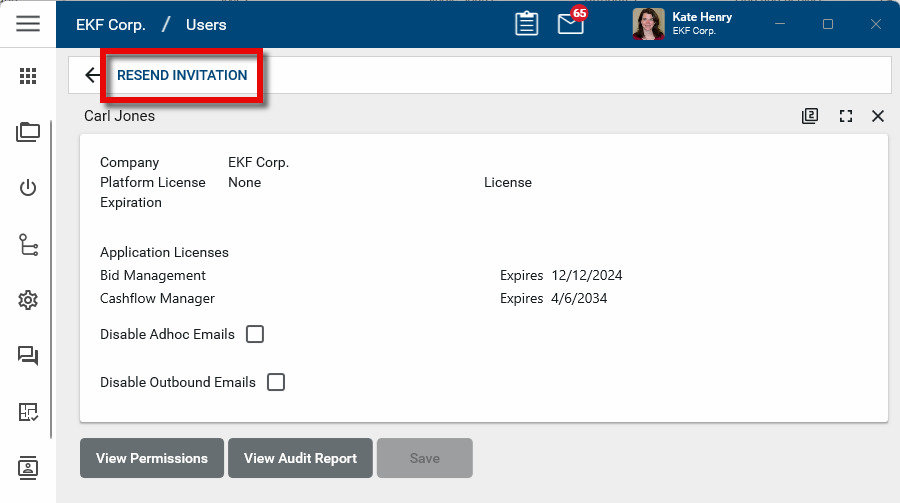
To re-send an invitation, complete the following steps:
-
Navigate to the Users app (Apps > Administration > Users or User Management > Users).
-
Locate the user on the users list. Click on their name to open the detail panel.
-
Select Resend Invitation from the action bar and click OK on the confirmation message.
-
A new invitation will be sent to the user. They will be asked to verify their login. Once they have completed their verification they will be able to complete the registration process.
Depending on your domain settings, it is possible for users to lock themselves out of their accounts due to repeated login attempts with an incorrect password. Domain administrators can unlock the user account prior to the expiration of the timeout period. For more information on these settings, refer to Account Security Requirements.
To unlock a user's account, complete the following steps:
-
Navigate to the Users app (Apps > Administration > Users or User Management > Users).
-
Click on the user's name in the user list to open the detail pane.
-
Select Unlock User Account.
Important The Unlock User Account option only appears for Kahua Domain Administrators.
To remove an existing user, complete the following steps:
-
Navigate to the Users app (Apps > Administration > Users or User Management > Users).
-
Click on the user's name in the user list to open the detail pane.
-
Select Remove from the action bar.
-
A warning message will appear. Click Ok to remove the user.
Once removed, users no longer have access to your domain and are removed from the Domain User group at the domain root level. If the Domain User group has been overridden at any level of the project structure, the user will not be removed from the group at that level and below. Their username will remain in projects that override the Domain User group membership.
There are several settings available for users related to their ability to send or receive emails outside of the Kahua domain.
Important Ad hoc emails (manually entering an email address instead of selecting a contact) and outbound emails can be disabled for all users on the project level in the Configuration application > Settings tab. Refer to Settings.
Note that if the settings are selected at the root domain in the Configuration app, they will not appear in the Users app.
To manage these settings for an individual user, complete the following steps:
-
Navigate to the Users app (Apps > Administration > Users or User Management > Users).
-
Click on the user's name in the user list to open the detail pane.

-
Review the following settings:
Setting Description Disable Adhoc Emails Select this option to prevent the user from entering an email address in the To/CC/BCC fields of a message and require them to select a contact record instead.
When this option is selected, the user will not be permitted to manually type an email address into the To/CC/BCC fields of a message. Instead, they will be required to select existing contacts from the People app in their domain.
Note The selected recipient contacts do not have to be Kahua users to receive a message. If the selected contact is not a Kahua user, the message will be sent to the email address on their contact record.
Disable Outbound Emails For sensitive or confidential projects, you can select Disable Outbound Emails so that the user will only be permitted to send content to other Kahua users as Message recipients. No external emails will be sent.
This means that if the selected recipient doesn't have a Kahua account, the recipient will not receive the message. A warning banner appears at the top of every message to let them know the message may not be delivered due to this setting.
Allow Outbound Notifications For sensitive or confidential projects, you can select this option allow this user to receive generic email notifications for items that require their attention.
When this setting is selected, the user will receive a generic email to their provider mailbox, while the message with the full content is delivered to the Messages app within Kahua.
Note This setting is only available for selection when Disable Outbound Emails is selected.
To view what licenses a user has, click on their name in the user list to open the detail pane. Their company name, any licenses they have been assigned, and the expiration date for those licenses will appear. To manage their licenses, open the Licenses app. For more information, refer to Managing user licenses.

Note In the log view, you can sort by any column by clicking on the column header. It can be helpful to sort by License status or Expiration date, or Last Active date.
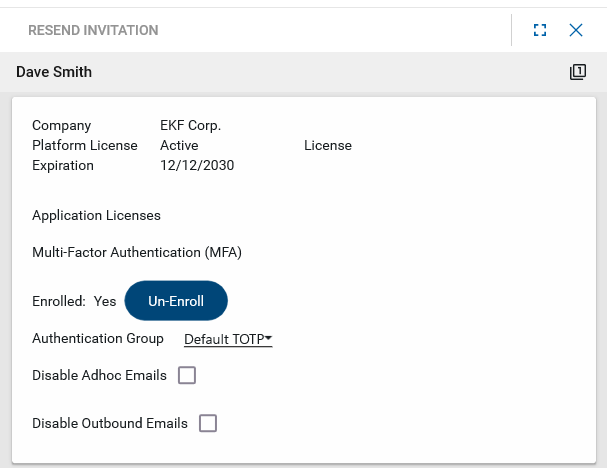
If you are using multifactor authentication (MFA) in your domain, you can manage the MFA settings for an individual user in the detail view of their user record.
Here you can select an alternate authentication group if something other than the default is appropriate. You can also allow a user who has lost access to their authenticator app (lost phone, deleted app, etc.) to re-enroll in MFA.
To manage a user's MFA settings, complete the following steps:
-
Navigate to the Users app (Apps > Administration > Users or User Management > Users).
-
Click on the user's name in the user list to open the detail pane.
-
To select an alternate authentication group for the user, click the drop-down list for Authentication Group and make the appropriate selection.
Authentication groups determine which of the possible MFA authentication methods are available to the user: an authentication app, email verification, or passkeys. If no changes are made to your configuration, the user can select any of the three options when they log in to Kahua.
Note By default, the Authentication Group is set to "None (Use Domain Default)". The domain default and any additional authentication groups are created and managed in the Domain Settings > Authentication app. For more information on setting the domain default and creating additional authentication groups, refer to Managing Multifactor Authentication in your domain.
-
If a user has lost access to the authenticator app for any reason (lost phone, deleted app, etc.), select Un-Enroll. This will remove their current multifactor authentication configuration and allow them to re-enroll the next time they log in to Kahua.
To view what permissions a user has across all applications, or to view the recent activity history of a user from the past two weeks, complete the following steps:
-
Navigate to the Users app (Apps > Administration > Users or User Management > Users).
-
To review reports on an individual user, click on the user's name in the user list to open the detail pane.
-
To review what permissions a user has across all applications, select View Permissions.
-
To review the history of a user's activity from the previous 14 days, select View Audit Report.
-
-
To review reports on all users in your domain, select Reports in the action bar.
-
To review a list of all users, license status, assignment date, and last active date, select User Log Report.
-
To view a list of projects and partitions users have access to by the groups they are members of, select the User Access Report.
-
To view the user activity of all users in your domain over the last two weeks, select the System Audit Report.
-
-
You can download a report, send it to someone in a Kahua message, or save the report to Kahua. For more information on working with reports, refer to Viewing Reports.
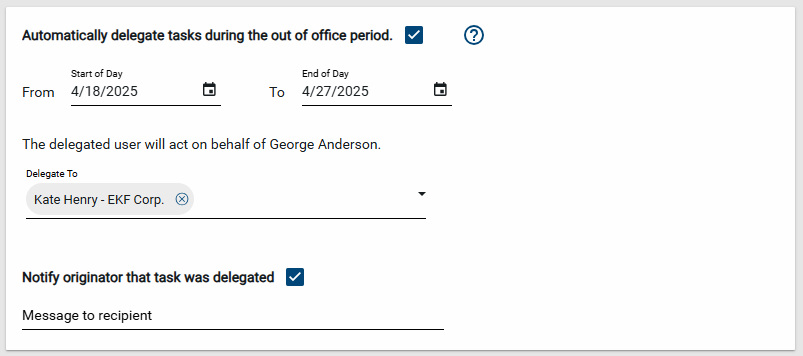
For active users in your domain, you can set up task delegation on their behalf. You can select a beginning and end date for task delegation to occur. All newly received tasks during this time frame will be delegated, existing tasks will not. All delegated tasks will remain delegated when the delegation period ends or the delegation is manually disabled.
Note While the Users app allows you to set up task delegation for new tasks that are received by a user during a scheduled period of time, you can use the Project Tasks app to delegate existing tasks on behalf of another user. Refer to Project Tasks.
To set up task delegation, complete the following steps:
-
Navigate to the Users app (Apps > Administration > Users or User Management > Users).
-
Click on the user's name in the user list to open the detail pane.
-
Scroll to the delegation section.
-
Select Automatically delegate tasks during the out of office period to enable task delegation.
-
Enter the From and To dates for the Out of Office period.
-
Select the user to whom the tasks will be delegated. This user must be a member of your primary domain. If the delegated task is from another domain and the user the task is delegated to does not have a contact record on that domain, the delegated user will be added as a contact in that domain.
-
Select Notify originator that task was delegated to have a message sent to the originator of the task letting them know that the task was delegated and enter text to be included in that message.
-
Click Save when you are done.
For more general information about task delegation, refer to Delegating Tasks.
Important Approval tasks will not be delegated unless the Enable Approval Task Delegation option is enabled in the Domain Settings app. For more information, refer to Enable approval task delegation.