My Settings
The My Settings page is where you manage your settings in Kahua, including your contact information which is visible to the broader Kahua Community.
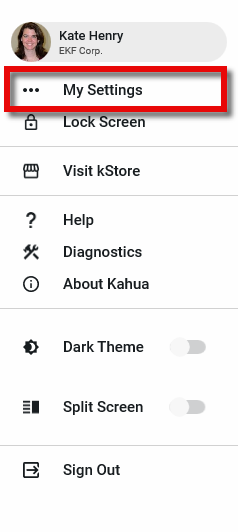
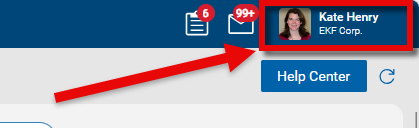
To access the My Settings page, click the person icon in the upper right corner of your screen (or your image if you’ve set a picture for your user account) and select My Settings from the drop-down menu.
There are up to eight tabs on the My Settings action bar, depending on which host you are using (desktop, web host, or mobile) and the selections made by your domain administrator:
The following options appear on the General tab:
| Setting | Description |
|---|---|
| Copy inbound emails that include inbox@kahua.com to my Inbox. | Select this option to have email messages with your email address in the To, CC, or BCC field that are also sent to inbox@kahua.com to be copied to your Messages app inbox. For more information, refer to Sending emails into Kahua. |
| Send copy of received messages to my email. |
Select this option to have a copy of new messages received in your Messages app inbox to also be sent to the email address associated with your Kahua account. Once enabled, several additional options appear:
You can select either or both Immediately and Send summaries options. |
| Timezone | Select the time zone you work in. |
| Default Language |
Select your preferred language. Note This setting controls the default output for portable views and other components that are managed by the platform. For example, if a user gets a notification when they are not logged in to Kahua, the Kahua platform uses this setting to determine what language to send the notification in. |
| Regional Format settings | Select your preferred date/time formatting. The Regional Format Examples section shows you how dates and times will appear in Kahua based on your selections. |
| Show project number | Select this option to include the Project Number with the Project Name as you navigate Kahua. This option is enabled for new users by default. |
| Show Account Details in Window |
Select this option to include your username and company name with your user icon in the top right of the header bar.
|
| Enable Full Navigation Breadcrumb | Select this option to enable the full navigation breadcrumb in the header. For more information, refer to Navigable Project Breadcrumb. |
| Open Child Task When Accessing Parent Record |
Select this option to have the task view appear when opening a parent record where you have been assigned a task for one of the child items on that record. Note When you open a record that is associated with one of your active tasks, the task view appears. This setting controls what happens when you open a record and you are assigned a task for a child item on that record (for example, when you open a submittal package and you have been assigned a task for one of the associated submittal items). |
| Enable Google Drive Uploads | Select this option to allow files to be uploaded from a Google Drive when you select Upload or Add Files throughout Kahua. Refer to Upload. |
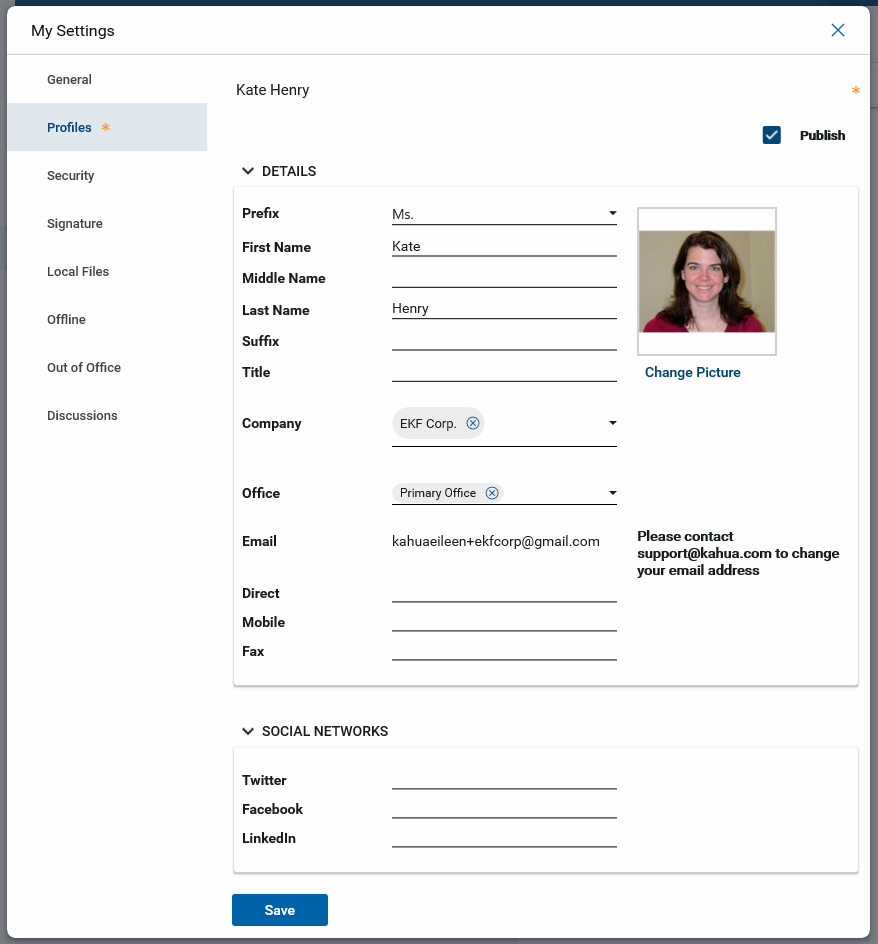
The Profiles tab is where you manage your personal information, including your name, job title, and contact information.
Important The email address associated with your Kahua account can only be changed by contacting support@kahua.com.
Fill out the Details section completely, especially if you are part of an approval workflow.
Complete remaining information, including uploading a photo, as needed by your organization. To upload or change your photo, select Change Picture and select an image file. Your photo will appear as your profile icon in the header.
Select Publish to publish your profile to the Kahua Community and be discoverable to other Kahua users.
On this tab you can change your password and, if applicable, add additional passkeys or reset your Trust this device selection for MFA.
-
To change your password, enter your old password, then a new one and a confirmation of the new one. Select Password Policy to see the password requirements for your organization. For more detailed information, refer to Changing your Password.
Note If you have access to multiple domains, your new password must meet the requirements of the domain with the most restrictive requirements, not just those of your primary domain.
If your domain uses multifactor authentication, the following options may appear:
-
If your domain administrator has enabled passkeys for your domain and you have already created one, the option to add additional passkeys will appear here.
Note You are not able to register multiple passkeys on the same device.
-
If your domain administrator has enabled the Trust this device option for logins, you can select Forget All Devices here to reset the Trust this device setting. The next time you log in to Kahua, you will again have the option to select Trust this device for the number of days chosen by your domain administrator.
Signature Block - By default, your signature block includes your signature image and your name. You can modify your signature to include any additional text as appropriate. Check with your organization for their signature standards. This signature block can appear in documents where you have added your signature.
Signature Image - Upload an image file of your signature. You can scan or take a picture of your signature for upload. This image will appear in the Signature Block.
#-Digit PIN - In this section, enter and confirm the PIN that you will use when a signature is requested by the system. The PIN you select must use the number of digits noted in the field label. This PIN may be requested in response to approval tasks or in the creation of certain communications.
This option only appears in the desktop host. Select Enable to turn on the local files feature. This will copy the folders and files from the File Manager app to a folder on your computer. The files can be accessed and edited locally and will sync back to File Manager. For more information, refer to Using Local Files Sync.
Note This feature must be enabled for your domain to be available to individual users. This is done on the Domain Defaults tab of the Domain Settings app. For more information, refer to File Sync.
This option appears in the mobile host and desktop host. Enable this feature to allow offline access to applications, including Daily Reports, Field Observations, File Manager, Punch Lists, Punch List Libraries, and RFIs. After enabling offline access in My Settings, it must be selected in each project and application. For more information, refer to Kahua Offline.
Note This feature must be enabled for your domain to be available to individual users. This is done by selecting the Offline option on the Domain Defaults tab of the Domain Settings app. For more information, refer to Offline.
Your tasks can be automatically delegated to another user while you are out of the office. You can select a beginning and end date for task delegation to occur. All newly received tasks during this time frame will be delegated. Any existing tasks will not be delegated. All delegated tasks will remain delegated when the delegation period ends or the delegation is manually disabled.
For more detailed information on task delegation, refer to Delegating Tasks.
To set up task delegation while you are out of the office, complete the following steps:
-
Click the person icon in the upper right corner of your screen (or your image if you’ve set a picture for your user account) and select My Settings from the drop-down menu.
-
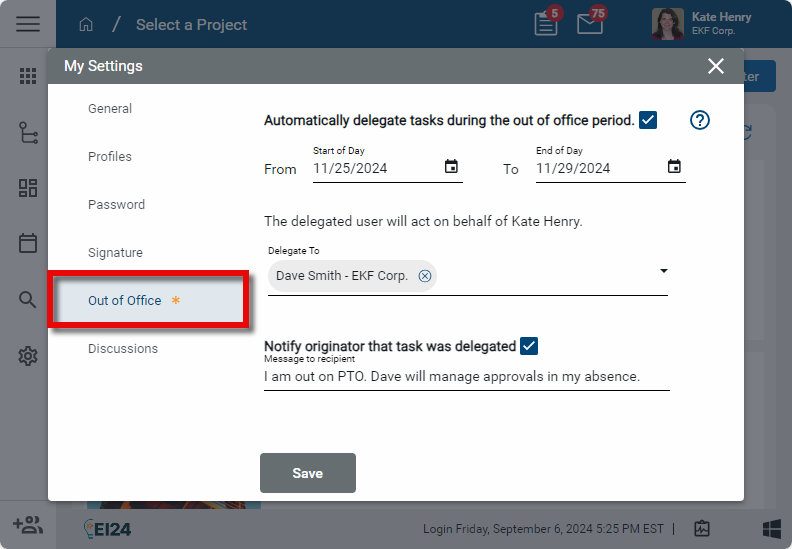
Select the Out of Office tab.
-
Select the Automatically delegate tasks during the out of office period check box.
-
Enter the From and To dates for the Out of Office period.
-
Select the user who will act on your behalf. This user must be a member of your primary domain. If the delegated task is from another domain and the user the task is delegated to does not have a contact record on that domain, the delegated user will be added as a contact in that domain.
-
Select Notify originator that task was delegated to have a message sent to the originator of the task letting them know that the task was delegated and enter text to be included in that message.
Important Approval tasks will not be delegated unless the Enable Approval Task Delegation option is enabled in the Domain Settings app. For more information, refer to Enable approval task delegation.
On this tab you can manage your Discussions notification settings. This tab only appears if your domain administrator has enabled the Discussions feature. For more information, refer to Discussions.
To modify your discussion notification settings, complete the following steps:
-
Click the person icon in the upper right corner of your screen (or your image if you’ve set a picture for your user account) and select My Settings from the drop-down menu.
-
Select the Discussions tab.
-
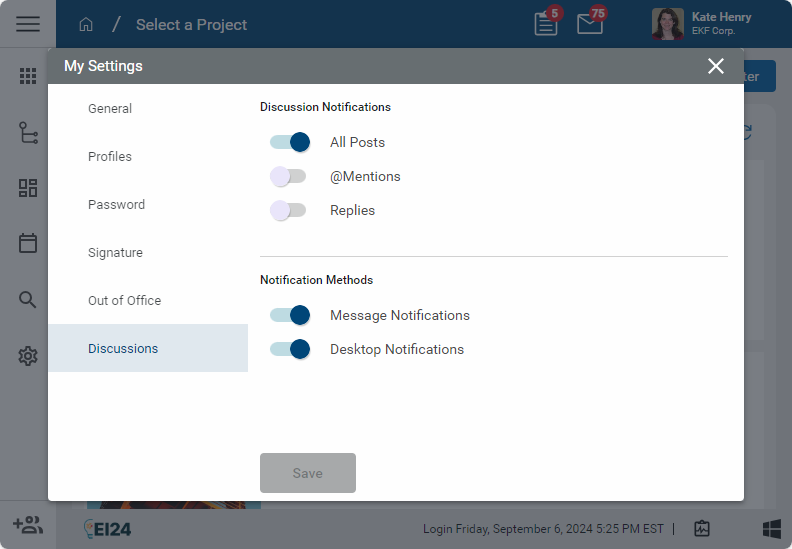
To manage which actions trigger notifications to you, enable or disable the following options under Discussion Notifications:
-
All Posts - Select this option to be notified when any post is added to a discussion that you are a participant in. Selecting this option disables the @Mentions and Replies options, as those posts are included in the All Posts notifications.
Note You are a participant of a discussion if you are the author of the discussion, you were directly added by the author, you have participated in the discussion, or you were previously mentioned in the discussion.
-
@Mentions - Select this option to be notified anytime you are mentioned in a post using the @mention feature (i.e., another user enters @yourname in a post or reply). This option is disabled if All Posts is selected, as that option includes these posts.
-
Replies - Select this option to be notified anytime someone directly replies to a post of yours by selecting the Reply icon
 . This option is disabled if All Posts is selected, as that option includes these posts.
-
-
To manage the way you receive notifications, enable or disable the following Notification Methods:
-
Message Notifications - Select this option to receive discussion notifications in a Kahua message. If you have selected Send copy of received messages to my email. on the General tab, you will also receive an email message. Refer to Send copy of received messages to my email.
-
Desktop Notifications - Select this option to receive discussion notifications as a desktop notification.
-
-
Click Save when you are done.
Important Note that you must enable at least one Discussion Notification option and one Notification Method to receive a discussion notification. You can select more than one option.