Master Service Agreements (MSA)
Applicable Packages This article applies to the Kahua for K-12 Education, Kahua for Owners, Kahua for General Contractors, and Kahua for Subcontractors packages. If you are not sure if this is relevant to you, please contact your domain administrator.
A Master Service Agreement (MSA) is a framework contract between a client and contractor that establishes long-term terms and conditions across multiple projects. Instead of negotiating separate agreements for every engagement, the MSA defines commercial, legal, and procedural rules that apply to future expense contracts.
MSAs are also known as master agreements, framework agreements, or blanket agreements. They support streamlined procurement, centralized risk management, and improved cost control across projects.
In Kahua, the Master Service Agreements application is part of the Cost Management > Expense applications. It allows owners, general contractors, and subcontractors to manage framework agreements and enforce spending limits.
Note If you are interested in this app and it is not available in your domain, reach out to Support or your account representative for more information.
Important things to know about this app include the following:
-
The Master Service Agreement app follows Kahua's inheritance model. The MSA must be created at a level in the hierarchy that is accessible to all the projects where you want to apply it.
-
The link between a contract and a Master Service Agreement is established in the contract. You must enable the use of Master Service Agreements in Contracts Configuration.
-
As needed, you can configure a maximum total value for all contracts linked to an MSA and a maximum value per individual contract.
-
Contracts must be in the same currency as the MSA to be linked to an MSA. The MSA and contract projects must be configured to use the domain currency as the project base currency.
-
You can configure the app to use a review and signature approval process for MSAs. Refer to Act on the MSA.
-
You can review linked contracts on the Linked Contracts tab.
-
The Summary section of the MSA calculates the available funds in the MSA and current and potential impacts from the linked contracts and contract change orders.
-
To have the MSA app not appear in select partitions or project in your domain, an administrator can disable it at the appropriate locations in the hierarchy. Refer to General.
How to . . .
To be able to apply MSAs to contracts, an administrator must enable the Use Master Service Agreements setting in Configuration > Applications > Contracts > Settings tab.
For more information on enabling this setting, refer to Expense Contracts.
To create a new Master Service Agreement (MSA), complete the following steps:
-
Review the header to ensure that you are in the correct project or partition.
Important MSAs follow the Kahua inheritance model. Contracts in the current project and in child projects of the current project can be associated with the MSA. It is important to place the MSA in a project that is accessible for all the contracts you want to associate with this MSA.
To have the MSA available to all projects in your domain, it must be placed in the root domain. -
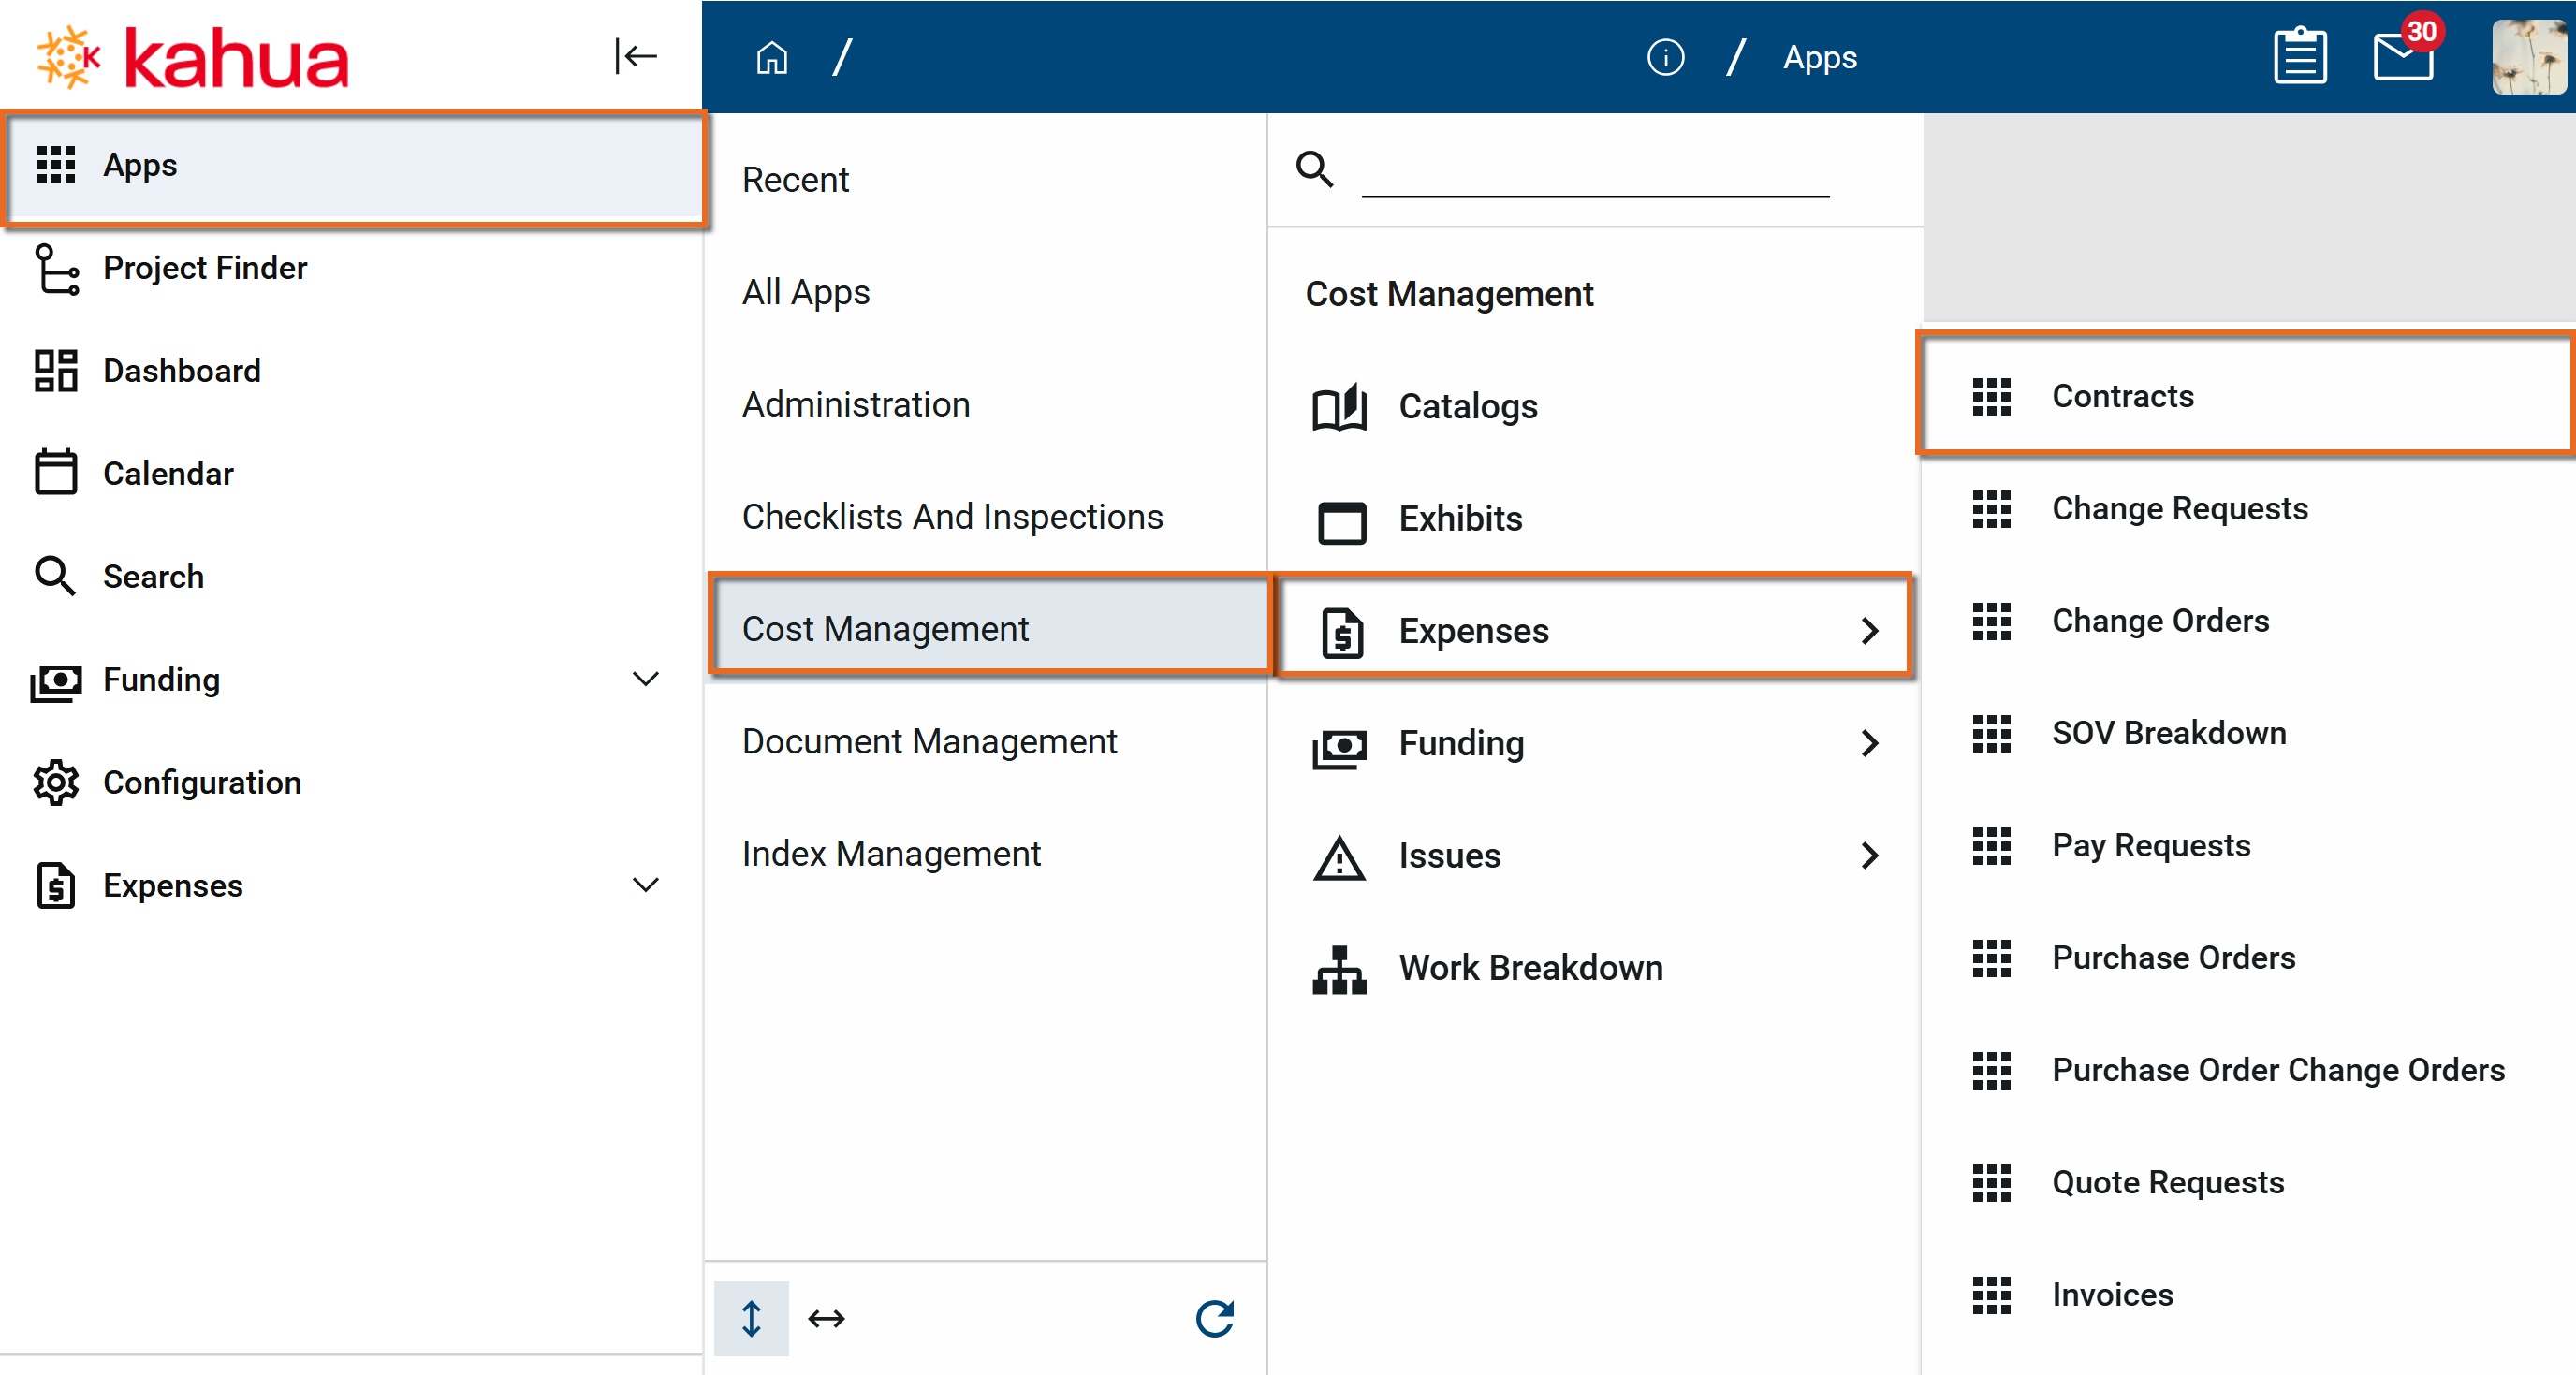
Navigate to the Master Service Agreements application (Apps > Cost Management > Expenses > Master Service Agreements).
-
Click New in the action bar.
-
Complete the following fields as appropriate:
Note Depending on how this app is configured for your domain, there may be fields or sections listed here that do not appear for you, fields and sections that appear for you which are not listed here, or fields and sections which appear in a different order. If you have any questions, check with your domain administrator.
Field Description Details Number Allow Kahua to auto-number the record, or enter a different value.
Note The number format can be configured by your domain administrator. Refer to Number.
Date Enter the date of the agreement. Title Enter a title for the MSA. Description Enter a brief description of the MSA. Contract Vehicle If appropriate, select an appropriate Contract Vehicle. Type If appropriate, select an appropriate contract type. Parties Client Contact / Client Company / Client Office
Select the appropriate contact details for the organization issuing the contract. Contractor Contact / Contractor Company / Contractor Office
Select the appropriate contact details for the company receiving the contract. Signer Contact Select the contact at the contractor who will be signing the agreement. Validations Prevent New Linked Contracts Select this option to prevent new contracts from being linked to the MSA.
This option is selected by default when the MSA is initially created, to prevent contracts from being added to the MSA while it is being drafted.
Once the MSA is approved through workflow or manually set to an approved status, this setting is automatically cleared.
Contracts already linked to the MSA are not affected if this rule is enabled after they have been linked.
Enforce MSA Current Amount Limit for Included Linked Contracts Select this option to ensure that the total value of linked contracts in specified statuses do not exceed the MSA value.
The calculated values for the MSA and linked contracts are visible on the MSA under the Summary section.
Enforce Maximum Contract Amount Limit Select this option to enforce a maximum contract amount for each individual contract associated with this MSA.
Enter the per contract maximum value in the Maximum Contract Amount Limit field.
Maximum Contract Amount Limit If the Enforce Maximum Contract Amount Limit option is selected above, enter the Maximum Contract Amount Limit allowed for an individual contract here.
Summary Currency Select the appropriate currency for the MSA.
Important Contracts from projects which use different exchange rates or base currency will not calculate correctly in the MSA Summary.
Original Approved Amount Enter the amount of the MSA.
This represents the expected or maximum value of the agreement. It does not appear as an expense commitment.
Note If Enforce MSA Current Amount Limit for Included Linked Contracts is selected, the value of pending and approved contracts and change orders cannot exceed the sum value of this Original Approved Amount and approved Changes.
Changes If there are adjustments to the MSA amount, those values are recorded here. Only values with a status of "Approved" are included in the Current calculations.
Click Insert to add a selected number of lines to the grid. For more information on working with grids, refer to Item Grids.
Date Enter the change date. Description Enter a description of the change. Status Enter the status of the change. This value is updated manually. There is no workflow to manage this value. Amount Enter the amount of the change. End Date If appropriate, enter an End Date for the change. This is for record-keeping only. There is no workflow associated with this value. Dates and Workflow The current Workflow Status appears in this section.
If you are using workflow to manage the approval of the MSA, some date values will automatically be updated. Remaining dates can be manually entered.
Start Date / End Date The values are entered manually. There is no workflow associated with these date fields. Comments Enter any comments as appropriate. Comments are recorded with the author name, and date and time the comment was saved. Comments from other users appear here. Exhibits Select Upload to upload exhibit documents from your computer, or Add to add exhibit documents from the Exhibits app. For more information, refer to Exhibits. References Upload or select any relevant files or documents. You can use drag and drop to add a file to this section. For more information on using this section, refer to References section.
-
Click Save when you are done.
When the MSA is saved, depending on your configuration and the current status of the MSA, the following options may appear on the action bar:

| Option | Description |
|---|---|
| Set to Approved |
Select this option to manually set the MSA status to approved. This action clears the Prevent New Linked Contracts setting, allowing you to link contracts to this MSA. |
| Submit for Review |
Select this option to submit this MSA for review. To appear as an option, the Use Review Workflow setting must be enabled on the Settings tab in configuration and the approval must be configured in Configuration > Approvals. Refer to Approval configuration. |
| Submit for Signature |
Select this option to submit this MSA for signature. To appear as an option, the Use Signature Workflow setting must be enabled on the Settings tab in configuration and the approval must be configured in Configuration > Approvals. Refer to Approval configuration. |
| Set to Closed |
Select this option to set the MSA status to closed. This action enables the Prevent New Linked Contracts setting, preventing contracts from being newly linked to this MSA. Contracts already linked to the MSA are not affected by this action. |
| Reset to Draft | Select this option to return the MSA to a draft status. This allows you to select one of the original options again. |
| Resubmit for Signature |
This repeats the signature process. To appear as an option, the Use Signature Workflow setting must be enabled on the Settings tab in configuration and an approval document must be set up in Configuration > Approvals. Refer to Create an approval document. |
Note Differences in exchange rates between projects will cause calculation discrepancies on the MSA summary fields and linked contracts log.
The Summary section includes the fields and calculated values as described below:
| Field | Description |
|---|---|
| Master Services Agreement | |
| Currency | This is the currency selected for the MSA. |
| Original Approved Amount | This is the value entered in the Original Approved Amount field. |
| Total Approved Changes | This is the sum of the Amounts listed in the Changes section that have a status of "Approved". |
| Current Approved Amount | This is the sum of the Original Approved Amount and Total Approved Changes. |
| Contracts | |
| Included Contracts Amount | This is the sum of the linked expense contracts that have a status of "Pending" or "Approved". |
| Included Contract Changes | This is the sum of the change orders with a status of "Pending" or "Approved" from the linked expense contracts. |
| Current Included Contracts Amount | This is the sum of Included Contracts Amount and Included Contract Changes. |
| Potential Contracts and Change Orders Amount | This is the sum of linked contracts in a draft or potential status, and any change orders in draft or potential status from linked expense contracts. |
| Total Current and Potential Amount | This is the sum of the Current Included Contracts Amount and the Potential Contracts and Change Orders Amount. |
| Available Amounts | |
| Current Available Amount |
This is the Current Approved Amount minus the Current Included Contracts Amount. This value represents the amount remaining on the MSA when all the contracts and change orders with a "Pending" or "Approved" status are included in the calculation. Note If the Enforce MSA Current Amount Limit for Included Linked Contracts rule is enabled, this value cannot be less than zero. |
| Potential Available Amount |
This is the Current Approved Amount minus the Total Current and Potential Amount. This represents a short-term forecast of the amount remaining on the MSA, considering the value of linked contracts and change order in draft and potential status. Note This value can fall below zero even if the validation rules are enabled. A value less than zero indicates that the MSA Amount will be exceeded if all linked contracts and changes are approved. |
The link between an expense contract and an MSA is set up in the contract. To link an expense contract to the MSA, the following conditions must be true:
-
The contract must be in a project in the hierarchy that is at or below the project containing the MSA.
-
The contract must be in a project that is configured to use MSAs. This is done on Apps > Administration > Configuration > Applications > Contracts > Settings tab. Refer to Expense Contracts.
To associate an existing contract with an MSA, edit the contract and select the appropriate MSA in the Master Services Agreement field.
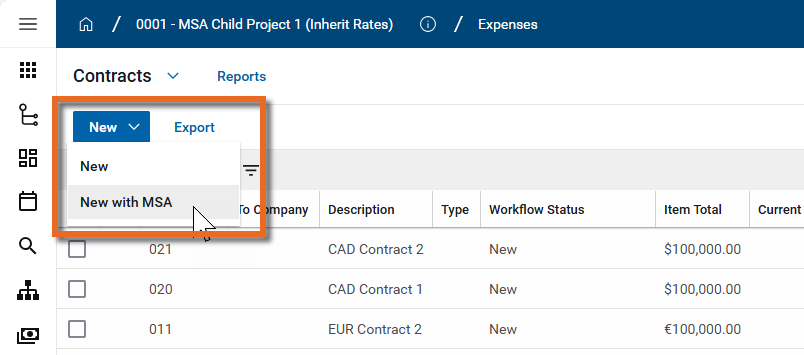
To create a new contract and associate it with an MSA, you can select New and add the MSA in the Master Services Agreement field. To create a new contract using a filter for the MSA selection process, complete the following steps:
- Review the header to ensure that you are in the correct project or partition.
-
Navigate to the Expense app (Apps > Cost Management > Expenses Contracts).
-
Click New > New with MSA in the action bar.
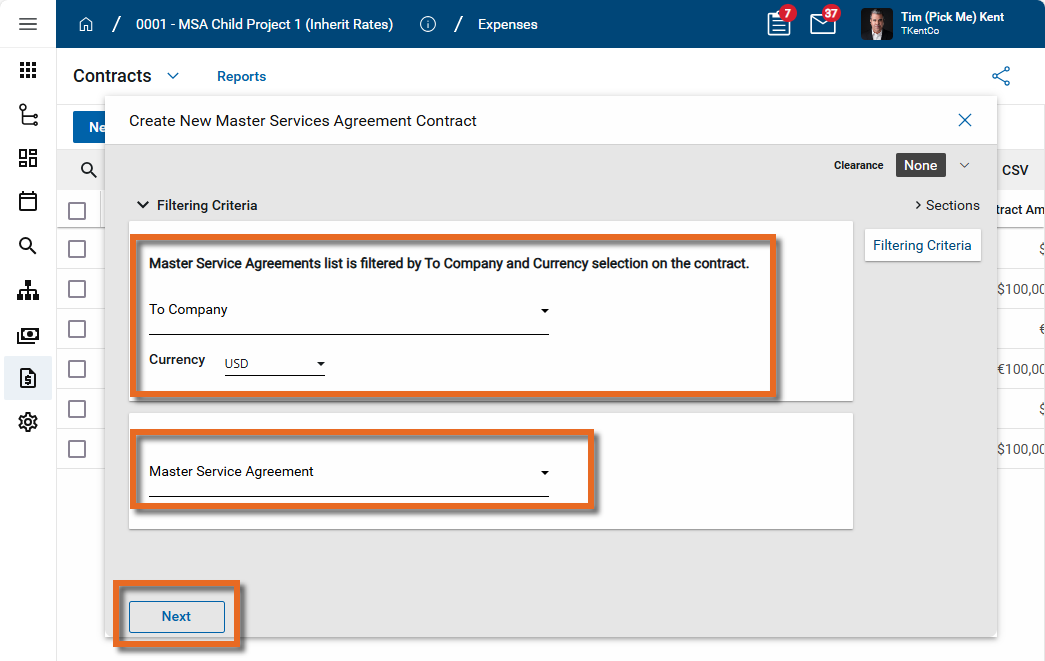
-
The Master Services Agreement page appears. You can filter the MSA list by selecting a To Company or Currency. In the Master Service Agreement field, select an MSA.
Note The Prevent New Linked Contracts setting must be cleared on the MSA for the MSA to be available for selection. This happens automatically when the MSA is approved. The setting can be modified manually.
-
Click Next.
-
The new contract appears with the Master Service Agreement. Complete the remaining fields. For general information on setting up a contract, refer to Expense Contracts.
Linked contracts appear on the Linked Contracts tab of the MSA.
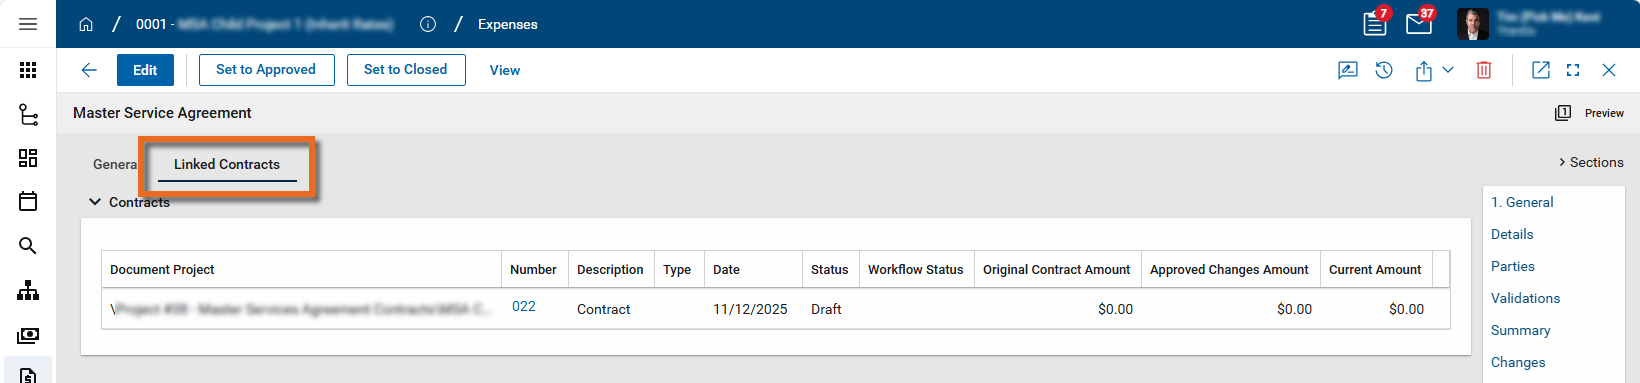
Click on Linked Contracts to view all the contracts associated with this MSA. To open the contract, click on the contract number in the Number column.
Note Differences in exchange rates between projects will cause calculation discrepancies on the MSA summary fields and linked contracts log.
Your project may be configured to require an approval document as part of the approval workflow for creating an MSA. An approval document is created in the References section of the MSA record. To create an approval document, select Add Approval Doc, name the document and select the appropriate supporting files. These files are then combined into a single PDF that can become part of the approval workflow.
For more detailed information on creating an approval document, refer to Create an approval document.
Note For information on setting up approvals, refer to Approval configuration.
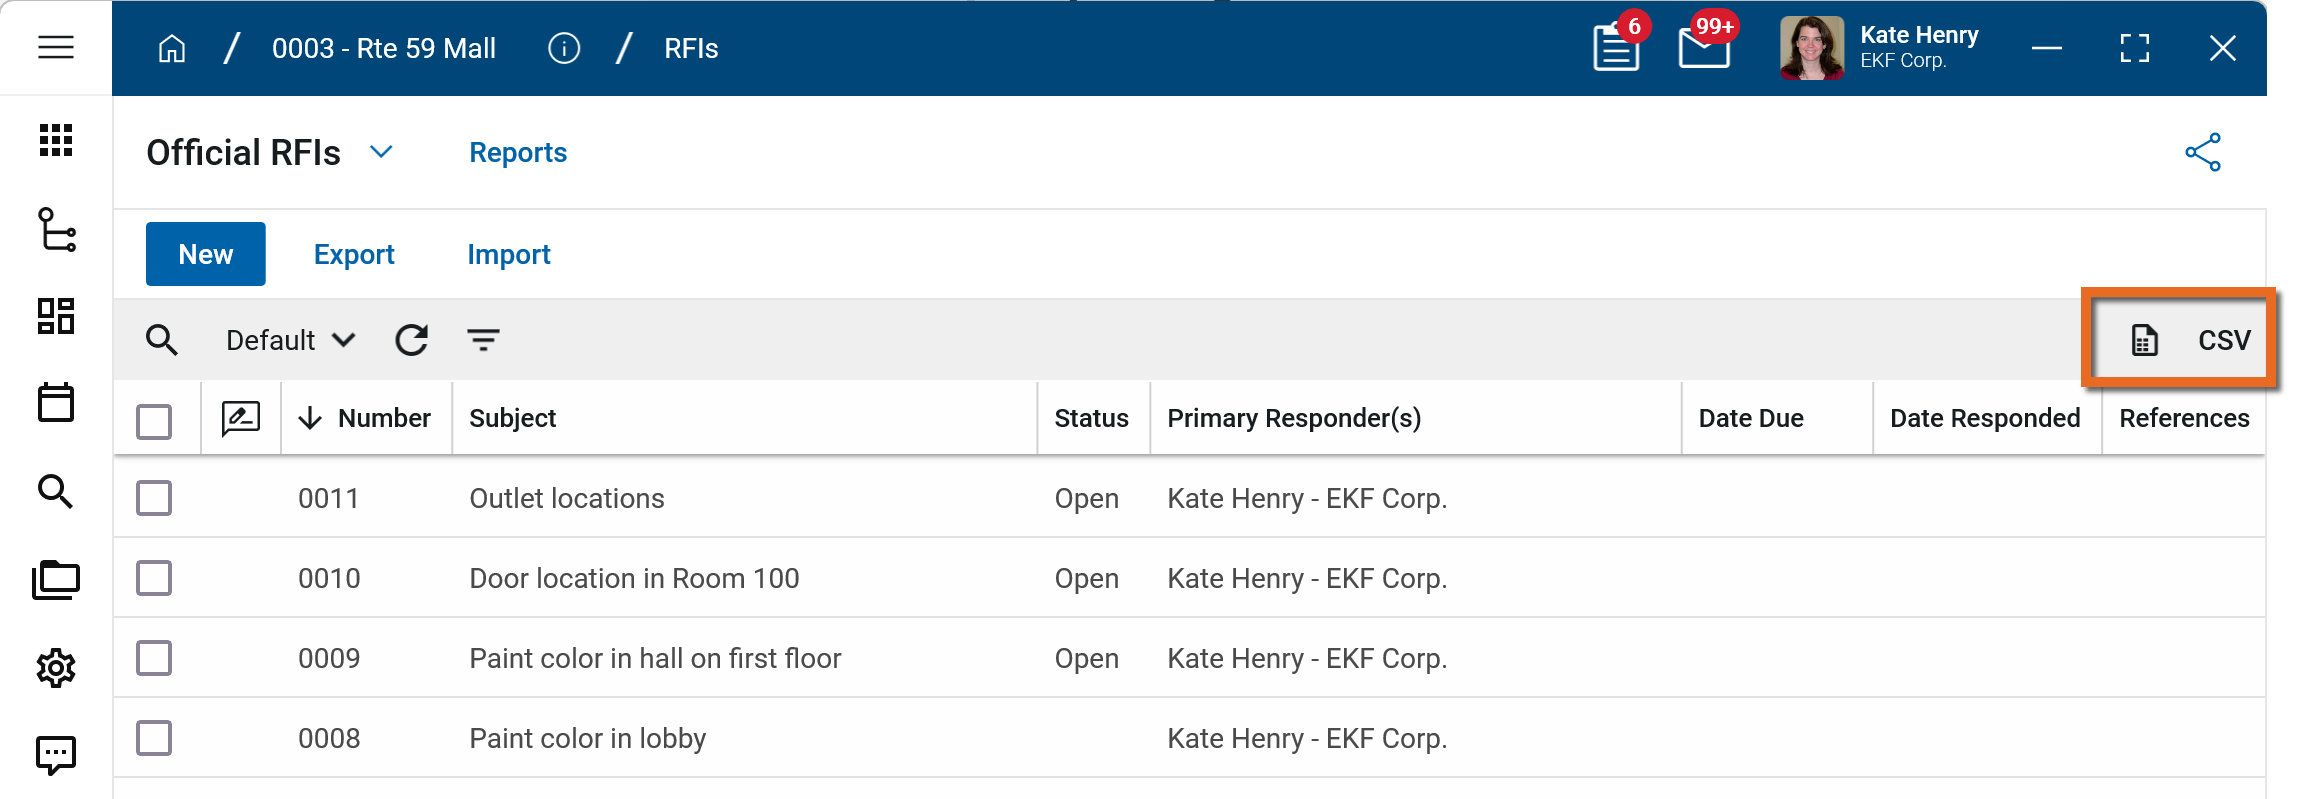
To generate a report from a log view with up to 10,000 records, select the report icon ![]() . If your log view contains more than 10,000 records, the report icon will be disabled and you can select to download the records to a CSV file instead. For more information, refer to Generate a report from a log view.
. If your log view contains more than 10,000 records, the report icon will be disabled and you can select to download the records to a CSV file instead. For more information, refer to Generate a report from a log view.
Your domain administrator or another user with the appropriate permissions can configure the app in the Configuration application.
Important When working in the Configuration app, it is important to review the header and ensure that you are working at the correct level in the hierarchy, either the root domain or at a partition or project level.
Settings that you establish at the root domain or lower levels will inherit down the hierarchy until they are overridden. For more information on the hierarchical structure of Kahua, refer to Understanding the hierarchical structure of Kahua.
The Configuration app can be accessed directly through the apps list (Apps > Administration > Configuration), or by right-clicking on an application in the launch bar and selecting Configure. When you select Configure for an app from the launch bar, the detail view of the configuration page for that application opens automatically.
For general information about the Configuration app, including how to set up an approval workflow, refer to Configuration app.
For general information on configuring this app in Configuration, refer to Application configuration.
The following items are specific to this application:
| Options | Description |
|---|---|
| Settings tab | |
| Use Review Workflow |
Select this option to make the Review workflow available. Note You must also configure the Review approval in Configuration > Approvals. Refer to Approval configuration. |
| Use Signature Workflow |
Select this option to make the Signature workflow available. Note You must also configure the Signature approval in Configuration > Approvals. Refer to Approval configuration. |