Meetings
Notice Kahua is a very flexible and customizable platform. In your domain, this application may have been modified to meet your company's needs. The online help uses default field labels for field names and describes standard workflows. Please check with your domain administrator for specific information about working in your organization's domain.
Construction project meetings are meetings that occur between project stakeholders to discuss the project progress, resolve issues, and assign responsibility for required actions or next steps.
The Meetings app allows you to establish agendas and record meeting minutes for project meetings for both one-time meetings and recurring meetings. Additionally, you can create action items from meeting items and add them as tasks for contacts who are Kahua users.
Key elements of the Meetings app are as follows:
-
You can create a single meeting or series of meetings.
-
You can update or extend a series of meetings any time after they are initially created.
-
You can create and distribute a meeting agenda ahead of the meeting.
-
You can create a sign-up sheet for expected attendees and additional attendees.
-
You can create and distribute meeting minutes to attendees and additional contacts.
-
You can create and assign action items. Action items can be assigned as tasks in Kahua.
-
You can copy items from a previous meeting into an existing meeting, including unresolved items from the previous meeting.
How to . . .
You can set up an outline for a meeting and use that outline to create a meeting agenda. This can be done for one-time meetings and recurring meetings. The agenda can be sent to anticipated attendees ahead of a scheduled meeting.
Note For information on copying information from an existing meeting to the next meeting in a series, refer to Copy Items from a previous meeting.
To set up a new meeting with an agenda, complete the following steps:
-
Review the header to ensure that you are in the correct project or partition.
-
Navigate to the Meetings application (Apps > Document Management > Meetings).
-
Click New in the action bar.
-
Complete the following fields as necessary in the Details tab:
Field Description Details Subject Enter the name of the meeting Type Select the type of meeting.
Note This list can be updated by your domain administrator in the Configuration app > Meetings > Lookups. Refer to Lookups.
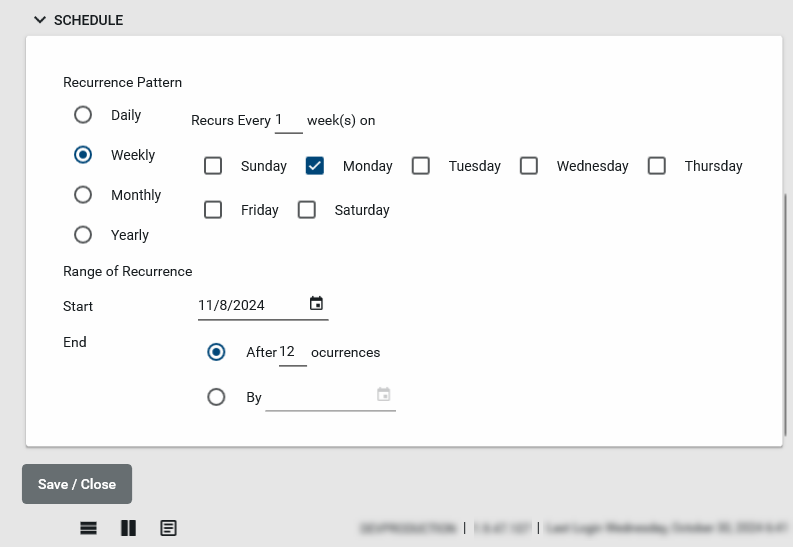
Status Select the status of this meeting. Location Enter the meeting location. Start Time / End Time Enter the scheduled start and end time. Prepared By Select the contact who has prepared the meeting notes. Distribution / CC Select non-attendees who should receive copies of the meeting minutes. For information on sending the meeting minutes as a Kahua message, refer to Send the Meeting Agenda, Sign-In Sheet, or Meeting Minutes as a Kahua message. Meeting Notes Enter general meeting notes, such as a description of the purpose of the meeting or meeting series. Schedule Recurrence Pattern Select the recurrence pattern for the meeting from the list of options, from no recurrence to daily, weekly, monthly, or yearly. When you select the frequency, the appropriate selections for recurrence interval appear.
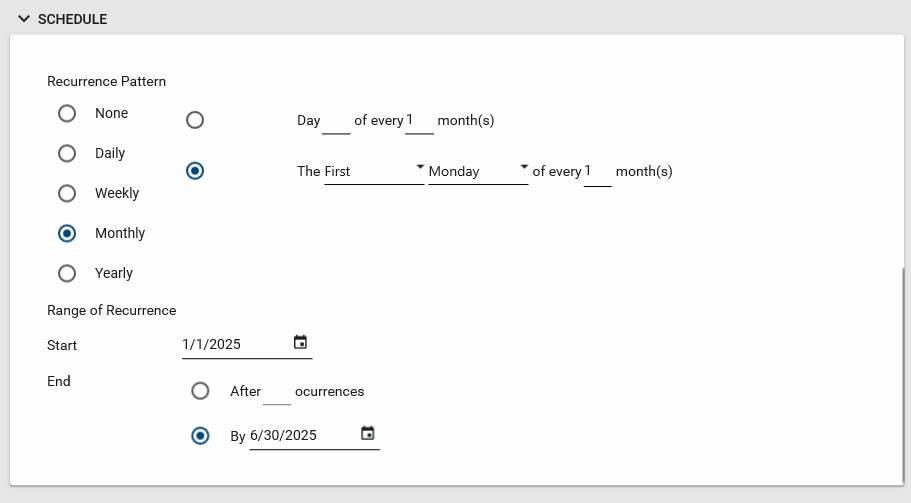
Range of Recurrence When you select a recurrence pattern, the Range of Recurrence section appears. Select a Start date. Select an ending after a number of occurrences or by a specific date. References Upload or select any relevant files or documents. You can use drag and drop to add a file to this section. For more information on using this section, refer to References section.
-
Click Save to save the meeting. If the meeting was set up as a recurring meeting, all the meetings in the series will be created once you save.
You can add anticipated attendees to a scheduled meeting, or a list of actual attendees to a meeting that has occurred. You can send the agenda to the meeting attendees ahead of time, and the meeting minutes to the attendees once they are recorded.
Note You can print a Meeting Sign-in Sheet that includes anticipated attendees from the attendee list. Refer to Print Meeting Agenda, Sign-In Sheet, or Meeting Minutes.
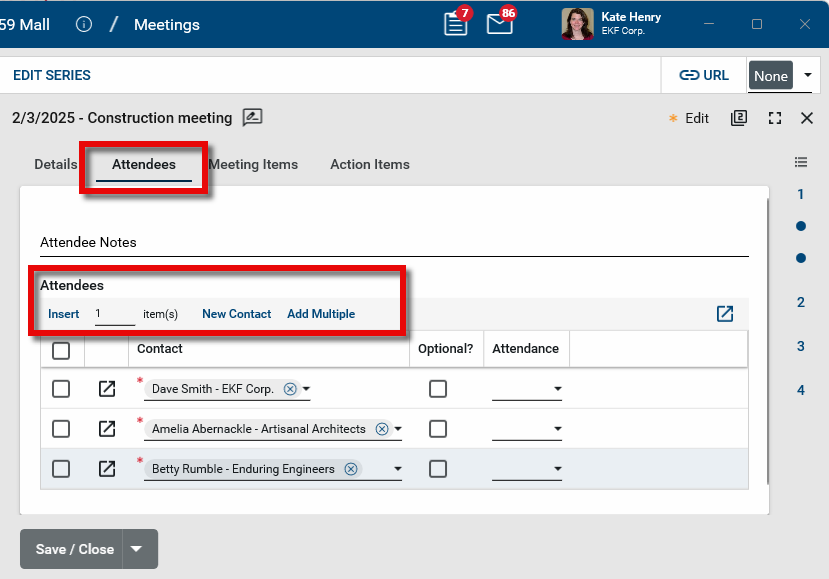
To add attendees to a meeting, complete the following steps:
-
Open the meeting record that you want to edit.
-
Select Edit from the action bar.
-
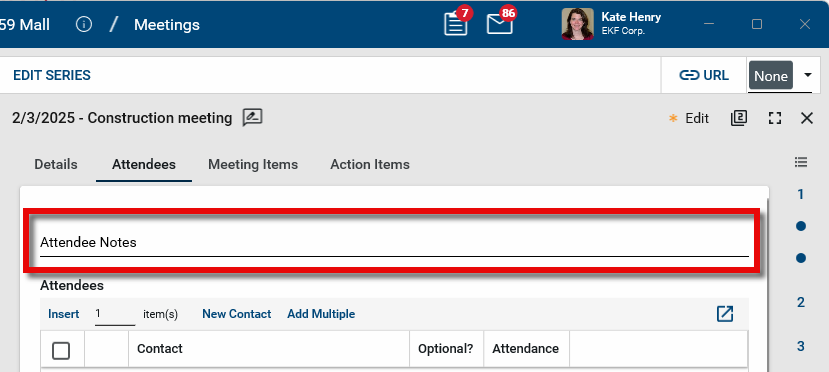
Select the Attendees tab.
-
To add multiple contacts at one time, select Add Multiple.
-
To enter a single contact, click Insert to add a new line. Click the Contact field and select an existing contact from the Contacts application. To limit the list to contacts in the project directory, if available select Only Show Project Directory People. For more information, refer to Project Directory.
-
To add a new contact to the Contacts app and select them as an attendee, select New Contact. For more information on the process of adding contacts, refer to Add a contact.
-
-
Select Optional for attendees who are optional to attend.
-
In the Attendance column, record individual attendance.
-
If there are attendees who are not contacts in your Kahua domain and you do not wish to add them as contacts, you can add their information in the Attendee Notes field.
-
Click Save when you are done.
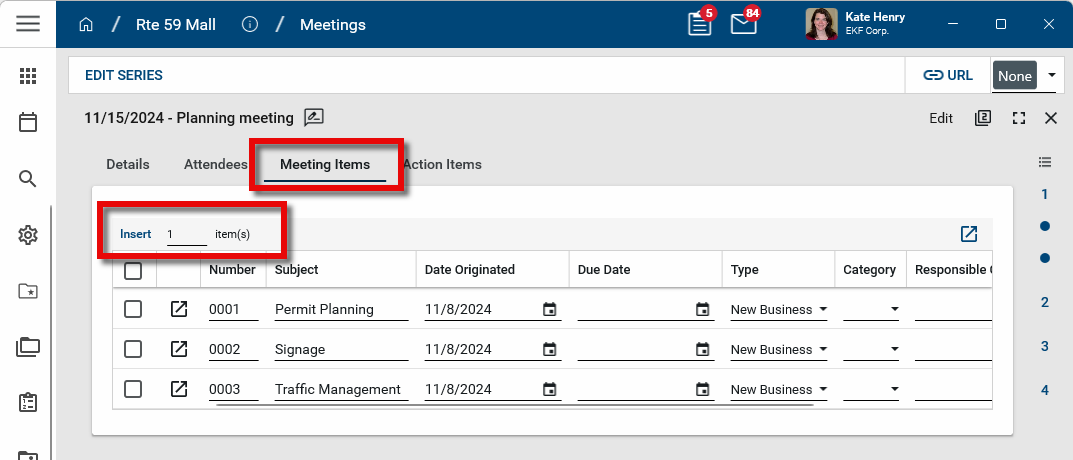
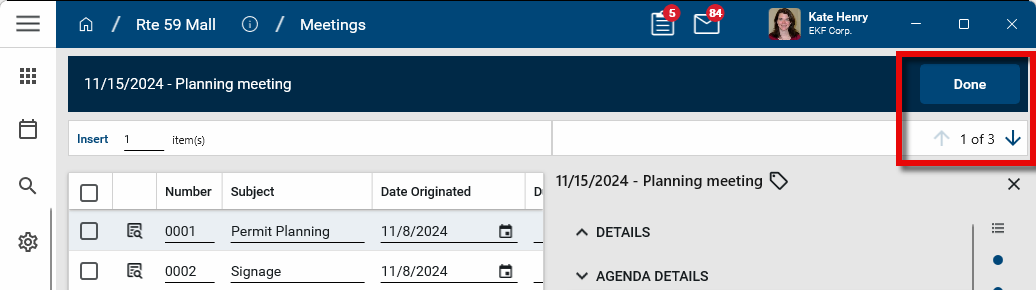
The Meeting Items are the topics discussed during the meeting. You can enter items ahead of time to create an agenda for the meeting, and then add details during or after the meeting to capture the meeting minutes.

Note When adding the minutes for an existing meeting in a series, use the Copy from Previous function to roll over basic information that typically remains consistent from one meeting to the next, such as the attendee list, and copy over unresolved meeting items that require continued discussion in the next meeting. Refer to Copy Items from a previous meeting.
To enter meeting items to a meeting, complete the following steps:
-
Open the meeting record that you want to edit.
-
Select Edit from the action bar.
-
Select the Meeting Items tab.
-
Enter a number and click Insert to add that number of lines to the meeting items grid.
-
Complete the following fields as appropriate:
Field Description Number By default, this number will be created automatically. You can modify it if desired. The configuration of this value is managed by your domain administrator in the app configuration. Refer to Number. Subject Enter the meeting item subject. Date Originated This defaults to today's date, but it can be modified.
Due Date If there's a due date for this discussion item, enter it here. Type Select "New Business" or "Old Business". When a "New Business" item is copied over to the next meeting using the Copy From Previous function, this changes automatically to "Old Business". Refer to Copy Items from a previous meeting. Category Select a category from the list.
Note This list can be updated by your domain administrator in the Configuration app > Meetings > Lookups. Refer to Lookups.
Responsible Companies Use the drop-down to select one or more responsible companies for this item. Responsible Contact Use the drop-down to select one or more responsible contacts for this item. -
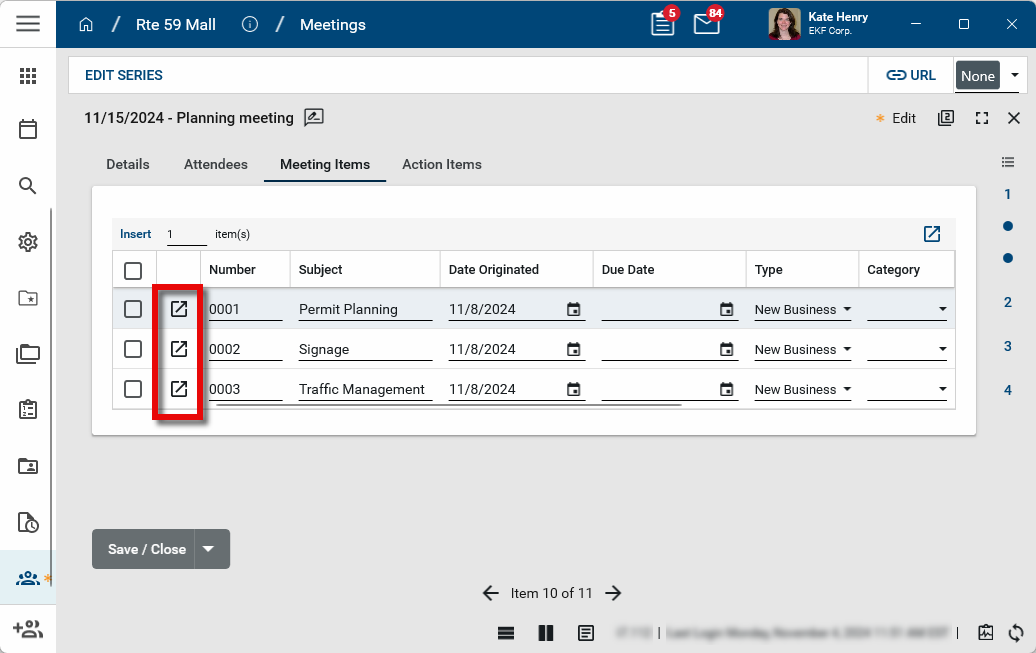
To add agenda details, minute details, or action items for an item, select the Expand icon
 .
.
-
The items grid detail page appears. For more information on navigating this page, refer to Item Grids.
Important The record must be in Edit mode to enable editing of the meeting item details in the items grid detail page!
-
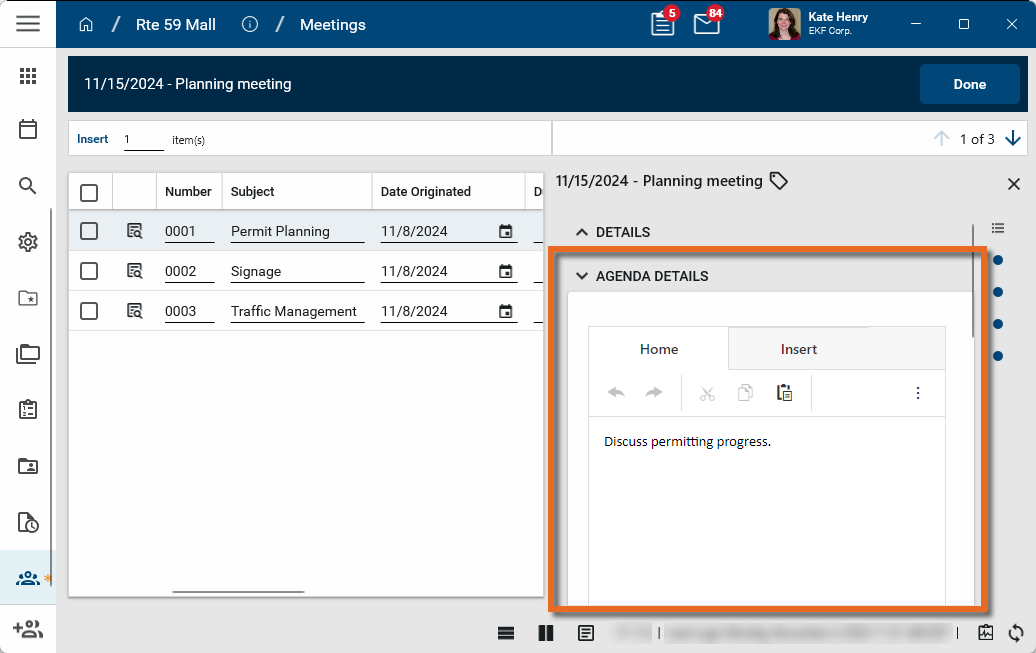
If the detail panel for the meeting item does not automatically appear, click on the View Details icon
 .
.
-
To prepare the agenda, enter any additional information to the Agenda Details field as appropriate. This information will appear on the Meeting Agenda report. Refer to Print Meeting Agenda, Sign-In Sheet, or Meeting Minutes.
-
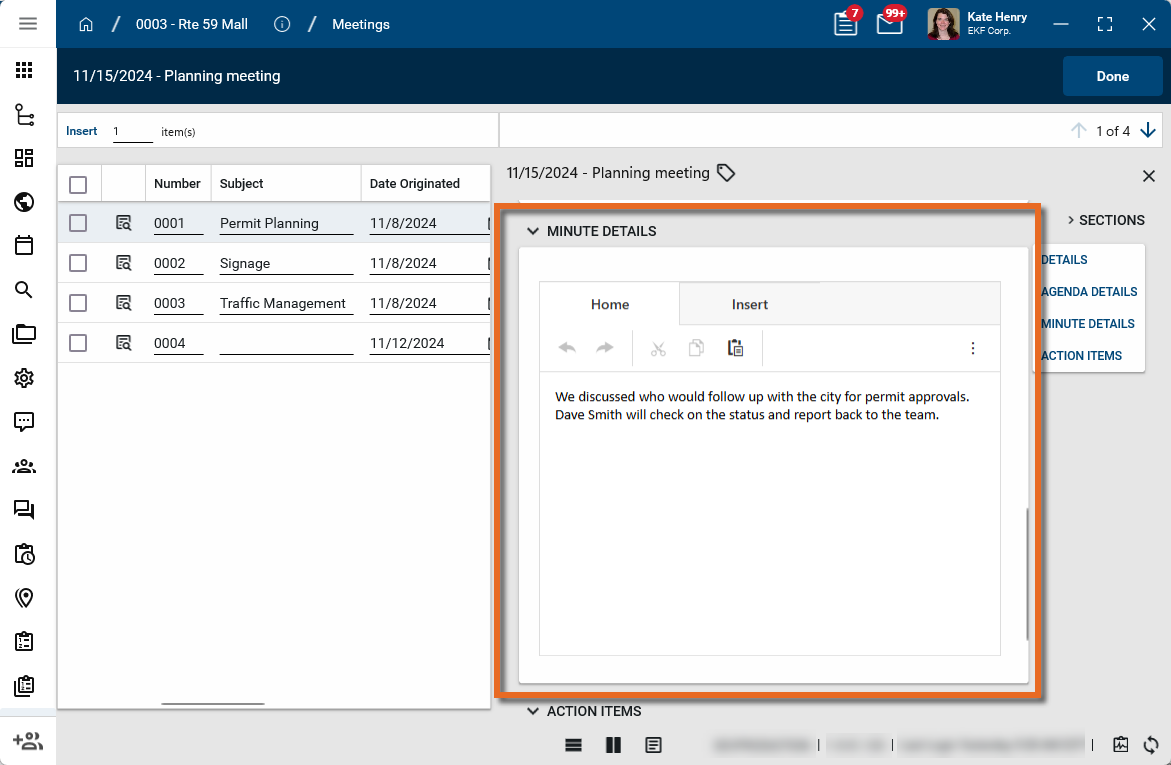
To record the meeting minutes, enter the notes into the Minute Details field as appropriate. This information will appear on the Meeting Minutes report. Refer to Print Meeting Agenda, Sign-In Sheet, or Meeting Minutes.
-
When you have completed entering information for this meeting item, use the arrow icons to navigate to the next item on the list. When you are finished, click Done.
-
Click Save to save your changes.
Important You must save the meeting record to save your changes to the meeting items.
The Meeting Items are the topics discussed during the meeting. You can enter items ahead of time to create an agenda for the meeting, and then add details during or after the meeting to capture the meeting minutes.
Individual action items are added to meeting items. While they can be viewed from the Action Items tab, they must be entered on a meeting item detail page as described below.
To add an action item to a meeting item, complete the following steps:
-
Open the meeting record that you want to edit.
-
Select Edit from the action bar.
-
Select the Meeting Items tab.
-
Select the meeting item you want to add an action item to and click the Expand icon
.
-
The items grid detail page appears. For more information on navigating this page, refer to Item Grids.
Important The record must be in Edit mode to enable editing of the meeting item details in the items grid detail page!
-
If the detail panel for the meeting item does not automatically appear, click on the View Details icon
.
-
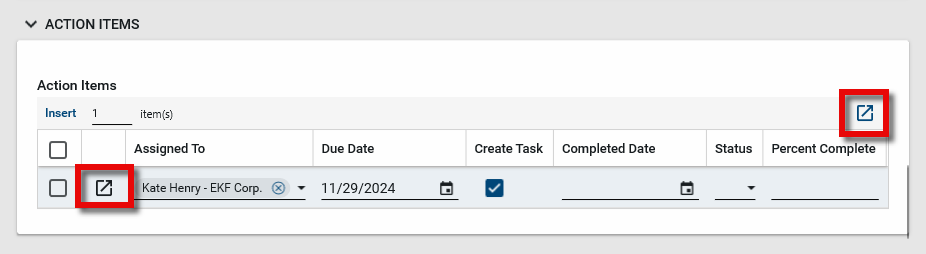
Scroll down to the Action Items section. Enter a number and click Insert to add that number of lines to the action items grid
 . Complete the fields as follows:
Field Description Assigned To Select a contact from the list. Due Date Enter a due date Create Task If the contact assigned to this action item is a Kahua user, select this check box to create a Kahua task for assigned user.
Note Once the item is saved and a task is created, the action item cannot be further modified unless it is recalled.
Completed Date If a Kahua task was created for this item, the date the task is completed will automatically be added here. Otherwise, this can be entered manually. Status Select a status. Percent Complete Enter the appropriate numeric value. -
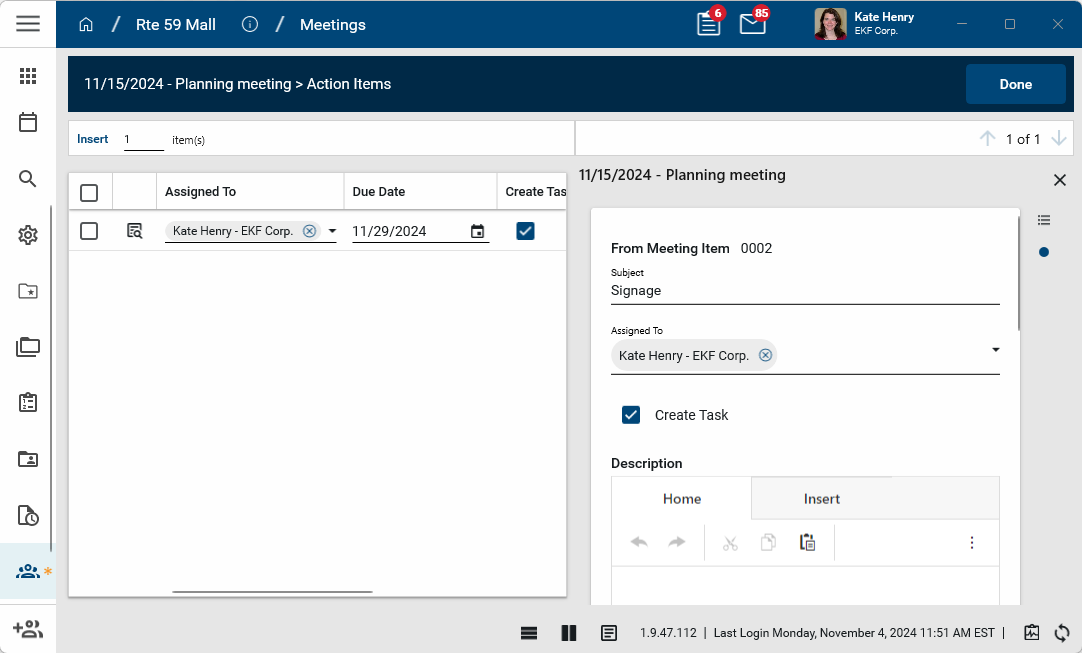
To enter additional notes for this action item, select the Expand icon
.
-
The item grid detail page appears. You can enter detailed notes and add reference documentation as needed. For more information on navigating this page, refer to Item Grids. For information on uploading references, refer to References section. When you are finished, click Done to return to the meeting item.
Note If the detail panel for the meeting item does not automatically appear, click on the View Details icon
. -
When you have completed entering information for this meeting item, use the arrow icons to navigate to the next item on the list. When you are finished, click Done.
-
Click Save to save your changes.
Important You must save the meeting record to save your changes to the meeting items.
As meeting minutes are created by updating the Minute Details field for individual meeting items, you can create one or more action items on meeting items. These action items can be assigned to Kahua contacts. When the assignee is a Kahua user, the action item can be added as a Kahua task by selecting the Task check box. For information on adding action items, refer to Add Agenda items or Meeting Items, including meeting minutes, to a meeting.
Note Action items cannot be added on the Action Items tab. They must be added to a meeting item.
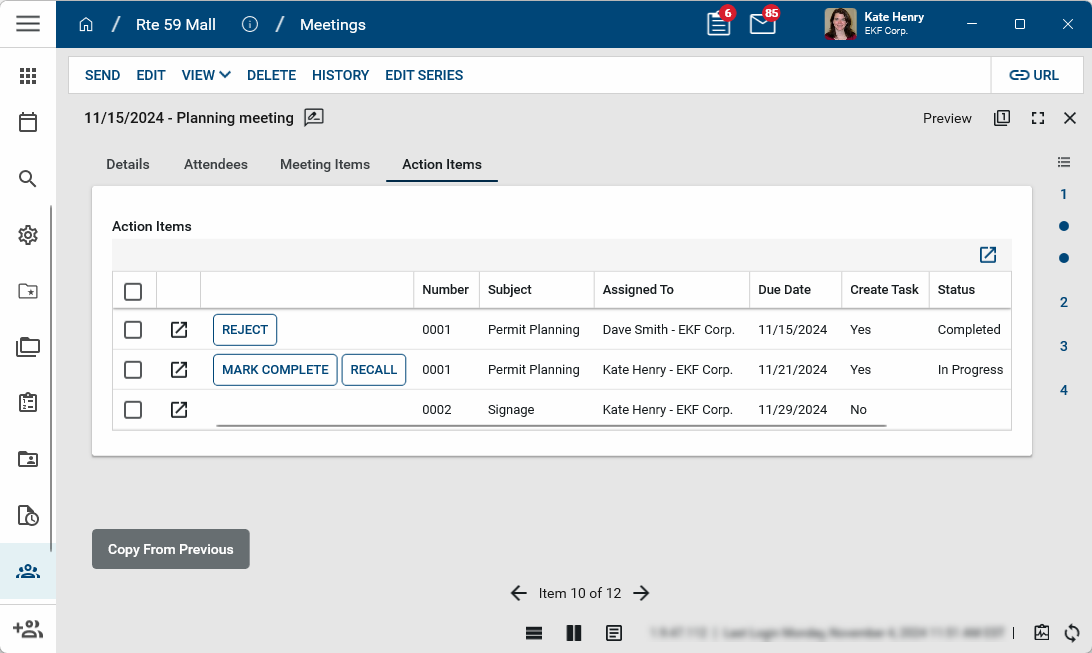
To set an action item as complete, one of the following steps can be taken:
-
The user to whom the task was assigned can mark it complete in the Tasks app. For more information, refer to Tasks App.
-
You can manually mark it as complete by selecting Mark Complete on the item on the Action Items tab for the meeting.
When an action item has been set as complete, you can select Reject to return the task to assignee if it is not actually completed.
To remove an action item as a task, select Recall.
To modify an existing action item that is not assigned as a task to a Kahua user, select Edit from the action bar. The meeting opens in Edit mode and any action items not currently assigned as a task can be modified. Click Save when you are done.
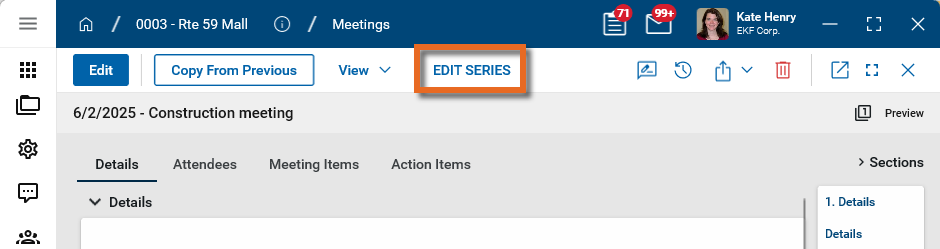
If you want to update the details, schedule, attendee list, or meeting items for future occurrences of a meeting series, you can do so by editing the series. Only future occurrences of the meeting will be impacted by the changes. Existing meetings will not be modified.
Important When you update a meeting series, Kahua deletes any existing future meeting occurrences and creates new ones based on your updated selections. To avoid impacting meetings which occurred in the past, you are required to enter a date equal to or after the current date in the Start date field in the Range of Recurrence section of the Details tab.
To edit or extend a meeting series, complete the following steps:
-
Open the meeting record where you want to update the recurrence information.
-
Select Edit Series from the action bar. The editable tabs of Details, Attendees, and Meeting Items appear.
-
On the Details tab, in the Range of Recurrence section, enter today's date or a later one in the Start date field.
-
Modify any additional information on the Details tab as desired. To extend the meeting series, in the Range of Recurrence section, modify the End date value or number of occurrences as appropriate. For more information, refer to Details.
-
On the Attendees tab, modify the Attendee Notes or Attendees list. Refer to Add attendees to a meeting.
-
On the Meeting Items tab, modify meeting items.
-
Click Save when you are done. All future meetings after the newly entered Start date are updated. If an individual future meeting's schedule had previously been changed (for example, moved to a different day due to a holiday), those changes will be discarded and the schedule will be updated to reflect the latest changes.
When a meeting is part of a series, you can copy items from a previous meeting into the next meeting. This allows you to roll over basic information that typically remains consistent from one meeting to the next, such as the attendee list, and copy over unresolved meeting items that require continued discussion in the next meeting. You can select what elements of the original meeting to copy into the next meeting.
To copy items from the previous meeting, complete the following steps:
-
Open the meeting record that you want to copy into.
-
Select Copy From Previous.
-
The Copy from previous page appears. Select the elements that you want to copy from the previous meeting.
Field Description Previous Meeting Select the meeting in the series that you want to copy the values from. Details Select this option to copy the values from the Details section of the Details tab. Note that References on the Details tab are not copied over. Attendees Select this option copy the Attendee list, including the Optional status. To include the Attendee Attendance values, select Copy Attendee Attendance below. Copy Attendee Attendance Select this option to include the Attendee Attendance values. The Attendees option must be selected to modify this field. Meeting Items Select this option to include the Meeting Items. Meeting Item Number
Select this option to include the Meeting Item Number values. The Meeting Items option must be selected to modify this field. Agenda Details to Select this option to copy the Agenda Details field. In the drop-down below, determine if the Agenda Details from the original meeting should be copied to the current meeting's Agenda Details field, Minute Details field, or both. Minute Details to Select this option to copy the Minute Details field. In the drop-down below, determine if the Minute Details from the original meeting should be copied to the current meeting's Agenda Details field, Minute Details field, or both. Update Type to Select this option to update the meeting item's Type field to "Old Business" or "New Business". Action Items Select this option to copy the Action Items from the original meeting. In the drop down menu below, determine if the Not Completed, Completed, or All items should be copied. -
Select Continue.
-
The items are copied into the meeting. Select the meeting from the log view and select Edit to modify it as necessary.
Once the agenda, attendee, or meeting minutes information is added to a meeting record, you can view and print the Meeting Agenda, Sign-In Sheet, or Meeting Minutes reports.
To print one of the reports, complete the following steps:
-
Open the appropriate meeting record.
-
Select View from the action bar.
-
Select one of the following reports:
-
Meeting Minutes
-
Meeting Agenda
-
Meeting Sign-In Sheet
-
-
The report view opens. To generate a PDF of the report, click on the Open PDF icon
 . The PDF file can then be printed.
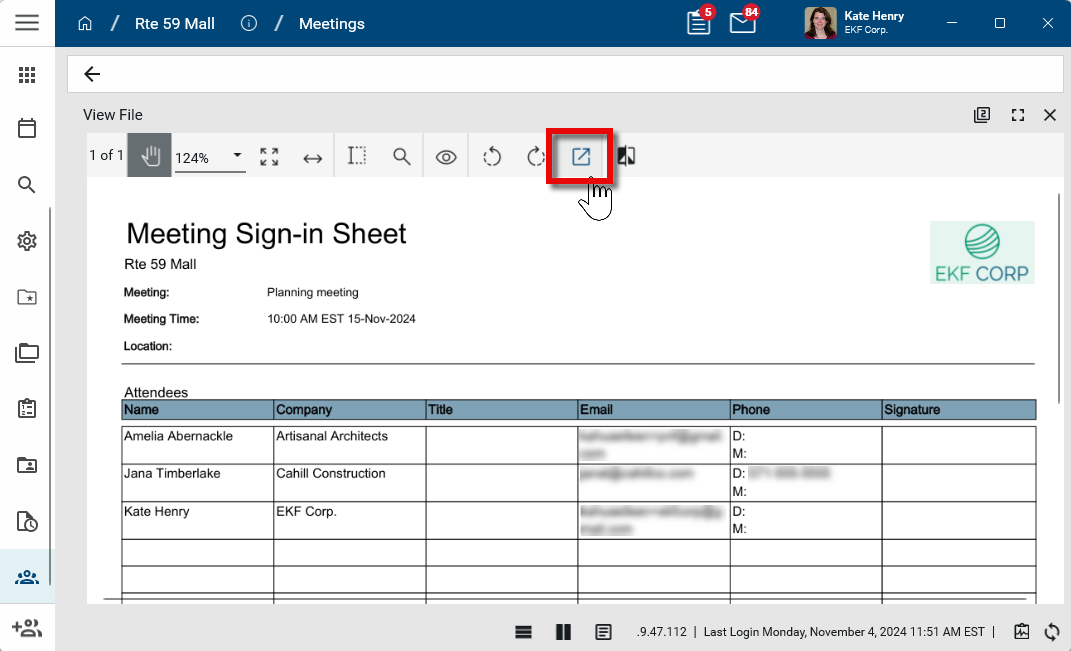
-
Click the Close icon
 when you are done. For more information on reports in Kahua, refer to Viewing Reports. For information on changing the logo used on reports, refer to Managing report logos.
Once the agenda, attendee, or meeting minutes information is added to a meeting record, you can send the agenda, sign-up sheet, or minutes to the users on the attendee list and distribution/cc list as a Kahua message.
To send the meeting as a Kahua message, complete the following steps:
-
Open the appropriate meeting record.
-
Select Send from the action bar.
-
Note that the contacts from the Attendee List are in the To section, and the contacts from the Distribution/CC field are in the CC section.
-
Modify the To/CC/BCC lists, Copy to Communications selection, and message Subject as appropriate. Non-Kahua contacts can be included by adding their email addresses to one of the To/CC/BCC fields.
-
Enter message text as needed.
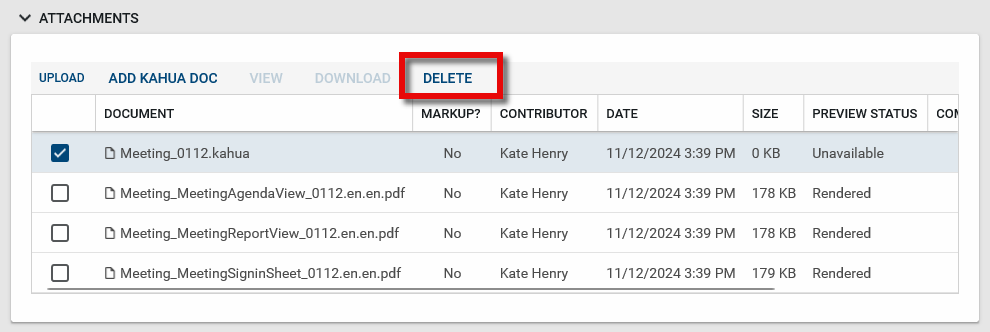
-
The message attachments appear below the message text. A PDF version of the Minutes, Agenda, and Sign-In sheet are generated added as attachments. To remove an attachment, select it and select Delete. Note that the ".kahua" file is a system file and can be removed.
-
Click Send to send the message. The meeting agenda, sign-in sheet, and minutes are attached. For more information on the Messages app, refer to Messages app.
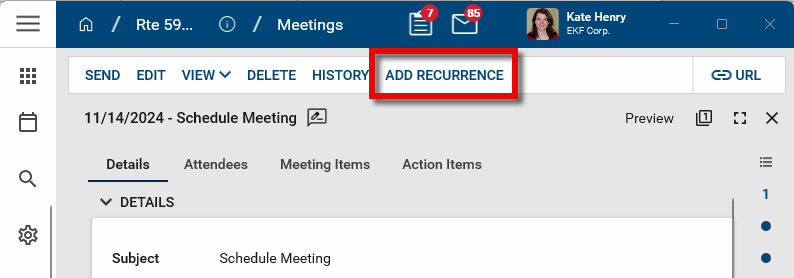
If a meeting was initially created a one-time meeting but you want to convert it to a recurring meeting, complete the following steps:
-
Navigate to the meeting in the log view and click on it to open the detail view.
-
Select Add Recurrence from the action bar.
-
Select Add Recurrence. The Schedule section appears.
-
Select the appropriate Recurrence Pattern and Range of Recurrence.
-
Click Save. Once saved, all the meetings in the series will be created.
Meetings can be deleted by users with the appropriate permissions.
To delete a meeting, complete the following steps:
-
Review the header to ensure that you are in the correct project or partition.
-
Navigate to the Meetings application (Apps > Document Management > Meetings).
-
In the log view, select the check box next to the record or multiple records that you want to delete. Select Delete from the action bar.
-
Alternatively, to delete a single record, right-click on an item in the log view and select Delete or open the detail view and select the Delete icon
 in the action bar.
 -
Click OK on the confirmation message. The record or records will be deleted.
Note If a record was deleted in error, it can be recovered from the Recycle Bin application by an administrator. Deleted records are available for restoration for a set number of days as configured in domain settings. For more information, refer to Using the Recycle Bin.
Your domain administrator or another user with the appropriate permissions can configure the app in the Configuration application.
Important When working in the Configuration app, it is important to review the header and ensure that you are working at the correct level in the hierarchy, either the root domain or at a partition or project level.
Settings that you establish at the root domain or lower levels will inherit down the hierarchy until they are overridden. For more information on the hierarchical structure of Kahua, refer to Understanding the hierarchical structure of Kahua.
The Configuration app can be accessed directly through the apps list (Apps > Administration > Configuration), or by right-clicking on an application in the launch bar and selecting Configure. When you select Configure for an app from the launch bar, the detail view of the configuration page for that application opens automatically.
For general information on configuring this app in Configuration, refer to Application configuration.
The following items are specific to this application:
| Options | Description |
|---|---|
| Default Sorting tab | |
| Meeting Item |
You can sort Meeting Items by one or more fields, in either ascending or descending order. Select the field to sort by and the order. To sort by an additional field, select Add Sort. To remove a sorting field, click the Delete icon |
| Action Item |
You can sort Action Items by one or more fields, in either ascending or descending order. Select the field to sort by and the order. To sort by an additional field, select Add Sort. To remove a sorting field, click the Delete icon |