Daily Reports
Notice Kahua is a very flexible and customizable platform. In your domain, this application may have been modified to meet your company's needs. The online help uses default field labels for field names and describes standard workflows. Please check with your domain administrator for specific information about working in your organization's domain.
A Daily Report contains vital documentation of the events taking place on the project site including: the report date, shift, notes, the companies, equipment, material received on the project, the day’s weather, and any relevant attachments such as photos in the media section.
The automation and workflow feature make daily reports easier to fill out, lets subcontractors and vendors contribute to daily reports, and automates the tasks. For more information on using automation with daily reports, refer to Daily Report Automation.
Note Automation does not have to be used.
Key elements to know about this application include the following:
-
Daily reports capture key site details such as date, shift, notes, companies, equipment, material received, and weather, along with relevant attachments.
-
Automation and workflow can streamline daily report completion, enable subcontractor/vendor contributions, and automate tasks.
-
Projects can be configured to automatically capture weather data, and users can add weather details from within a daily report.
How to . . .
To create a new daily report, complete the following steps:
-
Review the header to ensure that you are in the correct project or partition.
-
Navigate to the Daily Reports application (Apps > Documentation Management > Daily Reports).
-
Click New in the action bar.
-
Complete the following fields as appropriate:
Note Depending on how this app is configured for your domain, there may be fields or sections listed here that do not appear for you, fields and sections that appear for you which are not listed here, or fields and sections which appear in a different order. If you have any questions, check with your domain administrator.
Field Description Details Number Allow Kahua to auto-number the record, or enter a different value.
Note The number format can be configured by your domain administrator. Refer to Number.
Report Date By default today's date appears. Modify if appropriate.
Author Select the author contact.
Note A default value can be selected in the Configuration app. Refer to Defaults.
Work Location(s) Select one or more locations from the list, as appropriate.
Note For more information on setting up location values, refer to Setting up locations.
Distribution Select one or more contacts who should receive a copy of the daily report.
Shift If your job site uses more than one shift, select the appropriate value here.
Note This lookup list is managed in the Configuration app. Refer to Lookups.
Notes Enter any general notes. Lost Day Select this option to indicate this date was a "Lost Day". When selected, additional Lost Day tracking fields appear.
Note For information on setting up this feature, refer to Configure the Lost Days feature.
Lost Day Cause Select the reason for the lost work day (for example, weather or equipment failure).
Note This lookup list is managed in the Configuration app. Refer to Lookups.
Delay Reporter Select the contact responsible for sending the Lost Day notice to the client. Lost Day Notice Due The calculated due date for the client notification. Lost Day Notice Sent Indicates the notification has been sent. Lost Day Date Notice Due Offset The offset value configured on the Configuration > Daily Reports > Defaults tab appears here.
Example If the Offset value is 7, the Lost Day Date Notice Due will be seven days from Report Date.
Portable View Template Select the portable view template to apply to this daily report.
For more information on portable views, refer to Portable Views.
Companies Enter a line for each company on site for the day of the report. To have a task sent to a company to complete their portion of the report when the report is saved, select Auto Task and include a Report Contact.
For more information on working with grids, refer to Item Grids.
Auto Task To have a task sent to a company to complete their portion of the report when the report is saved, select Auto Task and include a Report Contact.
Report Contact / Company Select the appropriate company and contact.
For more information on setting up companies, refer to Understanding the Contacts app.
Work Location(s) Select one or more locations from the list, as appropriate.
Note For more information on setting up location values, refer to Setting up locations.
Reported Workers Total Labor Units (Hours) Non Work Day Work Description Counted Workers Default Shift Length (Hours) Notes & Work Completed For more information on working with grids, refer to Item Grids. Category Select the appropriate category.
Note This lookup list is managed in the Configuration app. Refer to Lookups.
Description Enter a description. Area Enter the appropriate area. Report Contact / Company Select the appropriate company and contact.
For more information on setting up companies, refer to Understanding the Contacts app.
Incidents For more information on working with grids, refer to Item Grids. Individual Enter the name of the individual involved.
Incident Type Select the appropriate incident type.
Note This lookup list is managed in the Configuration app. Refer to Lookups.
Description Enter a description. Area Enter the appropriate area. Report Contact / Company Select the appropriate company and contact.
For more information on setting up companies, refer to Understanding the Contacts app.
Visitors For more information on working with grids, refer to Item Grids. Name / Notes Enter the visitor name and any appropriate notes.
Report Contact / Company Select the appropriate company and contact.
For more information on setting up companies, refer to Understanding the Contacts app.
Equipment For more information on working with grids, refer to Item Grids. Asset Number Equipment Item Report Contact / Company Area Used Status Select the appropriate status.
Note This lookup list is managed in the Configuration app. Refer to Lookups.
Reading Notes Materials Received For more information on working with grids, refer to Item Grids. Description Quantity Received UOM Enter the unit of measure for the quantity received. Work Location(s) Report Contact / Company Weather Weather data is recorded here. For more information on using this section, refer to Enter weather data.
Media Upload or select any relevant image files. You can use drag and drop to add an image file to this section. For more information on using this section, refer to Media section.
Signatures Select Add Signature to apply your signature to the daily report. Enter your signature PIN when prompted. Your name, the current date and time, and an image of your signature are recorded.
For more information on managing your signature PIN, refer to Signature.
References Upload or select any relevant files or documents. You can use drag and drop to add a file to this section. For more information on using this section, refer to References section.
-
If appropriate, tag any relevant assets or locations.
Note Tagged daily reports appear in the Linked Documents section of the corresponding asset or location record.
-
Click Save when you are done.
You can configure your project to automatically capture weather data on daily reports, or select Add Current Conditions to add weather data to the daily report.
Note Weather data can be configured for locations in the following countries and territories: American Samoa, Canada, Guam, Mexico, Northern Mariana Islands, Poland, Puerto Rico, United Kingdom, United States, and the US Virgin Islands.
Important To have weather data available to be saved automatically, you must enter an End Date for the project on the Project Information page and configure the weather settings for the project on the Configuration app > Weather tab. For more information, refer to Configuring weather data for a project.
To enter weather data on a daily report, complete the following steps:
-
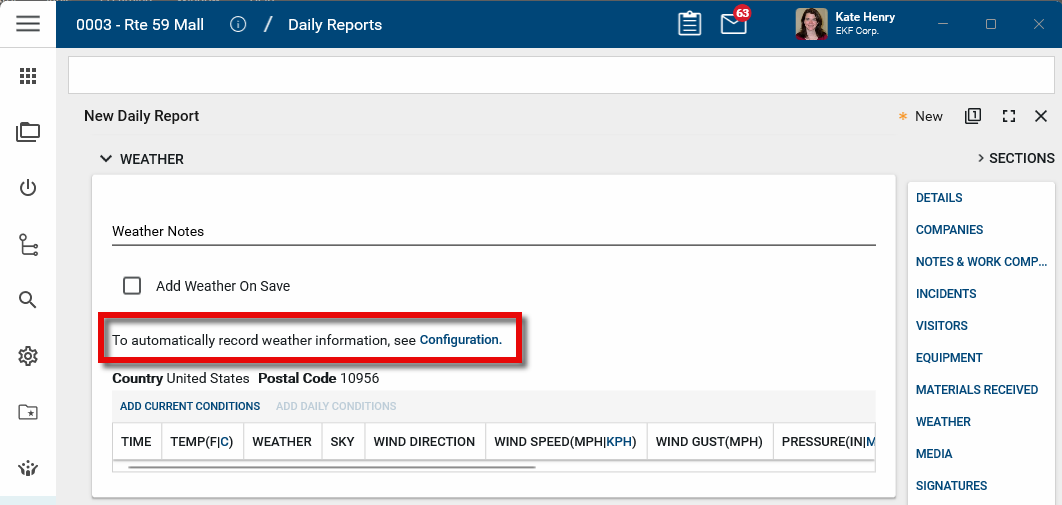
In the Weather section of the daily report, enter any general Weather Notes.
Note This is the only location where you can manually enter weather information on a daily report.
-
If you have not yet configured automatic weather data collection, select the option to open the Configuration app and select the Weather tab. For more information, refer to Configuring weather data for a project.
-
To automatically add saved weather data to the daily report, select Add Weather on Save. When selected, saving the daily report will add all the collected weather data for the date of the daily report to the weather section.
-
To add current weather data for the project postal code set on the Configuration app > Weather tab, select Add Current Conditions.
-
To add all the collected weather data for the date of the daily report, select Add Daily Conditions.
-
If your project is built over a significant physical distance encompassing multiple zip codes, such as a highway construction project or a pipeline project, you may want to allow users to select different postal codes for the daily reports as the project progresses. You must enable this setting on the Configuration app > Weather tab. Refer to Allow override of postal codes on daily reports.
Once the setting is enabled, you can modify the postal code on an individual daily report by clicking Change. As the weather data for the newly selected postal code is not collected over time, only the Add Current Conditions option is available for entering weather data.
You can generate a report from a selected log view, or use one of the built-in reports available by default in each application. For more information on creating your own reports, including how to set up scheduled reports, refer to Creating ad hoc reports.
Note For information on modifying the logo that appears on reports in your project, refer to Managing report logos.
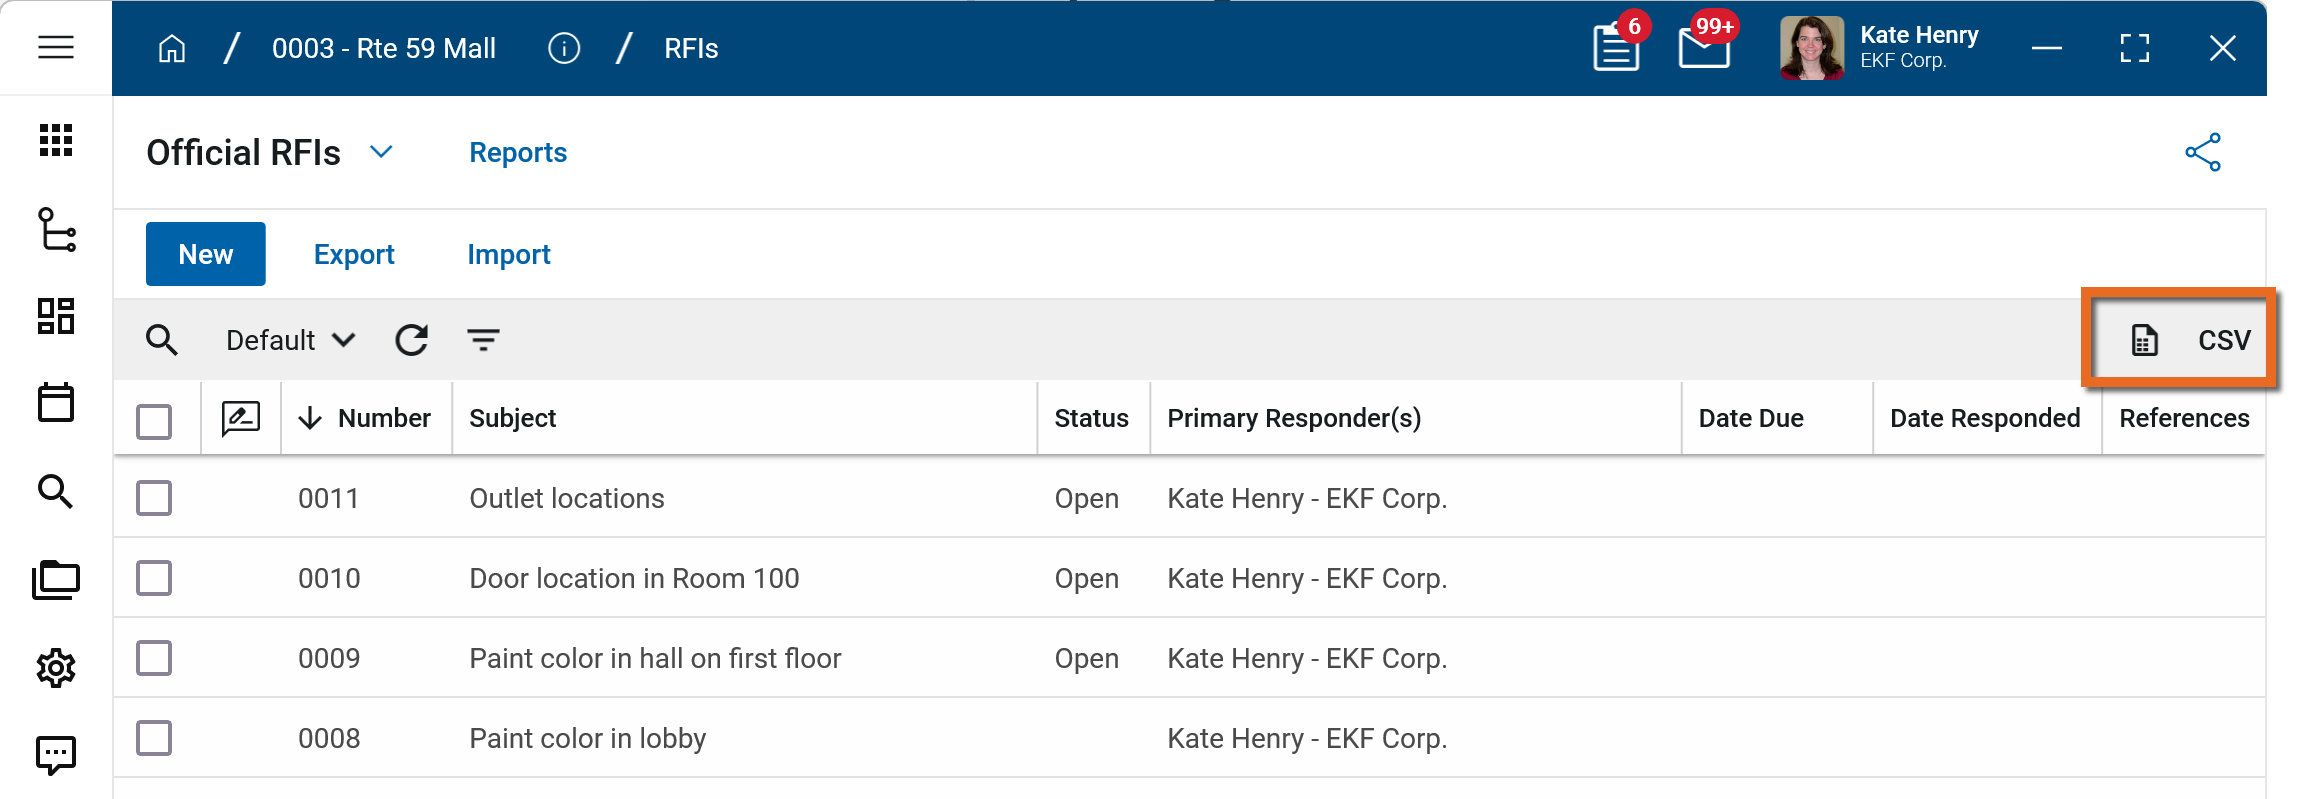
To generate a report from a log view with up to 10,000 records, select the report icon ![]() . If your log view contains more than 10,000 records, the report icon will be disabled and you can select to download the records to a CSV file instead. For more information, refer to Generate a report from a log view.
. If your log view contains more than 10,000 records, the report icon will be disabled and you can select to download the records to a CSV file instead. For more information, refer to Generate a report from a log view.
To generate an application report, complete the following steps:
-
Navigate to the application.
-
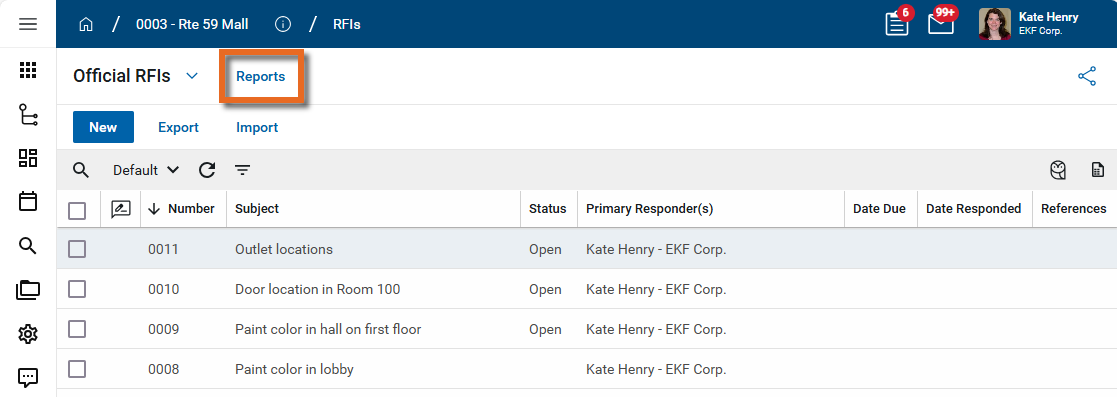
Select Reports in the application title bar.
-
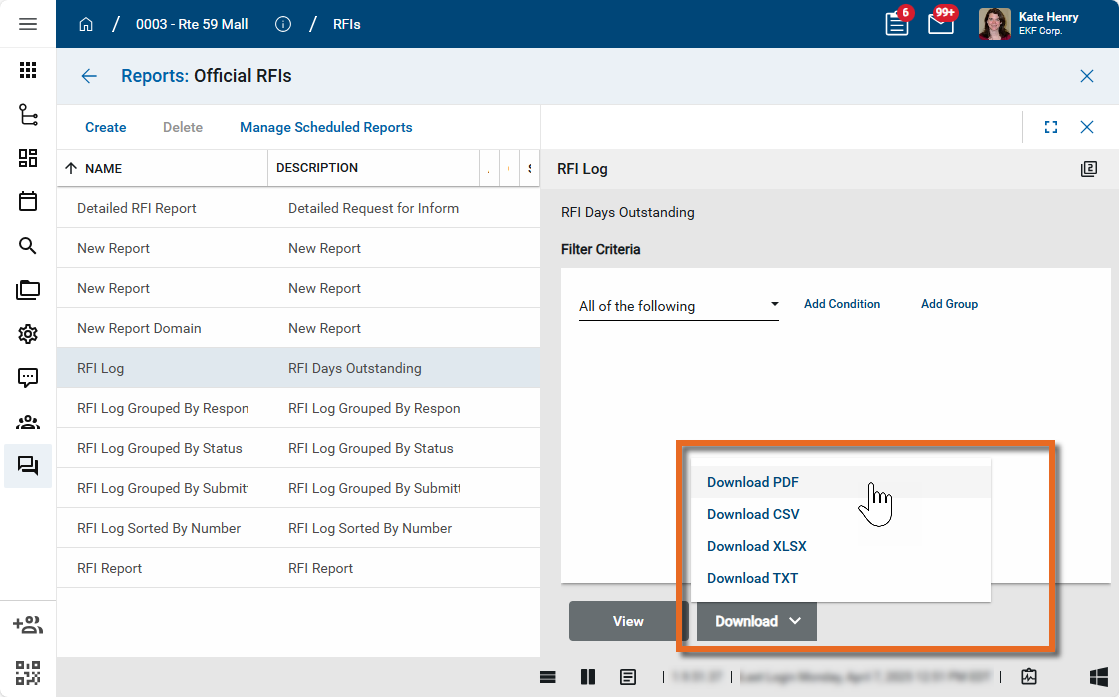
Select the report you want to run.
-
Apply any desired filters.
-
Select View or Download as appropriate. For more information, refer to Viewing Reports.
-
Click the Close icon
 when you are done.
Users with the appropriate permissions can delete records.
To delete a record, complete the following steps:
-
Review the header to ensure that you are in the correct project or partition.
-
Navigate to the application.
-
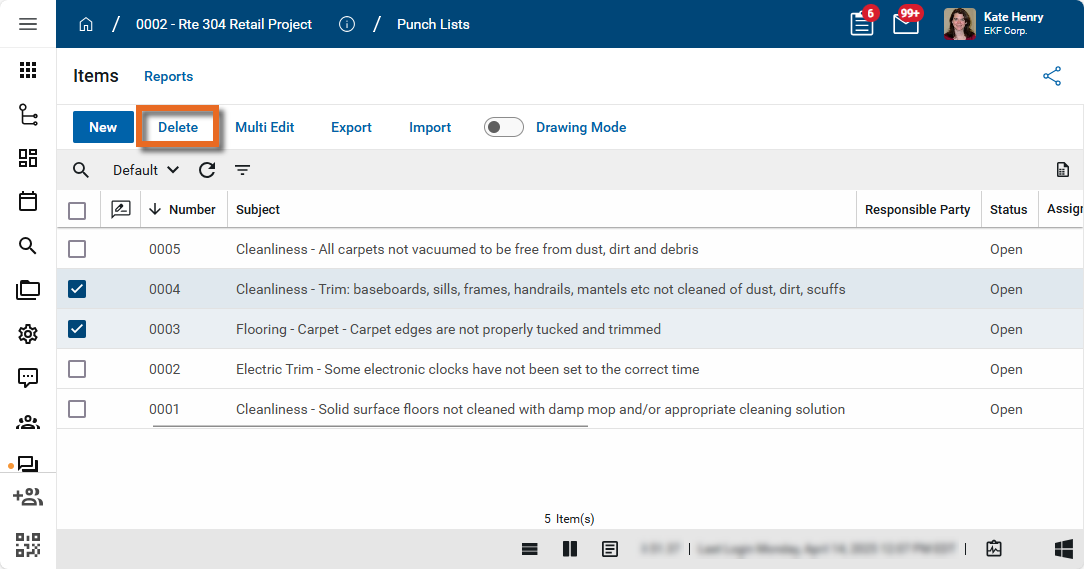
In the log view, select the check box next to the record or multiple records that you want to delete. Select Delete from the action bar.
-
Alternatively, right-click on the record in the log view and select Delete or open the detail view and select the Delete icon
 in the action bar.
 -
Click OK on the confirmation message. The record or records will be deleted.
Note If a record was deleted in error, it can be recovered from the Recycle Bin application by an administrator. Deleted records are available for restoration for a set number of days as configured in domain settings. For more information, refer to Using the Recycle Bin.
Note This feature is hidden by default and must be enabled in Configuration.
The optional Lost Days feature helps track lost work days and their causes (for example, weather, safety/accidents, equipment failure, environmental factors, permitting issues, labor strikes/disputes, and utility interruptions). When enabled, the feature also supports tracking who is responsible for notifying the client, when the notice is due, and when it has been sent.
To configure the Lost Days feature, complete the following steps:
-
Review the header to ensure that you are in the correct project or partition.
-
In the Configuration > Daily Reports application, navigate to Fields tab and select Override.
-
Select Is Visible for the Lost Day field.
-
Confirm Is Visible is selected for the remaining fields:
-
Delay Reporter
-
Lost Day
-
Lost Day Cause
-
Lost Day Notice Due
-
Lost Day Notice Sent
-
-
To control how the Lost Day Notice Due date is calculated, navigate to the Defaults tab, and set Lost Day Date Due Offset. The Lost Day Notice Due value is calculated by adding this number of days to the current date.
Example If the Offset value is 7, the Lost Day Date Notice Due will be seven days from Report Date.
-
If your project uses the Kahua Daily Report Workflow, navigate to Configuration > Daily Reports > Settings tab and select Use Lost Day Notification Workflow to enable a triggered workflow task that reminds the Delay Reporter to send the Lost Day notice.
Your domain administrator or another user with the appropriate permissions can configure the app in the Configuration application.
Important When working in the Configuration app, it is important to review the header and ensure that you are working at the correct level in the hierarchy, either the root domain or at a partition or project level.
Settings that you establish at the root domain or lower levels will inherit down the hierarchy until they are overridden. For more information on the hierarchical structure of Kahua, refer to Understanding the hierarchical structure of Kahua.
The Configuration app can be accessed directly through the apps list (Apps > Administration > Configuration), or by right-clicking on an application in the launch bar and selecting Configure. When you select Configure for an app from the launch bar, the detail view of the configuration page for that application opens automatically.
For general information on configuring this app in Configuration, refer to Application configuration.
The following items are specific to this application:
| Options | Description |
|---|---|
| Settings tab | |
| Use Downstream Companies (Include items below in task) | |
| Company Labor | |
| Notes & Work Completed | |
| Incidents | |
| Visitors | |
| Equipment | |
| Materials | |
| Use Legacy Workflow Status | |
| Open Message Edit on Distribute | |
| Use Lost Day Notification Workflow | When selected, triggers a workflow task to remind the Delay Reporter contact to send the Lost Day notice to the client. |
| Calculate Worker Count as sum of | Select Reported Workers or Counted Workers. |